Evaluate published rules
 Available with Data Reviewer license.
Once Data Reviewer validation or constraint attribute rules have been published to a feature service, you can evaluate these rules to assess the quality of your data. To evaluate your data, add the published feature layers to a map in ArcGIS Pro, configure the error layers, and manage branch versions to facilitate data quality assessment.
Add a feature service to the map
To evaluate rules in a feature service, add the published feature layers that contain rules to your map by completing the following steps:
Open ArcGIS Pro if it is not already open.
On the ArcGIS Pro ribbon, click the Insert tab.
In the Project group, click the New Map
 drop-down arrow, and click New Map.
In the Contents pane, right-click the Map, and click Properties.
In the Name text box, add the map name and click OK.
Open the Catalog pane, and click the Portal tab, and click My Content.
Double-click the feature service
 and select a feature layer. Optionally, select multiple feature layers by clicking them while pressing the Ctrl key.
Note:
You do not need to add the published error layers, they will be added in a later step.
Right-click one of the selected features and click Add To Current Map.
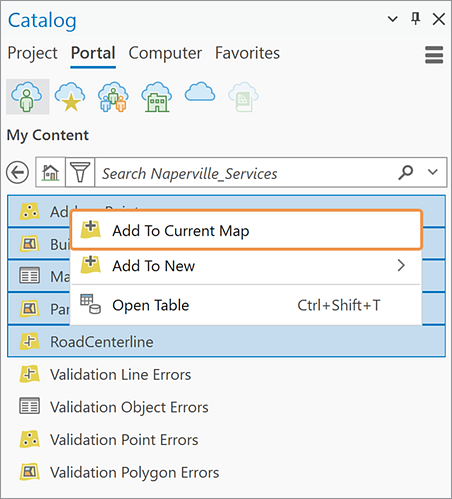
The layers are added to the map.
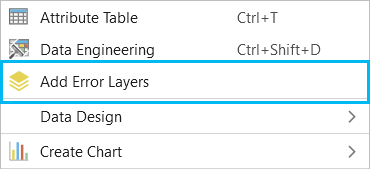
In the Contents pane, click one of the layers to select it, and then right-click and click Add Error Layers.
Note:
If the feature service is added to the map, error layers are also added as individual layers. Although the error layers are added individually, you must add them to the Contents pane as a group by right-clicking one non-error layer and selecting Add Error Layers. If the error layers are not added as a group using Add Error Layers, the Error Inspector pane will remain deactivated, and you cannot view or evaluate rules.
Switch to a child version
Switch to an existing child version or create a new child version to run Data Reviewer validation attribute rules. This ensures that changes are not unintentionally applied automatically to the default version. To create a child version complete the following steps:
In the Contents pane, click List by Data Source
 at the top of the pane.
Right-click the database connection and click New Version
 .
.The New Versions dialog box appears.
Click Name and add a name for the new version.
Optionally, add a Description.
In Access Permissions, set the appropriate permission level.
Click Change to this version.
Click OK.

Evaluate rules in the Error Inspector
To evaluate Data Reviewer validation attribute rules in a feature service using the Error Inspector pane, complete the following steps:
At the top of the Contents pane, click List by Drawing Order
 and go back to the map.
Click on the Edit tab, and in the Manage Edits group, click Error Inspector
 .
.In the Error Inspector, select the Geodatabase source.
Click on the Evaluate Rules dropdown and configure the options.
Learn more about evaluating rules in the error inspector pane
Click Evaluate Rules.
Any errors found in the data appear in the Error Inspector pane and on the map.
Now that your feature service data has been successfully added to the map, you can edit the data with your configured constraint attribute rules or review the error results from the Error Inspector pane using the configured validation attribute rules.