Share validation rules
 Available with Data Reviewer license.
Integrating data quality management into a feature service allows organizations to manage data quality in collaborative editing environments. In ArcGIS Pro, you can create ArcGIS Data Reviewer constraint or validation attribute rules to support organization-wide quality assurance workflows. In this workflow, you will open an existing map and prepare it for publishing by adding feature layers and configuring map properties.
Set up an enterprise geodatabase
Before you can share features as a web layer, you must configure an enterprise geodatabase and prepare the map you want to publish. To configure an enterprise geodatabase, complete the following steps:
Open ArcGIS Pro and sign in to your enterprise portal.
Open the project that contains configured Data Reviewer attribute rules, or create the Data Reviewer validation or constraint attribute rules that you want to run on your data.
In the Catalog pane, right-click a feature dataset in the enterprise geodatabase and click Manage.
The Feature Dataset Properties dialog box appears with geodatabase properties in the Manage geodatabase functionality section.
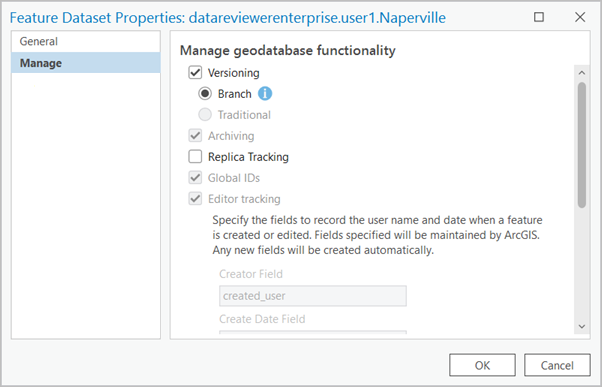
On the Feature Dataset Properties dialog box, check the Versioning check box and choose the Branch option.
Note:
Archiving, Global IDs, and Editor tracking are automatically enabled.
Click OK to apply the geodatabase properties.
Repeat steps three and four for other feature datasets, feature classes, or tables that you want to share to your feature service.
Register an enterprise geodatabase
With the enterprise geodatabase set up in ArcGIS Pro, register the geodatabase in ArcGIS Server Manager.
To register an enterprise geodatabase using ArcGIS Server Manager, complete the following steps:
Sign in to ArcGIS Server Manager and click Site > Data Stores.
Click the Register drop-down arrow and choose Database.
Provide a unique name for the registered database.
Click Import.
A window appears where you can browse to the database connection file (
.sde) on disk.Depending on how you set up the data sources to work with ArcGIS, choose one of the following scenarios:
If the publisher's machine and the ArcGIS Server site are working with the same database, click the Same as publisher database connection check box. This specifies the publisher's machine, and ArcGIS Server views and accesses data in the same database.
If the publisher's machine and the server are working with different databases, click Import next to the Server database connection section and choose a database connection file (
.sde).
Click Create.
The registered database appears on the Registered Data Stores dialog box.
Add data and error layers to the map
In ArcGIS Pro, ensure that the feature layers that contain Data Reviewer constraint or validation attribute rules are added to your map. To add layers to the map, complete the following steps:
In the Catalog pane, expand Maps, right-click the map that you are working on and click Open if it is not already open.
The map opens.
In the Catalog pane expand Databases and expand the enterprise geodatabase you created and the feature dataset if it is not already expanded.
Press Ctrl while clicking the feature classes from the enterprise geodatabase to select several feature classes at once.
Right-click any of the selected feature classes and click Add To Current Map.
The data sources are added to the map.
In the Catalog pane, press Ctrl while clicking each layer that participates in an attribute rule including the error layers.
Note:
If you authored attribute rules and do not see the attribute rule error layers, right-click the enterprise geodatabase and click Refresh.
Right-click the selected feature classes and layers and click Add To Current Map.
The data sources are added to the map.
Note:
The attribute rule error layers must be included in the map to enable the validation service data quality capabilities on the web layers.
Arrange layers for the feature service
Rename and rearrange the layers to reflect how they appear in the published web service.
Note:
Ensure that all layers that participate in the Data Reviewer checks with the Features to Compare or Additional Features to Compare parameters are added to the map with the Validation capability enabled.
To arrange the layers, complete the following steps:
Right-click the layer in the Contents pane and click Properties.
On the Layer Properties dialog box, edit the layer name to remove the fully qualified dataset portion of the layer name, and click OK.
For example, the fully qualified name, such as
datareviewer_tutorial.sde.RoadCenterline, would be renamedRoadCenterline.Tip:
You can edit a layer name from the Contents pane by clicking the layer to select it, and clicking it again to rename it.
Repeat the previous step for all layers that would expose the fully qualified dataset name when the service is published.
In the Contents pane, drag the layers to arrange them in the order that you want them.
In ArcGIS Pro, you can share a map that contains multiple layers as a web service. When you share a web service, the layers in the map become service sublayers. Each sublayer is identified by a unique numeric ID that allows you to use or reference it in a web map or application. For example, you can reference a service sublayer by the URL
https://<service-url>/<layerID>.By default, each layer that you share is automatically assigned an ID based on its drawing order in the Contents pane, beginning with 0 for the first layer. If you share selected layers from the map, the IDs are based on the sequence of the selected layers, including any group layers they are contained in.
Assign layer IDs
To assign layer IDs that will remain static as the map is modified, complete the following steps:
In the Contents pane, right-click the map and click Properties.
On the Map Properties dialog box, on the General tab, check the Allow Assignment Of Unique Numeric IDs For Sharing Web Layers check box.
Click OK.
Sequential IDs are assigned to each layer on the map.
Publish the map to a feature service
To share the Data Reviewer rules, you must publish a feature service.
Note:
The icons in this section are unavailable if you are not signed in to your Enterprise account and do not have publishing or administrative privileges.
To publish the map to a feature service, complete the following steps:
In ArcGIS Pro, verify that the map is open and active.
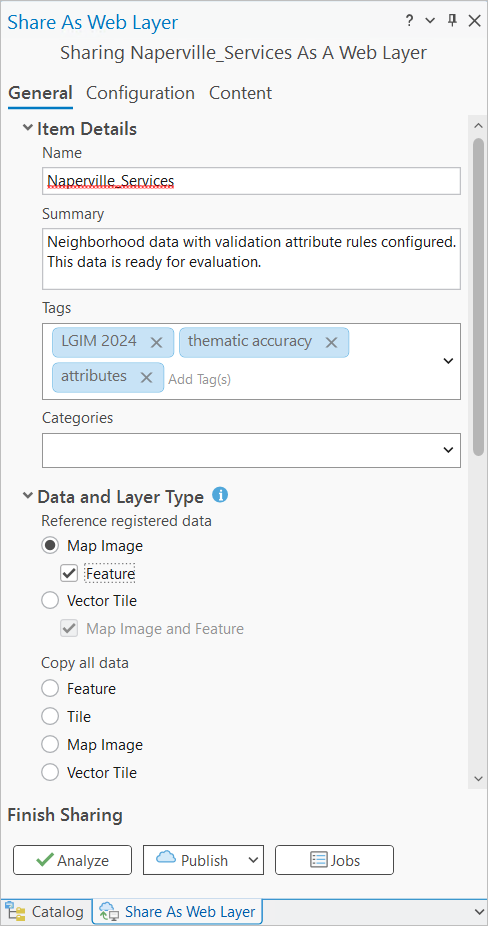
On the ArcGIS Pro ribbon, click the Share tab.
In the Share As group, click the Web Layer
 drop-down arrow and click Publish Web Layer .
The Share As Web Layer pane appears.
Type a name for your web layer in the Name text box on the General tab of the Share As Web Layer pane.
Optionally, provide a summary and add tags in the Summary and Tags text boxes.
In the Reference registered data section, ensure that Map Image is selected, and check the Feature check box to share the web feature layer as a dependent layer to the map image layer.
Caution:
For web feature layers to use attribute rules, they must reference registered data sources. This ensures that the data is not copied during the publishing process and is directly referenced by the service.
In the Location section, choose the storage location for the web layer in the Portal Folder and Server and Folder drop-down menus and select the GIS server.
Tip:
To save the web layer to a different folder in My Content, type the folder name or browse to an existing folder.
Under the Sharing Level, specify how the web layer will be shared:
Owner—Only the owner (and organization members with privileges to view content owned by other members) can access the item. This is the default option.
Organization—Share your content with all authenticated users in your organization. This option is available when you are signed in with an organizational account.
Everyone (Public)—Share your content with the public. Anyone can access and see it.
Optionally, under Groups, select groups to which you belong to share your content with your members.
On the Configuration tab, in the Configure Layers group, in the Capabilities section, check the Version Management and Validation check boxes.
Note:
If you have Event checks configured or are working with Linear referencing data, ensure that the Linear Referencing check box is checked.
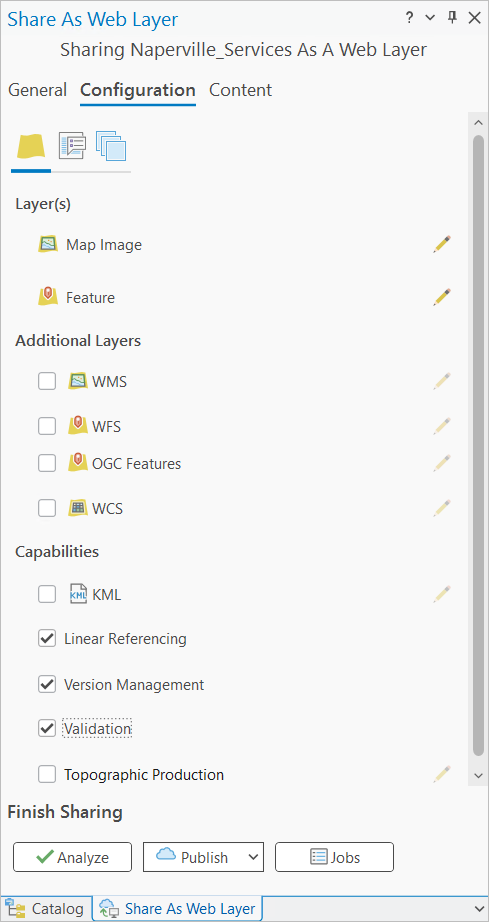
The Version Management service is required to activate the data quality management capabilities provided by the Validation service.
Optionally, click the Content tab to view the new web layers and their associated layer IDs.
Click Analyze to check for errors.
Errors appear on the Messages tab. Right-click the error message to access information about the error or warning message and review suggested fixes.
Note:
If you have not registered the enterprise geodatabase with the data store, you can click Options
 next to the error message and choose Register Data Source with Server to register it.
When the information and content pass validation, click Publish to share the datasets as web layers.