Install ArcGIS Server
The following steps guide you through the ArcGIS Server installation process on one machine using the setup user interface.
The following workflows guide you through the ArcGIS Server installation process on one machine.
If you will be creating a multiple-machine server site, you will first deploy ArcGIS Server to a single machine and then join the other machines to the site. Refer to Configure a multiple-machine ArcGIS Server site for additional considerations for multiple-machine server sites.
Note:
If you're upgrading to 12.1, see Upgrade ArcGIS Enterprise for more information.
Prepare ArcGIS Server for installation
Follow these steps before beginning the installation process for ArcGIS Server:
Obtain an authorization file for the machine on which you're installing ArcGIS Server.
Obtain the setup files for ArcGIS Server.
Note:
You can download the setup files on the Downloads tab of your My Esri account.
Verify that your site meets the system requirements.
Ensure the user has full permissions to the ArcGIS Server installation directory. The user account used to install ArcGIS Server will be the account used to run the software. Group users and all others must have at least run permissions to the ArcGIS Server installation directory. Note that installing ArcGIS Server with the root account is not supported. For more information, see ArcGIS Server account.
Browse to the directory where the ArcGIS Server tar file was uncompressed, or insert the ArcGIS Server media into the appropriate drive and browse for Setup to launch the setup program.
Sign in as a user with administrative privileges.
Close all applications on your computer.
Browse to the folder containing the downloaded ArcGIS Server setup.
Note:
You cannot install ArcGIS Server on a shared network directory (NFS mounted folder). The directory must be local on the target system.
Note:
As of ArcGIS Enterprise 11.3, the ArcGIS Server self-extracting package consists of two files with .exe and .exe.001 extensions. To extract the package, ensure that both files are in the same folder.
You're now ready to proceed with the ArcGIS Server installation.
Install ArcGIS Server
The instructions below describe how to install ArcGIS Server from the setup user interface. For instructions on installing ArcGIS Server silently from the command line, see Install ArcGIS Server silently.
Tip:
The installation mode that you choose will determine the default uninstallation mode. For example, if you choose to install from the setup user interface, the uninstallation will default to the user interface mode.
The setup program begins by checking the prerequisites that must be met to successfully set up and use ArcGIS Server. If all the prerequisites are met, the Introduction dialog box appears. Click Next to proceed.
On the Master Agreement dialog box, read the master agreement. If you accept the terms, click the I accept the master agreement button and click Next to proceed; otherwise, exit the setup by clicking Cancel.
On the Choose Install Folder dialog box, specify the installation location.
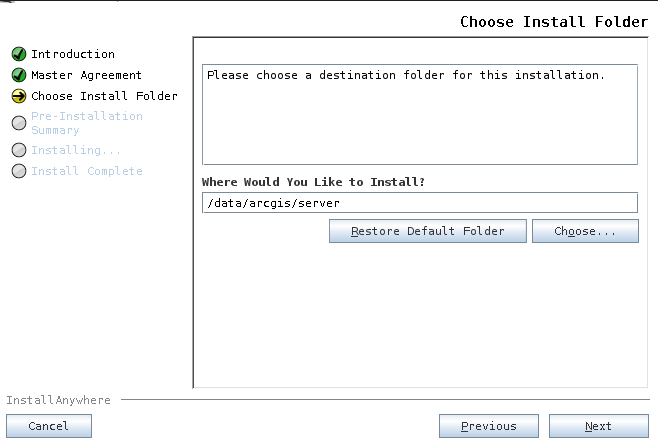
Note:
The name of the installation directory must be lowercase. The samples and data bundled with the installation require the data path to be lowercase.
On the Pre-Installation Summary dialog box, click Install to start the installation.

Note:
Approximately 1.5 GB of the required disk space is used only during the installation of the product. This temporary disk use ceases at the end of the installation.
Upon completion of the installation, follow the directions on the screen.
Authorize ArcGIS Server:
Tip:
The authorization tool can also be launched with one of the following methods after ArcGIS Server has been installed:
Use the shortcut on your desktop environment: ArcGIS > Authorize ArcGIS Server.
Run the authorization script:
<ArcGIS Server installation directory>/tools/authorizeSoftware. For more information about this authorization tool, see Authorizing ArcGIS Server silently.
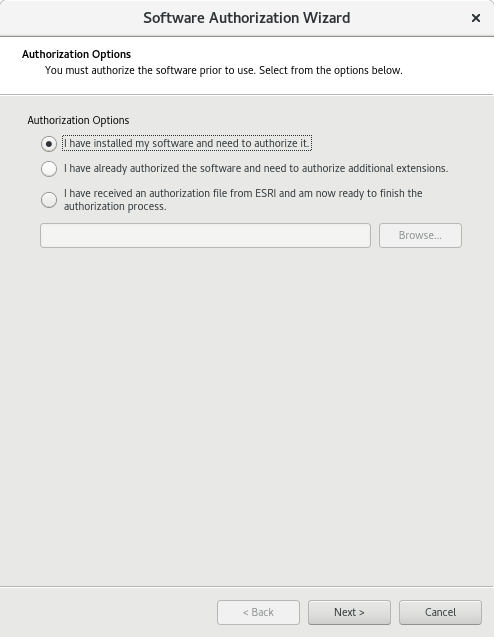
You can configure your machine using three methods:
I have installed my software and need to authorize it.
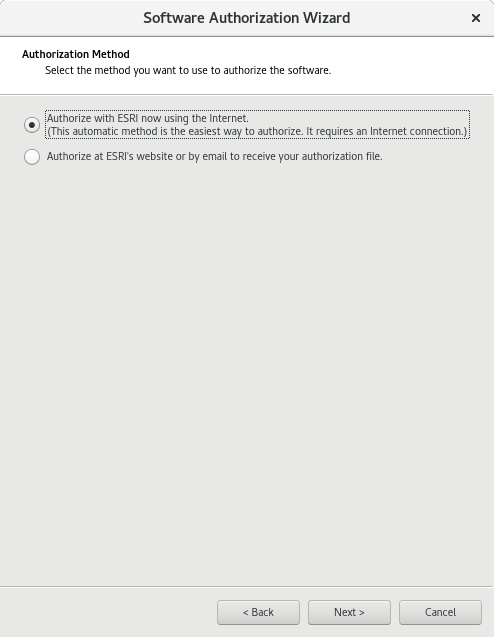
Select this option if you do not already have an authorization file. When this option is selected, there are several methods to provide your authorization information. Select the authorization method you want to use (see the Authorization Method screenshot below). This is the method by which you will provide your authorization information.
I have already authorized the software and need to authorize additional extensions.
Select this option if you have already authorized ArcGIS Server but want to authorize additional extensions (if available). When this option is selected, there are several methods to provide your authorization information. Select the authorization method you want to use (see the Authorization Method screenshot below). This is the method by which you will provide your authorization information.
Tip:
Authorizing now using the internet allows you to receive the authorization file immediately. It requires an internet connection.
I have received an authorization file from Esri and am now ready to finish the authorization process.
Select this option if you have already received your authorization file from Esri Customer Service. With this option, you can browse to the location of the file received from Esri Customer Service to complete your authorization.

After the installation is complete, ArcGIS Server Manager is automatically launched in Mozilla Firefox. You also can access Server Manager manually from any supported web browser by browsing to
http://<server name>:6080/arcgis/manager. For more information, see the ArcGIS Server help.Follow post-installation instructions to configure ArcGIS Server to start with the operating system.
The instructions below describe how to install ArcGIS Server from the setup user interface.
Browse to the location of the setup files and double-click Setup.exe.
During the installation, read the master agreement and accept it, or close the window if you do not agree with the terms.
The setup program displays the features that will be installed.
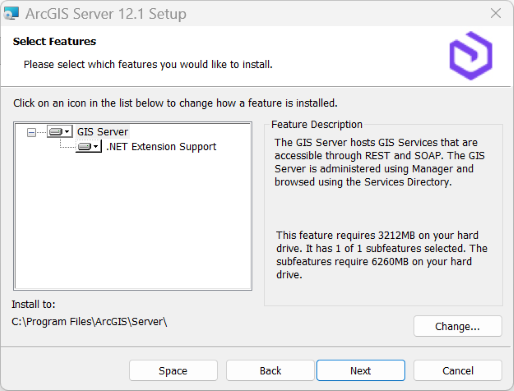
GIS Server—Hosts GIS services that can be accessed through REST and SOAP. It is administered using ArcGIS Server Manager and its services are browsed through the Services Directory. This feature is required and includes support for publishing and hosting ArcGIS Pro-based services.
.NET Extension Support—Supports the development and deployment of .NET server object extensions (SOEs) and server object interceptors (SOIs). This feature is optional. The appropriate version of Microsoft .NET is required for the .NET Extension Support feature to be displayed as a feature to be installed.
Note:
See the ArcGIS Server system requirements for the currently supported version of Microsoft .NET.
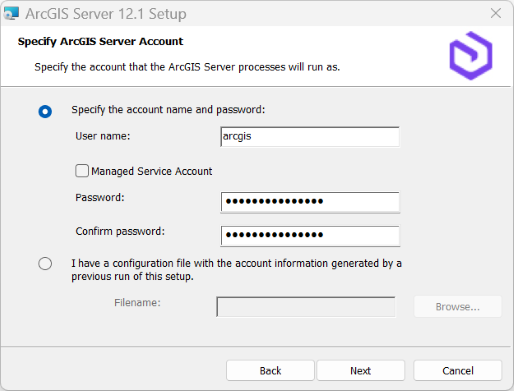
Specify the account to be used by ArcGIS Server to perform a variety of functions.
You are presented with two options: Specify the account name and password and I have a configuration file with the account information generated by a previous run of this setup.
The first option, Specify the account name and password, allows you to directly specify the account name and password. The account can be a local account, domain account, or Managed Service Account. It is recommended that you use an account that is not a member of the Administrators group and that has minimal privileges. If you use a Managed Service Account, the account must already be configured for your machine. If you use a local operating system account, the account is created if it does not already exist. The default account name is arcgis. For more information, see ArcGIS Server account.
Note:
For production systems, it's recommended that you use a preexisting account that resides in your domain or active directory and follows your organization's security policy. Creating a local account during the installation is primarily for the convenience of quickly installing ArcGIS Server.
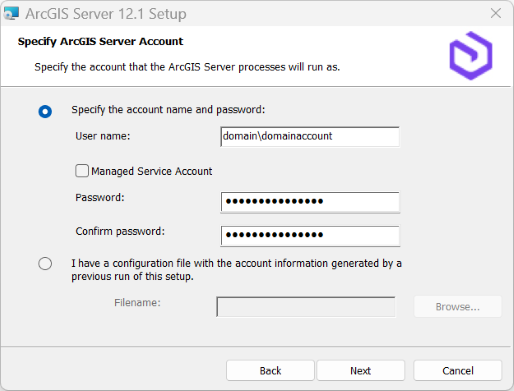
If you provide a domain account, it must already exist on the domain and must be entered using the following format:
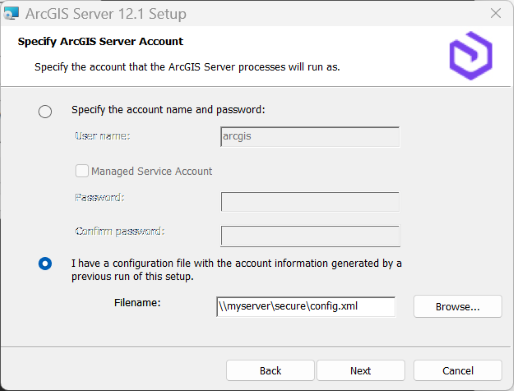
If you have a server configuration file generated by previously running the ArcGIS Server setup, choose the I have a configuration file option. Browse to the location of the server configuration file. The ArcGIS Server account is automatically configured with account information stored in the configuration file.
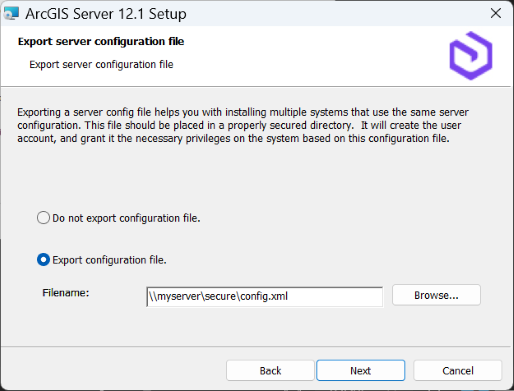
If you chose Specify the account name and password and manually entered the ArcGIS Server account information, the next dialog box presents you with the option to export a server configuration file. If you do not want to export a configuration file, click Next and accept the default Do not export configuration file option. If you want to export a server configuration file for future installations, choose Export configuration file, browse to a secure folder, and enter a name for the configuration file.
The ArcGIS Server account information is exported to the specified server configuration file.
Note:
There are several reasons you may want to export a server configuration file, including the following:
Create the same ArcGIS Server account when installing on multiple machines.
Store the account for use when upgrading to a newer version.
Perform a silent installation in which the username and password are encrypted.
Caution:
When exporting a server configuration file to a network share, the Local System account on the machine where ArcGIS Server is being installed must have write permissions to the network share. For example, if you're installing ArcGIS Server on a machine named Quick, the Local System account on Quick must have write permission to the network share. If the permissions are not set, the server configuration file may not export successfully. If you are unsure how to correctly set permissions for the network share, contact your system administrator or export the server configuration file locally and copy it to the network share.
Follow the directions on the screen to complete the installation.
After the installation completes, the Software Authorization Wizard window appears.
Authorize the software.
For more information, see Authorize ArcGIS Server.
Note:
If the machine you've installed ArcGIS Server on has multiple network interface controller (NIC) cards or DNS entries, you may want to specify the NIC card that will handle network communication for the server. To do so, follow the Configure ArcGIS Server in advanced scenarios workflow.
After completing authorization, ArcGIS Server Manager should be open.
Sign in to ArcGIS Server Manager and create a site.
For more information, see Create a site.
If you're preparing your site for a production deployment, install ArcGIS Web Adaptor.
ArcGIS Web Adaptor provides a link between your enterprise web server and your ArcGIS Server site. It allows you to select the port, address, and authentication settings for incoming requests. It also prevents outside users from accessing Server Manager and the Administrator Directory. For more information, see Introduction to ArcGIS Web Adaptor.
Use the
serverScan.pyscript to check for security best practices for your ArcGIS Server site following installation.Optionally, integrate your authorized and configured ArcGIS Server site with your ArcGIS Enterprise deployment.
A common, though not required, step is to federate an ArcGIS Server site with ArcGIS Enterprise. Content shared in your organization is powered by services running on its federated ArcGIS Server sites.
Note:
ArcGIS Server sites that are not federated are referred to as stand-alone sites.
Most of your work publishing services occurs in ArcGIS Pro. Users working in ArcGIS Pro can sign in to ArcGIS Enterprise or connect directly to stand-alone ArcGIS Server sites. See Connect to ArcGIS Server from ArcGIS Pro for instructions.
Ensure that ArcGIS Server can access all the data referenced by its services.
For more information, see Make data accessible to ArcGIS Server.
Your users can begin publishing and sharing content.
Note:
See Service publishing in ArcGIS Pro to learn more about the various publishing and sharing workflows available.
Postinstallation configuration
If you want ArcGIS Server to start with the operating system, complete the steps specific to your operating system.
Operating systems that support systemd
If your operating system supports the use of systemd to bootstrap and manage processes (for example, if you are using Red Hat Enterprise Linux (RHEL) Server 7.x), follow these steps to configure ArcGIS Server to start with the operating system:
Within a command shell, switch to root user.
Copy <ArcGIS Server installation directory>/framework/etc/scripts/arcgisserver.service unit file to /etc/systemd/system. Change file permissions of /etc/systemd/system/arcgisserver.service from 700 to 600.
This file is installed with ArcGIS Server.
Still as root user, run the following command to automatically create the links in /etc/systemd/system/multi-user.target.wants:
# systemctl enable arcgisserver.serviceTo verify that the systemd service is properly configured, restart the service and check its status.
# systemctl stop arcgisserver.service
# systemctl start arcgisserver.service
# systemctl status arcgisserver.service
End the root user session.
Reboot the operating system and verify that ArcGIS Server restarts properly.
Note:
If you install ArcGIS Server on a Linux machine that includes systemd v228 or a later version, you may need to enable and raise the systemd limit to 512 or more maximum threads if the ArcGIS Server machine is heavily used. (For example, SUSE Linux Enterprise Server (SLES) 12 SP2 includes systemd v228.) Setting systemd to a maximum of 512 or more threads can prevent any single service from spawning too many threads and consuming all server resources.
To enable and raise the limit, as the root user, uncomment and edit the following line in the arcgisserver.service unit file before deploying it to the /etc/systemd/system directory:
# TasksMax=512
Operating systems that support SysV
If your operating system supports the use of SysV to bootstrap and manage processes, follow these steps to configure ArcGIS Server to start with the operating system:
Within a command shell, switch to root user.
Copy the <ArcGIS Server installation directory>/framework/etc/scripts/arcgisserver shell script to the appropriate supported Linux distribution-based locations provided below:
RHEL Server: /etc/rc.d/init.d/
SLES: /etc/init.d/
Change the directory to the applicable init.d folder and check the arcgisserver script to ensure that root has at least read and run permissions.
Edit the arcgisserver script as follows:
Update the agshome variable to the ArcGIS Server installation directory, for example, /home/username/arcgis/server.
For RHEL Server only, add the line below just before # Description: ArcGIS Server Service:
# chkconfig: 35 99 01
Save the edits to the arcgisserver script.
Still as root user, run the following command to automatically create the links in /etc/rc*.d with the appropriate run levels:
RHEL Server:
$ chkconfig --add arcgisserver
$ chkconfig arcgisserver on
SLES:
$ insserv arcgisserver
$ chkconfig arcgisserver on
End the root user session.
Reboot the operating system and verify that ArcGIS Server restarts properly.
Machines with multiple network interface controller cards
ArcGIS Enterprise can be deployed on machines that have multiple network interface controller (NIC) cards. If you installed ArcGIS Server on a machine that contains more than one NIC card, you must identify which interface the server should use for network communication. This is done by adding a file into the installation directory for each machine in the site. .
Note:
Perform these steps immediately after installing ArcGIS Server and before creating the new server site.
Sign in to the multi-NIC machine where ArcGIS Server is installed. Browse to the
<Server installation directory>/framework/etcfolder. Create a file named hostname.properties, with appropriate permissions, inside this folder.Add the following text to the first line of the file, and specify the fully qualified domain name of the intended interface:
hostname=interface.example.com. For example, if you have a machine with two NIC cards (1 and 2), these interfaces' domain names resolve toS1.mycompany.comandS2.mycompany.com, and you want ArcGIS Server to use the second interface for network communication, add this text to thehostname.propertiesfile:hostname=S2.mycompany.com.Note:
In some cases, as when a host name is identical for multiple interfaces, you should instead specify the IP address of the interface you want ArcGIS Server to use for network communication. The syntax is
hostname=<IP address>.Save and close the
hostname.propertiesfile.Restart ArcGIS Server using the
stopserver.shandstartserver.shcommands. Repeat with other machines in your ArcGIS Server site as necessary.
If necessary, follow the steps to configure other ArcGIS Enterprise software components on machines with multiple NIC cards:
Additional configuration notes
You can perform the following additional configuration steps once you have successfully installed ArcGIS Server:
After completing authorization, ArcGIS Server Manager should already be open. You are now ready to sign in to Server Manager and create a site. For more information. see Create a site.
If you are preparing your site for a production deployment, you should install the ArcGIS Web Adaptor. The Web Adaptor provides a link between your enterprise web server and your ArcGIS Server site. It allows you to choose the port, address, and authentication settings that you want to use for incoming requests. It also prevents outside users from accessing Server Manager and the Administrator Directory. For more information, see Introduction to ArcGIS Web Adaptor.
Esri recommends using the serverScan.py script to check for security best practices with your ArcGIS Server following installation.
With your ArcGIS Server site authorized and configured, you can integrate it with your ArcGIS Enterprise deployment. A common, though not required, step is to federate your server site with ArcGIS Enterprise. Content shared to your organization is powered by services running on its federated ArcGIS Server sites.
Note:
ArcGIS Server sites that are not federated are referred to as stand-alone sites.
Most of your work publishing services occurs in ArcGIS Pro, the desktop application GIS professionals use to create maps, layers, locators, and so on. Users working in ArcGIS Pro can sign in to ArcGIS Enterprise or connect directly to stand-alone ArcGIS Server sites. See Connect to ArcGIS Server from ArcGIS Pro for instructions.
Ensure that ArcGIS Server can access all the data referenced by its services. For more information, see Make your data accessible to ArcGIS Server.
Your users can begin publishing and sharing content. See Service publishing in ArcGIS Pro to learn more about the various publishing and sharing workflows available.