Notebooks in ArcGIS Pro
ArcGIS Notebooks are built on top of JupyterLab, an open-source web application that allows you to create and share documents, called notebooks, that contain live Python code, visualizations, and narrative text.
With notebooks integrated into ArcGIS Pro, you can perform analysis and immediately view results in a geographic context. Notebooks in ArcGIS Pro provide the following benefits:
View your notebook and map contents side by side.
Layers and other contents of your map and default geodatabase can be accessed by name.
The output of geoprocessing tools is added to the active map by default.
Geoprocessing tools honor selections.
Global geoprocessing environment settings are respected and can be overridden.
Geoprocessing workflows can occur during an ongoing editing session. If a geoprocessing tool directly modifies a feature being edited in an edit session, you can save or discard the modifications on the Edit tab on the ribbon.
When a geoprocessing tool is run from a notebook, the tool's result log appears in the geoprocessing history.
All Python functionality in ArcGIS Pro is available through ArcGIS Notebooks, including ArcPy, the ArcGIS API for Python, and many third-party packages like NumPy and Pandas. For a full list of Python packages shipped with ArcGIS Pro, see the ArcGIS Pro Python environment. To create and manage custom Python environments and install additional packages, see the Package Manager.
While notebooks can be run locally in the ArcGIS Pro application, the integrated Jupyter Notebook experience is also available on the web with ArcGIS Online or ArcGIS Enterprise.
To use an interactive Python terminal to test or run short snippets of code without advanced notebook capabilities, use the Python window.
Get started
Notebooks in ArcGIS Pro are Jupyter Notebooks (.ipynb). They can be created and opened in ArcGIS Pro or any other software that works with Jupyter Notebooks.
To create a new notebook, from the Insert tab on the ribbon, click New Notebook  . Alternatively, open the Catalog pane, browse to your project directory, right-click a folder, and click New > Notebook .
To open an existing notebook in your project, browse to the notebook file in the Catalog pane and either double-click the notebook, or right-click the notebook and click Open Notebook.
If you already have a notebook open in your project, you can also click New on the Notebook tab on the ribbon.
Note:
To use ArcGIS Notebooks hosted with ArcGIS Enterprise and ArcGIS Online in ArcGIS Pro, download and open the .ipynb file.
Notebooks can also be added to a project catalog's Notebooks container  . The Notebooks container stores connections—essentially, a reference or shortcut—that allows you to use the notebook without adding a folder connection.
Notebooks that are created using ArcGIS Pro are automatically added to the project's Notebooks container. To add a connection to an existing notebook to your project, right-click the Notebooks folder and click Add and Open Notebook  . Alternatively click the drop-down arrow next to the New Notebook button on the Insert tab on the ribbon and click Add and Open Notebook.
Use notebooks
Notebooks open in a user interface that resembles a standard Jupyter Notebook. A notebook document is composed of a series of cells which you can add, edit, run, and delete. There are three types of cells: code cells for scripting, markdown cells for documentation, and raw cells. Code cells also have an output area where the results of running your code are printed. For more details, see the Jupyter Notebook documentation.
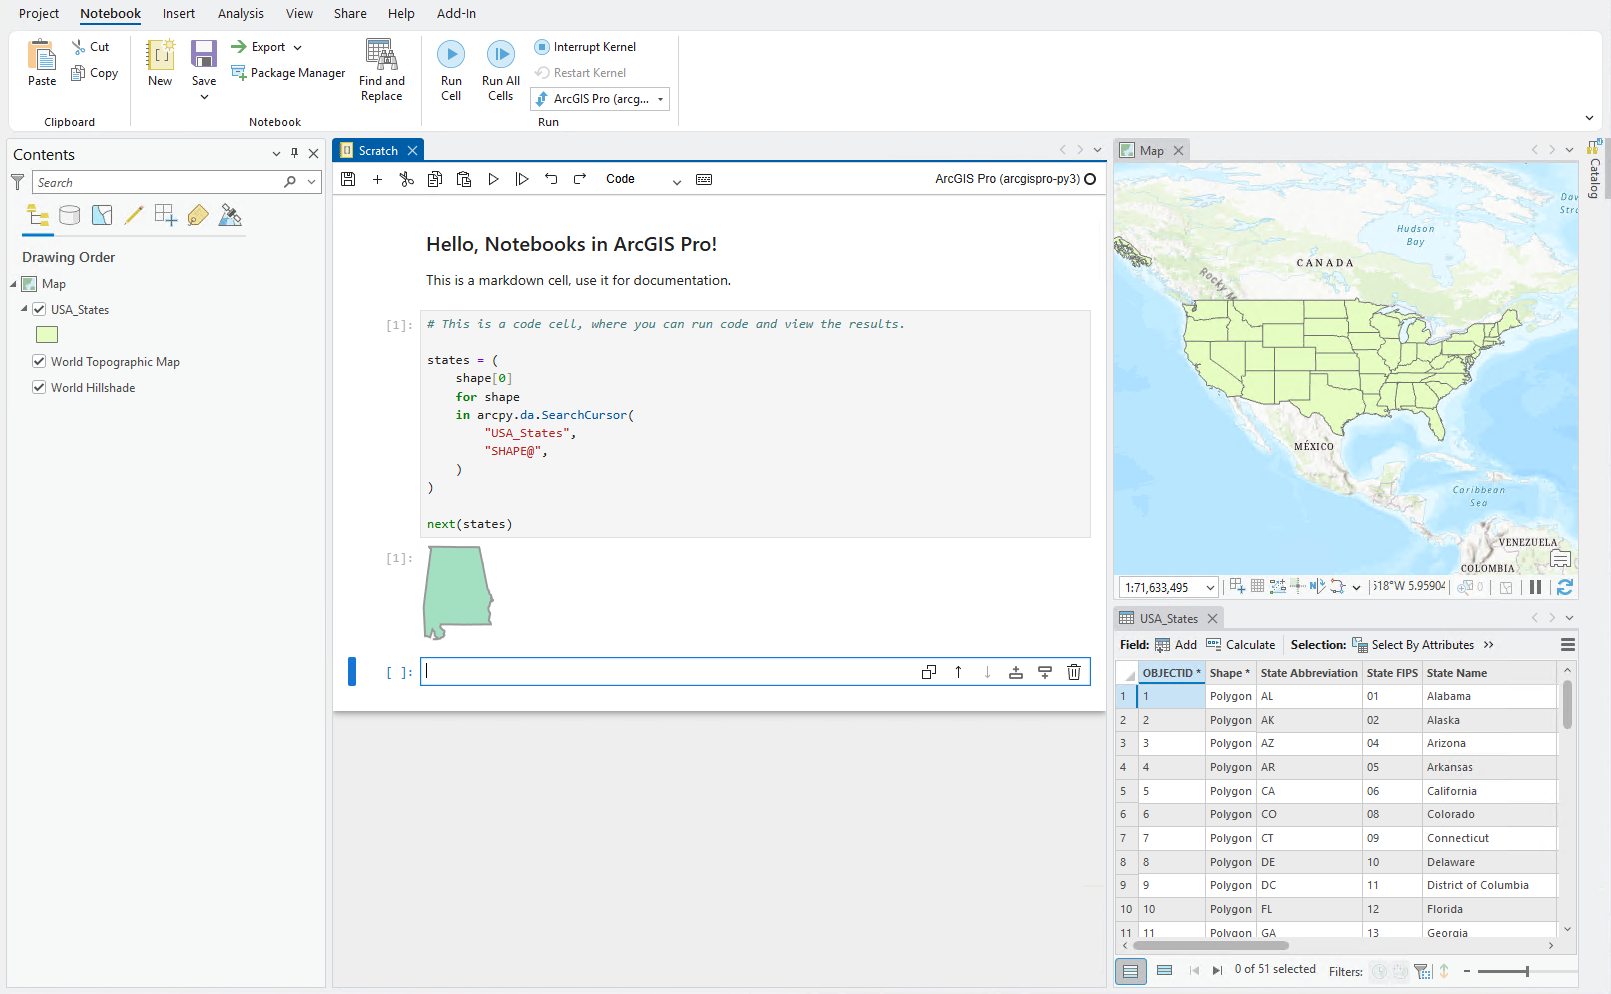
The focused cell is accented by a thick blue bar. To edit the cell, click in the editable area of the cell or press Enter. This causes the cell to go into edit mode (indicated by a blue border around the editable area). To exit edit mode, press Escape or click outside the editable area. This puts the notebook into command mode. In command mode, use the Up arrow and Down arrow to move focus to the next cell above or below. You can press A or B to create a new cell above or below the focused cell, and D+D to delete it. To change a cell to a markdown cell, press M, and to change it back to a code cell, press Y. Regardless of current mode, you can always use Shift+Enter to run the selected cell or cells, and move focus to the next cell.
Note:
The shortcut for undo is Ctrl+Z and the shortcut for redo is Ctrl+Shift+Z.
For cell operations, while in command mode the shortcut for undo is Z and the shortcut for redo is Shift+Z.
The Notebook tab on the ribbon is available when a notebook view is open and selected. The following are examples of common Notebook operations available from the Notebook tab:
To run a selected cell, use the Run Cell
 button.
Use Run All Cells
 to run every cell in the notebook.
To interrupt a cell that is running, click the Interrupt Kernel button
 .
To restart the notebook, click the Restart Kernel
 button.
Important:
Only external notebook kernels can be restarted. See Notebook modes and kernels for more information.
Note:
The Cut  , Copy
 , and Paste
 buttons operate on entire cells, not text within cells.
Many of the same common operations found on the ribbon tab are also available from the toolbar in the notebook view. The toolbar contains some additional operations that are not found on the tab. For example, to switch the cell type of a selected cell, use the Select the cell type drop-down from the toolbar. The default cell type is Code. Additional notebook commands are available from the notebook's Command Palette  button (Ctrl+Shift+C).
Notebook modes and kernels
A notebook runs code through a kernel. Each kernel is associated with an environment that provides the packages available to the notebook. Although a kernel uses an environment, the two are different concepts: the kernel provides the runtime for the notebook, while the environment contains the software available to that runtime.
ArcGIS Pro supports the following notebook modes:
ArcGIS Pro Notebook Mode
The default mode when you open a new notebook. It runs using the active Python environment and is deeply integrated with ArcGIS Pro, allowing for direct interaction with project contents. The ArcGIS Pro kernel cannot be restarted.
External Notebook Mode
Runs as a separate process independent of ArcGIS Pro. An external kernel does not have direct access to project contents. External kernels can use different environments and can be restarted.
External Notebook mode uses registered kernel definitions. A kernel definition specifies how a kernel is started, including the environment and startup settings it uses. After a kernel definition is registered, it becomes available for selection in External Notebook mode. All ArcGIS Pro environment clones are automatically registered and available.
The following table compares the capabilities of each mode:
| Capability | ArcGIS Pro Notebook mode | External Notebook mode |
|---|---|---|
| Default | Yes | No |
| View notebook and map contents side by side. | Yes | Yes |
| Geoprocessing outputs are added to the map | Yes | No |
| Reference layers in the map by name. | Yes | No |
| Reference layers in the default geodatabase by name. | Yes | No |
| Layer selections are honored. | Yes | No |
| Global geoprocessing environment settings are honored. | Yes | No |
| Global geoprocessing environment settings can be overridden. | Yes | No |
| Work with an ongoing editing session. | Yes | No |
| Geoprocessing results appear in the geoprocessing history. | Yes | No |
| Can interrupt the kernel. | Yes | Yes |
| Can restart the kernel. | No | Yes |
| Separate namespaces between each notebook. | No | Yes |
| Supported environments. | Only the current active Python environment | Any supported Python environment |
Note:
Code that relies on ArcGIS Pro integration, such as project and map functionality, may require modification when run in an external notebook or outside of ArcGIS Pro.
Caution:
Notebooks running in the default ArcGIS Pro mode share a single Python instance. If different ArcGIS Pro notebooks use the same variable name, name collisions could result. To avoid potential variable name collisions, consider the following options:
Use unique variable names in ArcGIS notebooks running concurrently.
Run the
%reset -fmagic command to delete all variables in a notebook.Run notebooks in external mode.
Notebooks in ArcGIS Pro only support Python; no other language kernels (such as R) are supported at this time.
Change the active kernel
The active kernel for the focused notebook is displayed in the Select Kernel control  on the Notebooks tab, in the Run group.
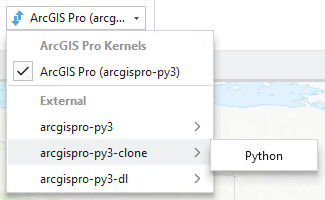
To change to a different kernel, use the drop-down arrow for the control. In the drop-down list, kernels are organized by environment. The environments are grouped by mode (ArcGIS Pro Notebook and External Notebook). Hovering over or clicking on an environment name in the list expands it to reveal available kernels for that environment.

In the notebook view, you can see the active kernel name on the right-hand side of the toolbar, alongside the kernel status indicator.
Python environments
Each notebook kernel is associated with an environment that provides the packages available to the notebook. You can manage the set of packages installed in an environment using the ArcGIS Pro Package Manager. To get to the Package Manager quickly from the Notebook tab on the ribbon, click the Package Manager  button in the Notebook group.
Tab completion and inline help
Notebooks feature tab completion and inline help for more effective and efficient coding without having to leave the notebook to search the documentation.
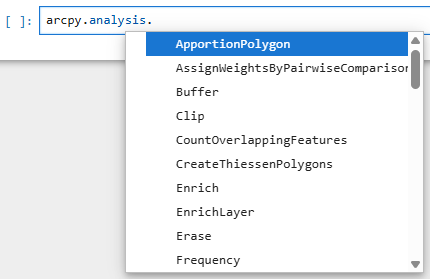
The tab completion feature provides contextual code completion suggestions based on the position of the cursor. To view available completions, type a dot (.) after an object, library, or module name and press Tab. For example, type arcpy.analysis into a cell, type dot (.) and press Tab to display the list of available functions, classes, and other members available in the analysis module. Once the list is displayed, you can narrow the results by typing additional characters. After selecting an item from the list, press Enter to insert it.
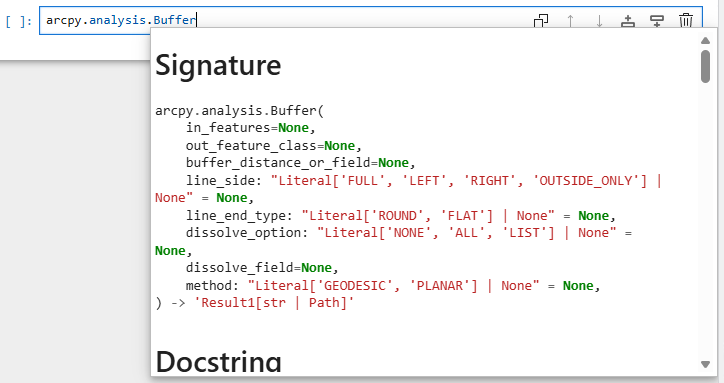
Python tools, modules, functions, classes, and keywords all store documentation that provides information on their use. Activate inline help to view documentation for the object at the cursor by pressing Shift+Tab. The following is the documentation displayed for the Buffer tool:
Export a notebook to a different format
To export a notebook to a Python (.py) or HTML (.html) file, use the Export drop-down list  under the Notebook group on the Notebook tab. This will export the currently focused notebook to the desired file type.
Use the Save  button to save your notebook in the standard
.ipynb format.
Authenticate the ArcGIS API for Python GIS instance in ArcGIS Notebooks
In the ArcGIS API for Python, the GIS object is used to represent the GIS you are working with, such as ArcGIS Online or an instance of ArcGIS Enterprise. Your GIS can support a number of authentication schemes; see Working with different authentication schemes to learn how to authenticate your scripts and notebooks for different schemes.
For example, from an ArcGIS Notebook do either of the following:
To connect to ArcGIS Online as an anonymous user, specify
gis = GIS().To connect to your active portal in ArcGIS Pro without entering credentials, specify
gis = GIS("home").
See Sample notebooks for examples of using the ArcGIS API for Python.