Set up the stereo mapping Softmouse 3D mouse
The 3D input devices used to support stereo mapping in ArcGIS Pro include the Softmouse 3D mouse. This device supports stereoscopic mapping workflows by reducing digitizing fatigue with two-handed mouse operation and reduced feature compilation duration by providing access to multiple editing commands at your fingertips. Each device is equipped with a scroll wheel for precise elevation definition, and multiple programmable buttons. Additional information on installation, setup, and use of the Softmouse is given below.

The Softmouse is a 3D input device designed specifically for use in topographic mapping applications. The Softmouse has 10 buttons and a high-precision horizontal thumbwheel to support height definition. The 10 buttons can be programmed to store up to 20 commands, which simplifies the editing workflow by allowing you to assign commonly used editing commands to the mouse keys, reducing the need to access desired commands from the ArcGIS Pro main menu.
Once ArcGIS Pro has been initialized, the Softmouse can be used as both a system mouse and a stereoscopic input device. Unlike a regular system mouse, the Softmouse will not work if there is not an active instance of ArcGIS Pro.
Configure the Softmouse
The Softmouse can be configured to work with ArcGIS Pro for efficient stereo compilation operations. You can customize the Softmouse buttons with two types of configurations, stereo map and system configurations. The stereo map buttons are configured using the ArcGIS Pro Options > 3D Input Device pane, while the system buttons are configured using your system's Window Registry Editor. The steps for each type of Softmouse configuration are detailed in the sections below.
Configure Softmouse Stereo Map buttons
ArcGIS Pro allows you to configure the Softmouse Stereo Map buttons as global Project settings. When ArcGIS Pro is open, on the main menu, select Project > Options > 3D Input Device. The Set options for Stereo Map mouse pane is presented, where you can assign functionality to particular buttons. Follow the steps below to configure the Softmouse Stereo Map buttons within ArcGIS Pro.
Connect the Softmouse to a computer with a USB port.
Open an ArcGIS Pro project, or create one.
Once ArcGIS Pro is open, on the main menu, select Project > Options.
The Options window appears, allowing you to set preferred options to configure the use of the Softmouse in ArcGIS Pro.
In the Application section, click 3D Input Device.
The Set options for Stereo Map mouse window appears.
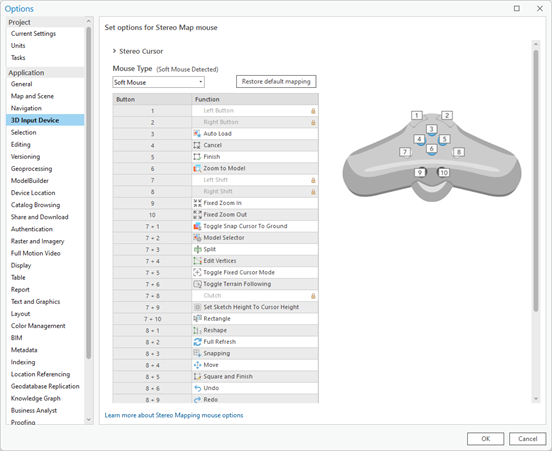
Next to Mouse Type, a Soft Mouse Detected notification is displayed, indicating that ArcGIS Pro recognized the connected Softmouse device. The absence of this notification indicates the device is disconnected.
Once connected, the Softmouse can be disconnected and reconnected without the need to restart ArcGIS Pro.
From the Mouse Type drop-down list, select Soft Mouse.
A graphic of the Softmouse model is displayed on the page. You may need to expand the page to view the full image.
The button function user interface shows default button assignments and allows you to assign commands to your preferred mouse buttons.
Assign mouse buttons
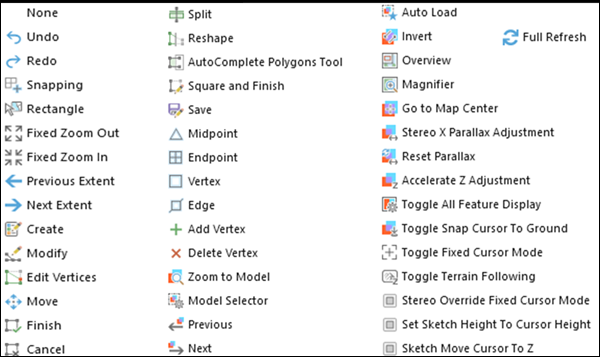
Various editing and stereo mapping functionality can be assigned to the Softmouse buttons to enhance stereo mapping efficiencies. The Softmouse is equipped with 10 buttons and a horizontal thumbwheel. These buttons can accommodate up to 20 programmable functions. A list of commands that can be assigned to the mouse buttons is shown in the steps below.
In the
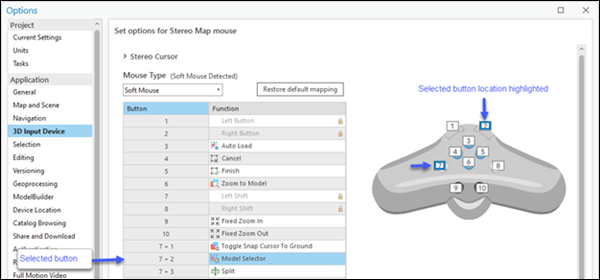
Buttoncolumn, click a specific button or button combination number to assign a function to.The function associated with the selected mouse button is highlighted in the list. The selected mouse button is highlighted in blue on the Softmouse graphic.
Click a function.
A drop-down list of supported functions is displayed.
Select a function to assign to the associated button or buttons from the drop-down list.
Repeat the above steps to assign other functions to the Softmouse buttons.
Once you finish assigning functions to buttons, click OK at the bottom of the window to accept all changes.
Click the Restore to Default button to return to the default button assignments.
The table below lists the commands that can be assigned to the Softmouse buttons.
The table below provides a brief description of the system function keys for the Softmouse.
|
Button |
Function |
Explanation |
|---|---|---|
|
1 |
Left button |
Mimics left-click functionality on the system mouse. Can be used as a pointer and for digitizing. |
|
2 |
Right button |
Mimics right-click functionality on the system mouse. Can be used for dynamic zooming. |
|
7 |
Left shift |
Similar to a function key, the Shift key works in combination with other keys to expand mouse button mapping capacity. |
|
8 |
Right shift |
Similar to a function key, the Shift key works in combination with other keys to expand mouse button mapping capacity. |
|
7 + 8 |
Clutch |
Clutch enables the moving of the mouse without changing its x,y and z position on the screen. |
Apply custom configuration to Softmouse system buttons
In addition to the Stereo Map buttons, Softmouse system buttons can also be optionally configured. You may want to reconfigure the default Softmouse system buttons if you are left-handed, or want to reassign system buttons based on familiarity or efficiency of Softmouse operability. The Softmouse system buttons are greyed out and not available for reconfiguration in the Set options for Stereo Map mouse pane. You can facilitate a custom Softmouse system configuration in your system's Windows Registry Editor.
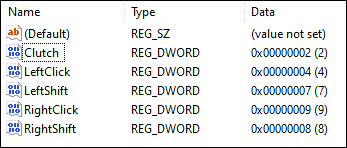
In this section, we will apply a custom configuration to the Softmouse system buttons: Left Click, Right Click, Left Shift, Right Shift and Clutch. This is optional and only required if the default system button number assignment is not preferred. To manually change the Softmouse system buttons number, do the following.
Note:
The following must be done before opening ArcGIS Pro. It is recommended that you work with your system administrator to complete.
On your keyboard press the Windows key + R, then type regedit. This will open your system's Windows Registry Editor.
Select Yes if prompted to allow the application to make changes to your device. The Registry Editor opens.
Caution:
Take care when editing the registry as errors may adversely impact system functionality.
Navigate to Computer\HKEY_CURRENT_USER\Software\ESRI\ArcGISPro\Settings\ and create a folder called StereoDevices. To create the folder, right-click on Settings folder, select New, then Key. A subfolder with the name New Key #1 will be created.
Right-click on New Key #1 and select Rename.
Rename New Key #1 to StereoDevices.
Within the StereoDevices folder, create a subfolder named Softmouse.
Right-click on Softmouse, select New, Key then DWORD (32-bit) Value. A New Value #1 file is created on the side of the window.
Rename the newly created DWORD file to Clutch.
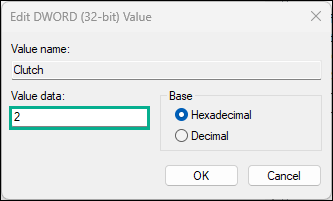
Right-click on Clutch then select Modify. This will open the Edit DWORD (32-bit) Value window.
In the Value data section, enter the preferred button number for Clutch then click OK.
Using the example below, repeat steps 7 – 10 to create the remaining Reg DWORD entries and assign your preferred button number.
Click on the Softmouse folder and select Export. The Export Registry File window will open. This is where you create and save to disk a registry file for future use that stores the system function button configurations just defined.
For File name enter an appropriate value. Ensure the file extension is *.reg.
Click Save to save the file to disk and close the Export Registry File window.
In the Registry Editor window, select File then Exit from the main menu.
Note:
In File Explorer, the exported Softmouse registry configuration file can be updated with a text editor to change the system button numbers. Once updated, double-click the file to automatically post the changes to the registry, and eliminate any further need for manual registry edits.
Invert mouse wheel scrolling
You can invert the scroll direction on the Softmouse by following the steps below.
Open ArcGIS Pro and click Project > Options.
The main Options window appears.
Under the Applications section, click Navigation.
The Set options for navigating maps and scenes pane appears.
Under Mouse wheel roll forward, click the Zoom out button, and click OK at the bottom of the window to accept the changes.
The Set options for navigating maps and scenes pane closes.
Click the back arrow in the About ArcGIS Pro window to return to the ArcGIS Pro home page.
Adjust Mouse XY Sensitivity using Windows Tool
The planimetric (XY) sensitivity of the Softmouse device can be adjusted using Windows Settings. To adjust the XY sensitivity of the Softmouse using Windows tools follow the steps below:
Ensure ArcGIS Pro is closed.
On your keyboard, press the Windows key + I. This will open the Windows Settings window.
Click Bluetooth & devices.
Select Mouse to expand the view.
Adjust Mouse pointer speed as desired.
When complete, close the window.
Note:
Optionaly, adjust the sensitivity of the Softmouse movements in the X and Y direction by using the Caps Lock keyboard key.
Adjust the mouse z rate of change sensitivity
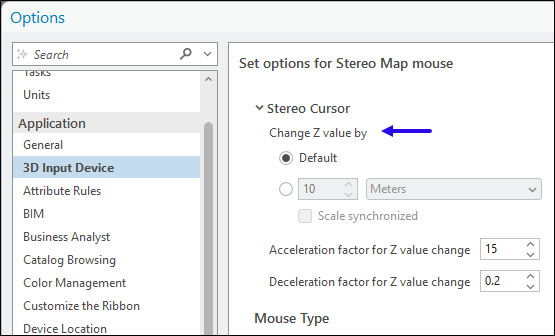
The thumbwheel on the Softmouse enables accurate height adjustments in the stereo window. Height increment changes are controlled by the Change Z Value By option in the Stereo Cursor section, found at the top of the Set options for Stereo Map mouse window.
This option can also be found on ArcGIS Pro main menu, on the Stereo Map tab, with the Z Sensitivity option in the Cursor group. For ease of access, it is recommended that you use the Z Sensitivity option when working in the Stereo map display.

The default settings change the height value in system defined increments. For smaller, or specific, increment changes, follow the steps below.
Open a Stereo Map window. On the main menu, click Insert, and on the New Map drop-down menu, click New Stereo Map.
The Stereo Map tab is enabled on the ArcGIS Pro main menu.
Click the Stereo Map tab, and click Z Sensitivity in the Cursor group.
The Z Sensitivity dialog box appears.
Click the button below Default to enable custom height increment settings.
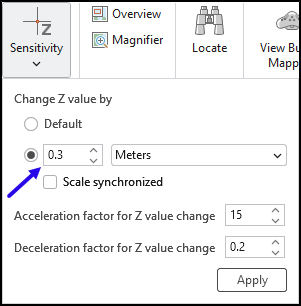
To adjust z values in increments of 30 cm, enter a value of 0.3 in the box adjacent to the units setting.
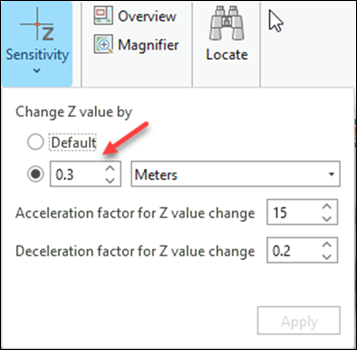
Click Apply to accept the changes and close the Z Sensitivity dialog box.
As you rotate the Softmouse thumbwheel, you will see the z values in the coordinate tray (at the bottom of the Stereo window) changing in increments of 30 centimeters.