Tutorial: Geocode a table of addresses
In this tutorial, you'll learn how to geocode a table of addresses or places using the Geocode Addresses tool.
Get the data
The data for this tutorial is available for download.
Go to the data download page.
Click the Download button, and save the file locally.
Unzip the downloaded file.
Geocode a table of addresses with a locator on disk
To geocode a table of addresses with a locator on disk, complete the following steps:
Start ArcGIS Pro.
Sign in to ArcGIS Online if you're not signed in already.
Create a blank project. On the start page, click Start without a template.
On the Insert tab, click New Map
 .
.A new map appears in your project.
On the Insert tab, in the Project group, click Add Folder
 .
.On the Add Folder Connection dialog box, browse to the GeocodingSample folder and click OK.
If the Geoprocessing pane is not open, on the Analysis tab, click Tools
 to open the pane.
In the Geoprocessing pane, type geocode addresses in the search box.
Click the Geocode Addresses tool
 to open the tool in the Geoprocessing pane.
Click the Browse button
 next to the Input Table box.
On the Input Table dialog box, under Project
 , click Folders to browse to the GeocodingSample folder.
Click the
Evansville.gdbgeodatabase and select theCustomerstable, click OK.Click the Browse button
next to the Input Address Locator box.On the Input Address Locator dialog box, under Project
, click Folders to browse to the GeocodingSample folder.Select the Evansville locator and click OK to add it to the project.
Alternatively, select the Evansville locator from the Input Address Locator drop-down menu.
Ensure that Multiple Field is selected from the Input Address Fields parameter drop-down menu, and confirm that all fields in the table are mapped to the corresponding Field Name from the locator.
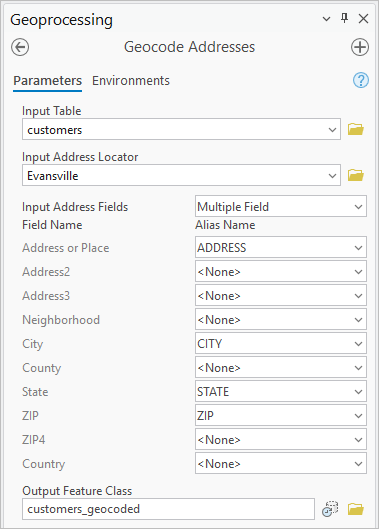
Type customers_geocoded in the Output Feature Class field and choose the folder where you want to save the output.
Click Run to geocode the table.
The customers_geocoded output feature class is added to the map when finished.
Geocode a table of addresses with ArcGIS World Geocoding Service
To geocode a table of addresses using the ArcGIS World Geocoding Service, an ArcGIS Online for organizations subscription is required. The service operates under a credit-based usage model that allows you to pay only for what you use. If you don't have a subscription, purchase one or request a free trial. For more information on the credit-based usage, see the credits overview for geocoding.
Start ArcGIS Pro.
Sign in to ArcGIS Online if you're not signed in already.
Create a blank project. On the start page, click Start without a template.
On the Insert tab, click New Map
.A new map appears in your project.
On the Insert tab, in the Project group, click Add Folder
.On the Add Folder Connection dialog box, browse to the GeocodingSample folder and click OK.
In the Geoprocessing pane, type geocode addresses in the search box.
Click the tool to open the Geocode Addresses tool.
Click the Browse button
next to the Input Table box.On the Input Table dialog box, under Project
, click Folders to browse to the GeocodingSample folder.Click the
Evansville.gdbgeodatabase and select theCustomerstable, and click OK.In the Geoprocessing pane, select the locator titled ArcGIS World Geocoding Service from the Input Address Locator drop-down menu.
If you are signed in with an ArcGIS Online for organizations account, the ArcGIS World Geocoding Service is available in geoprocessing tools automatically.
Ensure that Multiple Field is selected from the Input Address Fields parameter drop-down menu, and confirm that all fields in the table are mapped to the corresponding Field Name from the locator.

Specify the name and folder where you want to save the output in the Output Feature Class field.
Click Run to geocode the table.
The output feature class is added to the map when finished.