Use an OGC API service
You can use OGC API Features or OGC API Tiles (map tiles and vector tiles) services that are available on the web when using ArcGIS Pro. The OGC API service client support in ArcGIS allows you to access these services over the internet and add an OGC API Features or OGC API Tiles layer to your map.
Use OGC API Features services
The OGC API Features standard is a specification for working with spatial data over the web. ArcGIS Pro supports multiple parts of this specification. Check the conformance endpoint of an individual server URL for details.
Add an OGC API Features layer
After an OGC API server connection is created, it appears in the Servers collection  in the Catalog pane. You can add an OGC API Features layer to a map either from an OGC API server connection in your project or from an OGCFeatureServer item on the Portal tab of the Catalog pane. When you add the layer, the Add OGC API Layer(s) dialog box appears. You can limit the features added to the map in the following ways:
Specify an extent.
Set the maximum number of features added to the map.
Set a visibility scale range.
The ability to limit the features added to the map improves performance with very large datasets. These properties can also be set or modified on the Layer Properties dialog box after a layer is added.
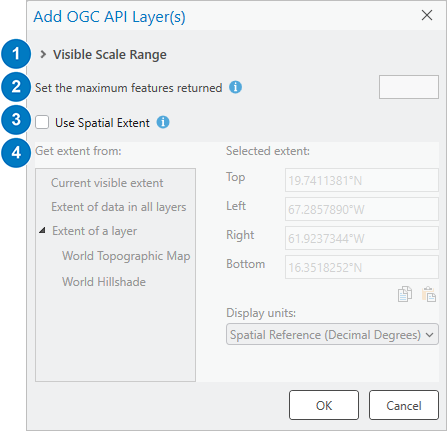
Parameters table
| Parameter | Description | |
|---|---|---|
| 1 | Visible Scale Range | When a layer is added to a map, the map zooms to the layer extent. Setting values for this parameter prevents features from being added unless the map scale is within the visible scale range. This setting is especially useful when you cannot set the maximum number of features because the layer is opened in on-demand mode. To set a scale range, expand the Visible Scale Range heading, select Show layer between these scales only, and type or choose maximum and minimum scale values. If no scale range is set (the default), all features are added. |
| 2 | Set the maximum features returned | Specify a value in the input box to set the maximum number of features returned for the layer. If no value is set (the default), all features are returned. If a spatial extent is also used to limit the features, the maximum number of features returned is applied to features within that extent. You can only set the maximum number of features when the layer is opened in snapshot mode. |
| 3 | Use Spatial Extent | Check this check box to limit the number of features by specifying an area of interest (spatial extent). The OGC API Features service must support the bbox parameter to use this functionality. If the box is unchecked (the default), all features are added. |
| 4 | Selected extent | When the Use Spatial Extent check box is checked, you can set a custom extent to limit the features added to the map. You can enter coordinates manually or use extent values from the current visible extent, the extent of data in all layers, or the extent of a specific layer. When an extent is provided, ArcGIS Pro sends the extent values using a bbox parameter with every request to the server. ArcGIS Pro depends on the response from the server to return the correct features within the bbox sent, so the service must support the bbox parameter according to the OGC API Features specification. |
For layers added from an OGC API server connection, all features are added by default. For layers added from the Portal tab of the Catalog pane, the maximum features returned value may be set by default to reflect the limit of the service. To remove the limit, you can delete the value.
If multiple layers are selected and added to a map at one time, the values set on the Add OGC API Layer(s) dialog box are applied to all selected layers.
The ArcGIS data model allows only one geometry type per table. If a mixed geometry OGC API Features layer is added to the map, by default, the geometry type of the layer is determined by querying the first feature in the OGC API Features service. To change the geometry type of the layer, use the Geometry Type property on the OGC Features tab of the layer properties dialog box.
Work with an OGC API Features layer
When an OGC API Features layer is added to ArcGIS Pro, it behaves like a read-only feature layer. For example, you can open the attribute table to view the records in the layer, query features in the map, or change the symbology of the layer. Since the OGC API Features layer is not editable, you cannot make edits to the data or schema through ArcGIS Pro.
OGC API Features layer properties
When an OGC API Features layer is added to a map, you can get information about its properties. To access the Layer Properties dialog box, right-click the OGC API Features layer in the Contents pane and click Properties. For example, you can view the data type, URL, layer name, and layer alias on the Source tab.
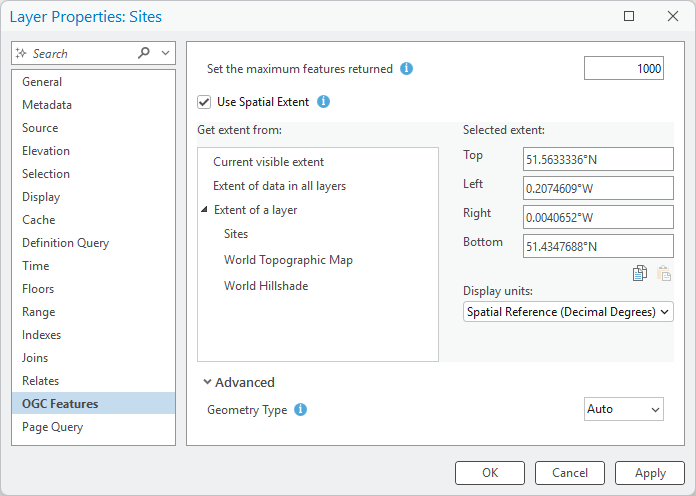
On the OGC Features tab, you can modify settings made when the layer was added, such as the visible scale range, maximum features returned, and spatial extent. See the Parameters table for information about these settings.
You can expand the Advanced section to see the Geometry Type property. By default, this property is set to Auto. This means that ArcGIS Pro discovers the geometry type by querying the geometry field of the first feature in the layer. If you know that the layer contains mixed geometry types—for example, if the table contains rows with both lines and polygons—you can choose a geometry type from the drop-down menu to display features that match the chosen type.
ArcGIS Pro OGC Features layers are limited to one geometry type per layer. To display multiple geometry types from the same layer, add the layer multiple times and specify a geometry type for each layer. The Geometry Type parameter is only applicable to snapshot mode.
Layer connection mode
Like WFS layers in ArcGIS Pro, OGC API Features layers have snapshot and on-demand connection modes.
In snapshot mode, the data is downloaded locally into a temporary folder and is deleted when your ArcGIS Pro session ends. Since the layer uses a local copy of the data that was downloaded when the layer was added to the map (that is, a snapshot in time), the layer is not updated with any changes to the service unless it is refreshed manually.
Snapshot mode is the most compatible with third-party and older ArcGIS services since it only requires the service to support a basic request to download the data. By default, most OGC API Features service layers are added to the map in snapshot mode.
In on-demand mode, the layer is dynamically updated with the most recent records from the service. In this mode, ArcGIS Pro sends requests to the server as you pan and zoom the map, select features, or query the data. The requests that are sent to the server in on-demand mode use methods described in the OGC API Features specification. ArcGIS Enterprise OGC API Features service layers are added to the map in on-demand mode by default.
Note:
For a service to work in on-demand mode, the service must support
bboxand enhanced filter parameters such ascql2-text. It must also use an ID field with unique values. It is recommended that you use this mode only if the server has a quick response time, since ArcGIS Pro relies on server response time to load data in a timely manner. There are known limitations with on-demand mode when making more complex queries on the data, queries on date or time fields, and queries on the attribute table. To view the requests that ArcGIS Pro sends to the service while performing these operations, you can use the HTTP tab on Diagnostic Monitor.
Set the connection mode
ArcGIS Enterprise OGC API Features services are added to the map using the on-demand connection mode. All other services are added using the snapshot connection mode. To force the connection to use a specific mode, you can set a custom request parameter in the OGC API server connection properties where MODE is the key and SNAPSHOT or ONDEMAND is the value. This property is set for all layers in the connection.
Refresh a layer
You may want to refresh an OGC API Features layer with the most recent data from the service, especially if records change frequently.
To refresh a layer in snapshot mode, do any of the following:
Modify any property on the OGC Features tab of the Layer Properties dialog box and click OK.
Add the layer to the map again.
Save the project and exit and restart ArcGIS Pro.
To refresh a layer in on-demand mode, pan or zoom the map or modify any property on the OGC Features tab of the Layer Properties dialog box and click OK.
If layer features are limited to a spatial extent, both snapshot and on-demand modes honor that extent when the layer is refreshed. To refresh data outside the extent, open the Layer Properties dialog box, click the OGC Features tab, and change the selected extent or uncheck the Use Spatial Extent check box.
Use OGC API Tiles services
The OGC API Tiles standard is a specification for working with geospatial information as tiles.
Work with an OGC API Tiles map tiles layer
When an OGC API Tiles map tiles layer is added to ArcGIS Pro, it behaves like a map layer. You can view the pregenerated georeferenced map images or change the image format and tiling scheme of the layer.
To get information about the map tiles layer, access the Layer Properties dialog box by right-clicking the layer in the Contents pane and clicking Properties. For example, you can view the data type, URL, layer name, and layer alias on the Source tab. On the OGC API Maptiles tab, you can switch the image format and tiling scheme.
Work with an OGC API Tiles vector tiles layer
OGC API Tiles vector tiles can be added to a map from a tiles endpoint by browsing to the endpoint in the Catalog pane after adding an OCG API service connection, or by clicking Add Data > From Path to enter a URL to a tiles endpoint. Features in tile endpoints are displayed using default symbology. Tile endpoints added to a map from the Catalog pane use the WGS 1984 Web Mercator (auxiliary sphere) coordinate system.
A style endpoint can also be added to a map from the Add Data > From Path dialog box. In this case features are displayed using symbology defined in the style. Style endpoints are not accessible from the Catalog pane and can be added to a map only from the Add Data > From Path dialog box.
To get information about the vector tiles layer, open the Layer Properties dialog box by right-clicking the layer in the Contents pane and clicking Properties. From the Layer Properties dialog box, you can see the data type, URL, the layer name, and the layer alias on the Source tab. You can change the tiling scheme on the OGCAPI Vectors tab.