Review Ground Control Points
Note:
ArcGIS Reality Web App is a beta feature at ArcGIS Enterprise 12.2. While in beta, this capability may not be feature complete and, as such, may have known performance or quality issues and will not be supported by Esri Technical Support.
Feedback on this feature can be provided through the Esri Early Adopter Community.
After initial processing of a mission, GCPs can be used to improve the geolocation accuracy of the image collection and products. The review Ground Points page of a reality mapping mission provides the tools for tagging and reviewing GCPs.
Tagging GCP
Each GCP needs to be identified and marked (tagged) in at least three photos. GCP tagging requires that the initial processing of the mission is completed. Follow the steps below to tag GCPs:
Open a mission
Click the
review Ground Pointsoption. The review Ground Points page opens. The page containsGCP pane: Shows a table of the default GCP set or any GCP set that a user select from the drop-down option at the top. The table has the GCP Name, number of tags for GCP and drop-down option to specify a point as a GCP or checkpoint.
GCP Views pane: GCPs can be viewed in a map or Tags summary. The default view pane is a map with base imagery showing the GCPs and the mission photos. The GCPs and photos symbols depends on the states as shown below:
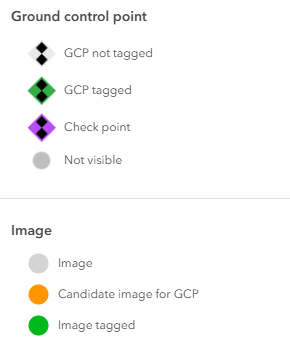
Hover on a GCP in the GCP list table (or on the Map) to see candidate photos that may contain the GCP marker highlighted in orange.
Click one of the candidate photos to open it for GCP tagging, with potential GCP location highlighted in circle.
Zoom and pan to find the GCP: Use mouse scroll or the Zoom in and out to zoom in and out. Hold left click and move to pan around and left click to tag the image.
Tag the GCP by clicking the precise location on the photo. A blue cross will appear for tagged GCP.
Use <> to move on to another candidate photo for tagging. After tagging the GCP on one photo, the
Auto Tagoption can be used to find marker in the other photos. Atleast 3 tags are required for each GCP.
Note:
If using Auto Tag, the GCP tagging window switches to Grid View Mode.
- Repeat for other GCPs: After the first GCP has been sufficiently tagged, click
Tag another GCPdropdown on the bottom right to select another GCP to tag from GCP list. You can also close the GCP tagging window to return to theReview Ground Control Pointsdialogue.
GCP tagging can also be done from the Grid View mode. The Grid View lists candidate images for a GCP in a grid view, facilitating tagging of multiple images. Use mouse scroll bar to zoom in and out of any of the grid images. Hold left click to pan and left click to tag the image.