Analyze hosted video layers
Use ArcGIS Excalibur to analyze hosted video layers
You can analyze a hosted video layer in the canvas in ArcGIS Excalibur. By default, videos open in the canvas in a split view, which allows you to work with videos and view their geospatial context side by side.
Note:
ArcGIS Excalibur requires an add-on license and additional installation. To learn more, see the ArcGIS Excalibur system requirements.
Focus Panel view
Hosted video layers open in the Focus Panel view of the canvas. The Focus Panel view offers several controls to work with video layers, and you can expand the panel to give yourself more room to interact with videos.
Expand the Focus Panel view
To expand the size of the Focus Panel view, complete the following steps:
Click Expand Focus Panel
 in the upper right corner of the panel.
The Focus Panel view expands to cover the entire canvas.
Click Reset to Split View
 to revert to a split view.
Map Panel view
By default, the Map Panel view opens next to the Focus Panel view in the canvas. The Map Panel view allows you to visualize the metadata of the video open in the Focus Panel view.
Work with hosted video layers
Once a hosted video layer is published, you can open and work with it in the Focus Panel view.
Click Play video
 to play the video.
Click Pause video
 to pause the video.
If the video has sound, you can turn the sound on or off.
To turn on the sound, click Turn on sound
 .
.To turn off the sound, click Turn off the sound

Optionally, click Layers
 to open a menu to swap between layers in the opened service.
You can navigate the video using the following options if you are connected to an on-demand video:
Click Jump backwards 10 seconds
 to go back 10 seconds.
Click Jump forward 10 seconds
 to skip 10 seconds.
Click Jump to the start
 to go back to the start.
Click Jump to the end
 to skip to the end.
Click Update video layer graphics
and do any of the following to update the graphics on the map:Note:
These options are only available if the video layer contains the required metadata.
Choose a layer color.
Click Sensor Location
 to show or hide the sensor's location.
Click Sensor Trail
 to show or hide the sensor's trail.
Click Sensor Sight Line
 to show or hide the sensor's line of sight.
Click Frame Outline
 to show or hide the outline of the frame extent.
Click Frame Center
 to show or hide the center of the frame extent.
Click Frame
 to overlay the video frame within the field of view telemetry on the map.
By default, the graphics on the map follow the extent of the frame and sensor and are set to Follow Video
 . To change this, and do any of the following:
Note:
These option are only available if the video layer contains the required metadata.
Click Follow Sensor
 to make the graphics follow the sensor's location.
Click Follow Frame
 to make the graphics follow the frame extent.
Click Change the playback rate
 and choose a playback speed for on-demand videos.
Click More playback settings
 and do any of the following:
Click Display video metadata to display the video layer's metadata.
Click Use precision time to show milliseconds in the video playtime.
Click Loop playback to loop the video.
Click Fullscreen playback mode to expand the Focus Panel view to cover the entire canvas.
If you are viewing a video layer that contains multiple streams, click the Playlist
 to view the list of streams and select which one you would like to view. Alternatively, you can click the point feature in the map panel for the sensor location to open the feature popup and click Open Video
  to open the feature for that specific camera.
You can overlay features on your video if you have a feature layer added to your map and are using an on-demand video. Click the Map Overlay toggle to see the features on your video if they are within the field of view of your telemetry.
Use ArcGIS Desktop to analyze hosted video layers from a portal
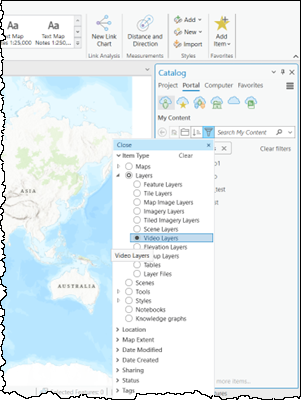
When logged into a portal that provides video layer services, you can consume a video layer from the portal and add it to the map in ArcGIS Pro and ArcGIS AllSource. Through the portal connection, you can filter by Item Type, Layers, and Video Layers, as well as other options.
Right-click the video file in the Catalog pane and select Add To Current Map. The video file will be listed in the Contents pane in the Standalone Video section, and the video player will be initialized.
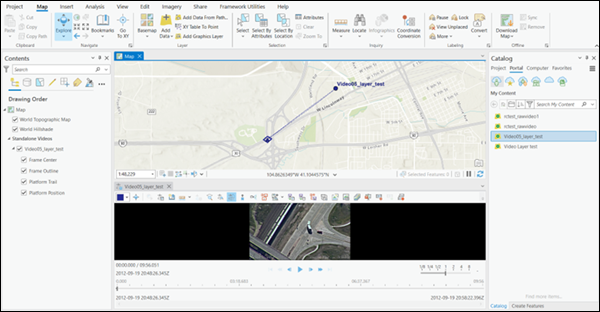
The video player opens with the video loaded and docked below the map. The video player can be moved and placed anywhere on your display. It can be resized by moving a corner or edge of the player.
Choose a color to identify the video layer telemetry and the associated graphics-such as a video footprint-on the map.
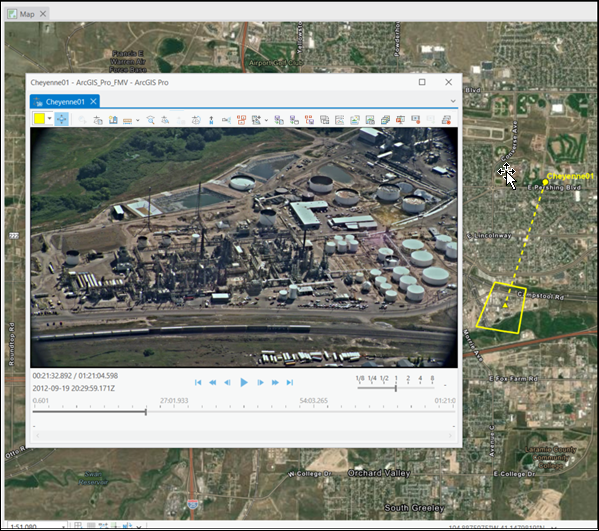
The video playback controls are described in the following table:
|
Control |
Label |
Description |
|---|---|---|
|
|
Play |
Plays the video according to the frames-per-second rate of the video. When the video is zoomed in and playing, it is played at the selected zoom level and position within the video frame. After clicking Play, the control changes to the Pause control while the video plays. |
|
|
Pause |
Pauses the video. The paused video is at the selected zoom level and position within the video frame. After clicking Pause, the control changes to the Play control while the video is paused. |
|
|
Step Forward |
Steps the video forward by 1 frame. |
|
|
Step Backward |
Steps the video backward by 1 frame. |
|
|
Fast Forward |
Fast-forwards the video based on the playback rate of the video player. The speed increments by a whole number each time Fast Forward is clicked. Playback speed is reset to 1x when the player is paused or stopped. |
|
|
Rewind |
Rewinds the video based on the playback rate of the video player. The speed increments by a whole number each time Rewind is clicked. Playback speed is reset to 1x when the player is paused or stopped. |
|
|
Jump to End |
Goes to the end of the video. |
|
|
Jump to Start |
Returns to the beginning of the video. |
Learn more about working with video layers in ArcGIS Pro and ArcGIS AllSource.