Create a highly available ArcGIS Enterprise deployment using the Cloud Builder for AWS app
The ArcGIS Enterprise Cloud Builder for Amazon Web Services (AWS) app guides you through the creation of an ArcGIS Enterprise deployment. When you choose the highly available option, the deployment contains a minimum of three EC2 instances: two that contain ArcGIS Enterprise components, and one for hosting server directories.
The following sections explain what ArcGIS components are created and take you through using the ArcGIS Enterprise Cloud Builder for AWS app to create a highly available base ArcGIS Enterprise deployment, plus optional instances for federated servers, a spatiotemporal big data store, and a graph store (which is created automatically if you include a federated Knowledge Server in the deployment.)
ArcGIS components
When you create a highly available ArcGIS Enterprise deployment, a minimum of three Amazon Elastic Compute Cloud (EC2) instances are created. The ArcGIS Enterprise components and federated servers are present on two of the instances. One EC2 instance is the primary ArcGIS Enterprise machine and the other is the secondary ArcGIS Enterprise machine. Both instances are part of the hosting server site and federated server sites. The third instance is used for ArcGIS Server directories and, optionally, the configuration store and portal content directory.
This base ArcGIS Enterprise configuration is shown in the following diagram:

For most federated servers, three additional EC2 instances are added to the deployment by default, but you can adjust the number of machines in the federated ArcGIS Server site.
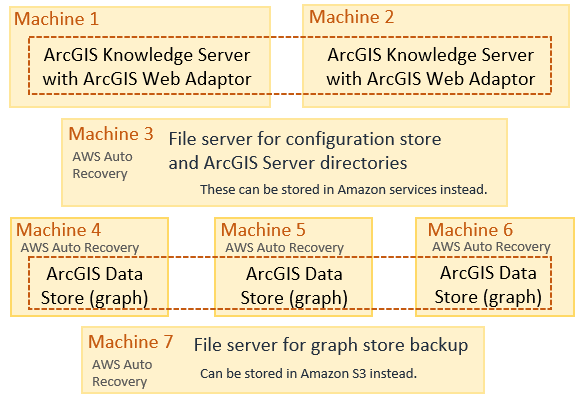
If you include a federated ArcGIS Knowledge Server, six additional EC2 instances are included in the deployment—two (by default) for the Knowledge Server site, two for the required ArcGIS Data Store graph store, and two file servers. The following diagram shows the machines added for a federated Knowledge Server:
Prerequisites
You need the following before you can create an ArcGIS Enterprise deployment using ArcGIS Enterprise Cloud Builder for AWS:
Obtain an AWS account. Ensure that you have the AWS account credentials, such as an Access Key ID and Secret Access Key, and that they have access to required AWS services.
Download and extract ArcGIS Enterprise Cloud Builder for Amazon Web Services.
Obtain a Portal for ArcGIS license file and an ArcGIS GIS Server license file for the hosting server.
Obtain ArcGIS Server license files for the federated server roles you require.
Purchase SSL certificates from a certifying authority, and configure them for the domains you will use in the ArcGIS Enterprise on AWS deployment.
Create a deployment with Cloud Builder
After you complete the prerequisites, follow these steps to use the Cloud Builder app to create a highly available ArcGIS Enterprise deployment with (or without) additional components:
Open the ArcGIS Enterprise Cloud Builder for AWS app from the Start menu on your computer.
Connect to your AWS account by doing one of the following:
Provide the access key ID and secret access key for your account and click Sign In.
Choose the AWS profile you defined on the machine where you're running Cloud Builder and click Sign In. See the AWS documentation for information about configuring a local profile.
Once Cloud Builder connects to your AWS account, it proceeds to the Deployment page.
Click Add Deployment.
The Choose a Deployment Type page appears.
On the Choose a Deployment Type page, choose ArcGIS Enterprise, and click Next to proceed to the Define the ArcGIS Enterprise Deployment page.
Select Highly Available to create two Amazon EC2 instances that each contain the base ArcGIS Enterprise components.
To add federated servers to the ArcGIS Enterprise deployment, click the arrow next to Choose Additional Servers (Optional) and check the box next to each federated ArcGIS Server role you require.
See ArcGIS Server licensing roles for more information.
All federated server roles add EC2 machines to the ArcGIS Enterprise deployment.
Tip:
When you select ArcGIS Knowledge Server, a graph store is added to the deployment automatically. The graph store is created on separate EC2 machines.
To add a spatiotemporal big data store to the Enterprise deployment, click the arrow next to Add Spatiotemporal Big Data Store (Optional) and check the box next to Spatiotemporal Big Data Store.
For information about when you need a spatiotemporal big data store, see Functionality and apps that require system storage.
Click Next to proceed to the General Configuration Parameters Details page.
Choose the AWS Region option where you want the resources deployed.
Choose the operating system to be used on the Amazon Elastic Compute Cloud (EC2) instances: either Ubuntu or Windows.
If you included ArcGIS Notebook Server in the deployment, Ubuntu is selected by default and cannot be changed.
If you use a custom Amazon Machine Image, the Ubuntu option indicates any supported Linux operating system on that image; you aren't forced to use Ubuntu.
Provide a name for the deployment.
This name must be unique. When Cloud Builder verifies that the name is unique, a verified symbol
 appears.
Provide the ID of a custom Amazon Machine Image in the AMI ID field, or leave the field blank to use the default AMI for the operating system you chose for this deployment.
Note:
If you deploy on an EC2 instance running Ubuntu in Amazon Web Services GovCloud, you must specify an AMI ID; you cannot leave this field blank.
Specify an Amazon Virtual Private Cloud (VPC) to use for the deployment's virtual network.
If the VPC exists, choose it from the drop-down menu.
To create a VPC, click the Create New VPC button
 . Provide a name for the VPC, use the default range of IP address or specify a range of IP addresses in a Classless Inter-Domain Routing (CIDR) block, and click Create. Each subnet ID will be created in different, randomly selected AWS zones. See the AWS documentation for more information about VPCs and CIDR blocks.
If you create a VPC outside of Cloud Builder, such as in AWS Management Console, while Cloud Builder is open, click the Refresh VPCs button
 to update the VPC ID list.
If you choose an existing VPC, ensure that there are two different subnets in the Subnet1 ID and Subnet2 ID drop-down menus.
Subnet1 ID and Subnet2 ID values should be in different availability zones in the AWS region in which you are creating the deployment.
Specify an Amazon EC2 Key Pair to use for the deployment's virtual network.
If the key pair exists, choose it from the drop-down menu.
To create a key pair, click the Create New Key Pair button
, provide a name for the key pair, and click Create. See the AWS documentation for more information about Amazon EC2 Key Pairs.If you create key pairs outside of Cloud Builder, such as in AWS Management Console, while Cloud Builder is open, click the Refresh Key Pairs button
to update the Key Pair list.
Click Next to proceed to the Configure Elastic Load Balancer (ELB) page.
Configure an elastic load balancer for ArcGIS Enterprise and each federated server (if any) included in the deployment. Repeat these substeps for the portal and each federated server. Remember that elastic load balancers and domain names must be unique per site and Enterprise organization.
Choose or upload the SSL certificate (
.pfx) that is mapped to your domain.If the SSL certificate exists in the Amazon S3 bucket in your account—for example, if you uploaded the certificate when you created another deployment—choose it from the SSL Certificate drop-down list.
If you need to upload the certificate, click the Upload New SSL Cert button
, browse to the location on your local disk where the certificate file resides, provide the password for the .pfxfile, and click Create.
If you chose the certificate from the SSL Certificate drop-down menu, provide the certificate's password in the SSL Certificate Password field.
Choose a load balancer from the Elastic Load Balancer (ELB) list or create an elastic load balancer. If all the load balancers in the list are in use, click the Create New ELB button
, provide a name, and click Create.In the Site Domain field, provide the name of the domain that is specified in your SSL certificate. Click Validate to ensure that you typed the correct domain.
Click Next to proceed to the ArcGIS Credentials page.
Provide a username and password for the initial portal administrator account (which is also the administrator for all federated servers in the deployment). Type the password again in the Re-Enter Password field to ensure that you typed the password correctly.
The username for the portal administrator must contain at least three ASCII alphanumeric characters, must start with a letter, and cannot contain any special characters other than an underscore (_).
The password for the portal administrator must be at least eight alphanumeric characters. The password can also contain dots (.). The password cannot contain any other special characters or spaces.
If the deployment uses EC2 instances running Windows, proceed to the next step to set a password for the service account. If the deployment uses EC2 instances running Ubuntu, proceed to step 21. A password is not needed for Ubuntu instances because they use SSH authentication with a
.pemfile.Provide a password for the Windows account that will be used to run the service accounts for all ArcGIS components. Type the password again in the Re-Enter Password field to ensure that you typed the password correctly.
The service account follows Microsoft Windows password enforcement policies.
The account name is always arcgis.
Click Next to proceed to the ArcGIS Enterprise Configuration Details page.
Provide information for the Amazon EC2 instances to be used in the deployment.
Choose an instance type from the Instance Type drop-down list.
The list contains only those types that are supported for use with ArcGIS Enterprise. However, not all instance types are supported in all AWS regions. See the AWS calculator for information about specifications and pricing for each instance type. If no price is listed for an instance type in the selected region, that instance type is not available.
In the Drive Size Root field, spcify the size you want, in GB, for the root drive on the ArcGIS Enterprise instances.
Choose or upload your Portal for ArcGIS and ArcGIS Server licenses.
If the license files already exist in the Cloud Builder S3 deployment bucket in your account—for example, if you uploaded the files when you created another deployment—choose the license files from the license drop-down lists.
If you need to upload any of the license files to the Cloud Builder S3 deployment bucket, click the Upload button
 , browse to the file on your local disk, and click Upload.
Ensure the licenses are for the same ArcGIS release as the release of Cloud Builder you are using and that the ArcGIS Server license file is for the correct role you need. For the hosting server, you must have an ArcGIS GIS Server license.
From the Configuration Store Type drop-down menu, choose where to store the portal content directory and ArcGIS Server configuration store and shared directories and click Next.
Cloud Store—Choose a cloud store to use AWS storage services for the portal content directory, ArcGIS Server configuration store, and ArcGIS Server shared directories.
File System—Choose a file system to store the content directory, configuration store, and shared directories on an EC2 instance.
Provide a name for the ArcGIS Web Adaptor used with the portal in the Portal Web Adaptor Name field, and Provide a name for the ArcGIS Web Adaptor used with the hosting server in the Server Web Adaptor Name field.
If you included a spatiotemporal big data store in step 7, click Next and proceed to the next step.
If you did not include a spatiotemporal big data store, but you did include federated servers with your deployment, click Next and proceed to step 27.
If you did not include a spatiotemporal big data store or any federated servers with your deployment, click Next and proceed to step 33.
On the ArcGIS Spatiotemporal Big Data Store Configuration Details page, provide EC2 instance and backup information for the spatiotemporal big data store.
Choose an EC2 instance type.
The Instance Type list contains only those instance types supported for a spatiotemporal big data store. For specifications and pricing for each instance type, see the AWS documentation.
Specify a size for the root drive on each instance.
Choose the number of EC2 instances for the spatiotemporal big data store.
The data store must contain an odd number of instances.
Choose one of the following for data store backup location:
File System
Cloud Store
If you choose File System, specify the instance type and the size for the root drive.
Click Next.
If you included federated servers in the deployment, specify configuration details for each federated server site.
The information you provide varies depending on the type of federated server you configure. Provide the information necessary for each federated server in the deployment. There will be a separate page for each federated server type.
Provide information for the Amazon EC2 instances to be used in the site.
Choose an instance type from the Instance Type drop-down list.
The list contains only those types that are supported for use with an ArcGIS Server site, but you must have licensing appropriate for the number of cores present in the type you choose. Also, not all instance types are available in every AWS region. See the AWS documentation for specifications and pricing for each instance type and information about the instance types that are available in each region.
In the Drive Size Root field, specify the size, in GB, for the root drive on the ArcGIS Server instances.
For all federated server types except an ArcGIS GeoEvent Server site, use the Number of ArcGIS Server Instances drop-down menu to choose how many EC2 instances to include in the site.
ArcGIS GeoEvent Server sites on AWS are always a single instance at this time.
Depending on the type of federated server, you may need to choose the EC2 instance type to use for the file server machine for the site's directories.
In the File Server Drive Size Root field, specify the size, in GB, for the root drive on the file server instance.
Choose or upload the license file appropriate for the federated ArcGIS Server role and verify that the license file is for the same ArcGIS release as the release of Cloud Builder you are using.
If the license file already exists in the S3 deployment bucket in your account—for example, if you uploaded the file when you created another deployment—choose the license file from the license drop-down menu.
To upload the license file to the S3 deployment bucket, click the Upload New Server License button
, browse to the file on your local disk, and click Upload.
For all federated ArcGIS GIS Server and ArcGIS Image Server sites, choose the location for the site's configuration store.
Cloud Store—Choose a cloud store to use Amazon DynamoDB and S3 to house the configuration store and shared ArcGIS Server directories.
File System—Choose a file system to house the configuration store on an EC2 instance.
ArcGIS GeoEvent Server, ArcGIS Mission Server, and ArcGIS Notebook Server sites always use a file system for their configuration stores.
In the Server Web Adaptor Name field, provide a name for the ArcGIS Web Adaptor to be used with the ArcGIS Server site.
Click Next to proceed to the deployment summary.
Review the deployment summary.
If any information is incorrect, click Back until you reach the page that contains the information you need to correct; then continue deployment creation.
To automate the creation of future deployments like this one using the ArcGIS Enterprise Cloud Builder Command Line Interface for Amazon Web Services utility, click Download to create a JSON file containing the options for this deployment.
When the summary information is correct, click Create.
Do not close the deployment page or Cloud Builder until creation completes.
Once deployment completes, you can view the deployment logs by clicking the log links. Log files are stored in
location\Logs\Login the directory where you extracted Cloud Builder. Error log files are stored inlocation\Logs\ErrorLog. Click Close to open a list of all your deployments.
When the deployment is created successfully, the deployment status shows Completed, and you can open the portal by clicking the link for the deployment type. Sign in to the portal using the site administrator credentials you provided in step 19 and proceed with configuring your portal.
You can use the webgisdr utility installed with Portal for ArcGIS to create backups of the ArcGIS Enterprise components and federated servers. If a spatiotemporal big data store is included, though, you must run the ArcGIS Data Store backupdatastore utility to create backups of it.