Upgrade ArcGIS Server
ArcGIS Server is provided as a setup program and is run through a utility named Setup.exe.
The ArcGIS Server setup package is capable of upgrading 11.0 and later versions currently installed on your system. You can choose to upgrade interactively using the setup program or to upgrade silently.
Important:
If your ArcGIS Server site is federated with ArcGIS Enterprise, carefully review the information for upgrading ArcGIS Enterprise before upgrading ArcGIS Server.
Caution:
The upgrade process will restart all of your ArcGIS Server services. You should consider your ArcGIS Server site to be offline during the upgrade.
Prepare to upgrade ArcGIS Server
In the process of upgrading, you must reauthorize your software with a new authorization file. You can access your new authorization files in My Esri.
All ArcGIS Enterprise components in your deployment must be the same version, including ArcGIS Web Adaptor.
Do not unfederate any servers when you upgrade your deployment. This adversely impacts your organization, as users will be unable to access, share, or use ArcGIS Server services in the organization.
When upgrading an ArcGIS Server site, ensure adequate space is available in the
/tmpdirectory to store contents for the upgraded site. Determine the size for both the<install dir>/usr/config-storeand<install dir>/usr/directoriesfolder contents to approximate ample space.Beginning with 11.4, ArcGIS GeoAnalytics Server sites are not upgraded. When you upgrade Portal for ArcGIS, the ArcGIS GeoAnalytics Server site will be removed from the GeoAnalytics Server role in the organization, but the site will still be federated. You can license the site for other purposes—such as to act as a federated GIS Server—or if the site is no longer needed, you can unfederate and remove it.
If you back up your ArcGIS Server site before upgrading, you can use the backup if you need to roll back to the previous version. For steps on how to back up your ArcGIS Server site before upgrading, see Back up and restore your ArcGIS Server site configuration.
If your site is in read-only mode, the site mode will be set to editable when you upgrade. After all machines in your site have been successfully upgraded, the site will remain in editable mode. You can switch back to read-only mode once your upgrade is complete.
Before upgrading, clear the cache of all web browsers used to access the ArcGIS Server deployment.
Before you upgrade your ArcGIS Server site, ensure that any databases you use with the site are supported at the upgraded ArcGIS Server release. See the relevant ArcGIS relational database management system requirements topic below for details. Use the Other versions drop-down list to choose the ArcGIS version to which you'll be upgrading.
Before upgrading, check that required ports are open for communication.
Upgrade a multiple-machine site
If you have a multiple-machine ArcGIS Server site, you must upgrade each machine in the site. It's recommended that you upgrade each ArcGIS Server machine sequentially; that is, wait until the first machine is upgraded before continuing the upgrade on the next one. Each ArcGIS Server machine in the site must be at the same version number and be licensed the same.
Upgrade using the setup program
To upgrade using the setup program, complete the following steps for each machine in the ArcGIS Server site:
From the command prompt, launch the ArcGIS Server setup script as the same user that installed the existing earlier version, for example,
<CD ROOT or untar directory>/Setup.You do not need to stop ArcGIS Server before launching this script. See the instructions for installing ArcGIS Server silently for the setup options and sample syntax.
Tip:
To launch the setup script from the ArcGIS Server setup media, click the setup script, and click the Run in Terminal button.
The setup detects your existing earlier version of ArcGIS Server on the target machine and prompts you to continue or exit the upgrade. The following is an example:
=========================================================================
ArcGIS Server <New Version> (Linux)
=========================================================================

Your ArcGIS Server <Previous Version> is installed at:

/home/ags/arcgis/server

Confirm Settings
=========================================================================
Product to upgrade:             ArcGIS Server <Previous Version> (Linux)
Location to upgrade:            /home/ags/arcgis/server

Your ArcGIS Server <Previous Version> will be stopped when performing the upgrade and
ArcGIS Server <New Version> will be started after the upgrade completes.

  'y' to continue with these settings
  'q' to exit without upgrading this product

Enter choice [y,q] (y):
Type y and press Enter to accept the detected settings and continue with the update.
Note:
Wait while ArcGIS Server is upgraded. This may take several minutes.
After installation is complete, reauthorize ArcGIS Server with a new license file.
You can access your new authorization files in My Esri. You can authorize your software later, but you must complete this workflow before moving on to the next step of the upgrade process.
Note:
If you'll be authorizing ArcGIS Server as multiple server roles, you must run the authorization tool once for each licensing role you apply to the machine.
Once authorized, open ArcGIS Server Manager and click Continue Server Upgrade to complete the upgrade on your first machine.
You must use ArcGIS Server Manager on the local machine where you're running the upgrade to complete this step. If a local host is not available, you can access ArcGIS Server Manager through the fully qualified domain name of the server machine on port 6443 (
https://gisserver.example.com:6443/arcgis/manager). You cannot use Continue Server Upgrade in ArcGIS Web Adaptor or a load balancer.If you have a multiple-machine ArcGIS Server site, repeat the steps above on the remaining ArcGIS Server machines in your site. Wait until a machine in your site has finished upgrading before clicking Continue Server Upgrade on another machine in your site.
Caution:
If errors are returned when you use Continue Server Upgrade, you may need to address the errors before you can continue. For example, if you encounter an error about an invalid license, you must reauthorize the software using a valid license. You can retry by clicking Continue Server Upgrade again.
Browse to the location of the setup files and double-click Setup.exe.
During the installation, read the master agreement and accept it, or close the installation window if you do not agree with the terms.
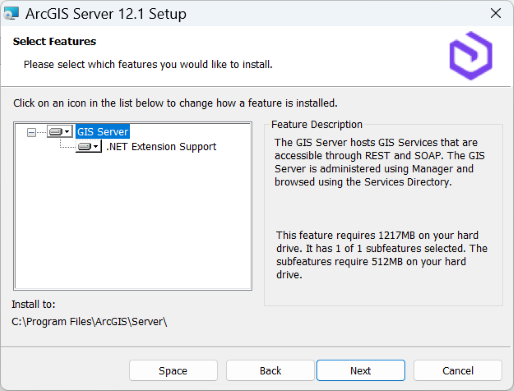
Click Next after confirming the features that will be installed.
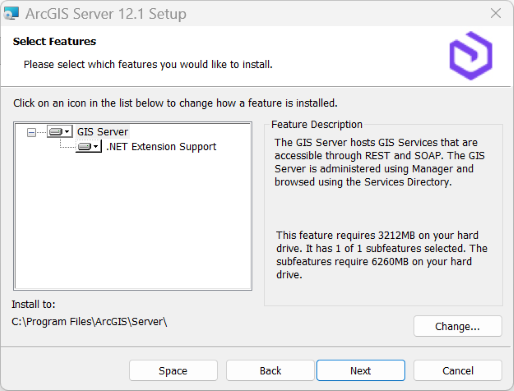
GIS Server—Hosts GIS services that can be accessed through REST and SOAP. It is administered using ArcGIS Server Manager and its services are browsed through the Services Directory. This feature is required, and it includes support for publishing and hosting ArcGIS Pro-based services.
.NET Extension Support—Supports the development and deployment of .NET server object extensions (SOEs) and server object interceptors (SOIs). This feature is optional. The appropriate version of Microsoft .NET is required for the .NET Extension Support feature to be displayed as a feature to be installed.
See the ArcGIS Server system requirements for the currently supported version of Microsoft .NET.
Specify an ArcGIS Server account.
If you select the Specify the account name and password option, enter the password for the ArcGIS Server account used by your existing installation that is prepopulated in the ArcGIS Server Account text box.
Typically, this is the password you provided when installing the software. If the password has changed since you installed the software, for example, by using the
configureserviceaccountutility, you must provide the password you designated when modifying the account.If the password is not validated, an error message appears indicating that the password is invalid. If you are unsure of the password for the ArcGIS Server account, contact your system administrator or reset your password using the
configureserviceaccountutility. For more information, see ArcGIS Server account.If you select the second option, I have a configuration file with the account information generated by a previous run of this setup, enter the same credentials in the server configuration file used by your existing ArcGIS Server site.
If you selected Specify the account name and password and manually entered the ArcGIS Server account information, choose whether to export a server configuration file. If you do not want to export a configuration file, click Next, and accept the default Do not export configuration file option. If you want to export a server configuration file for future installations, select Export configuration file. Browse to a secure folder and provide a name for the configuration file.
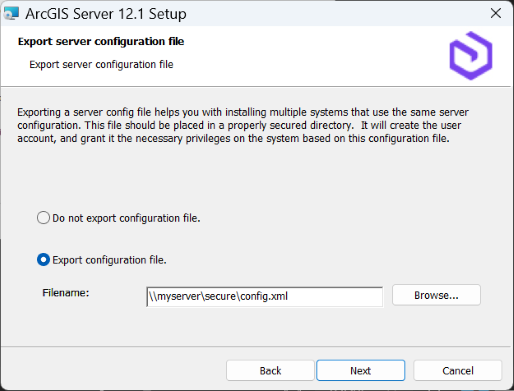
The following are reasons you may want to export a server configuration file:
Create the same ArcGIS Server account when installing on multiple machines.
Store the account for use when upgrading to a newer version.
Perform a silent installation in which the username and password are encrypted.
Caution:
When exporting a server configuration file to a network share, the Local System account on the machine where ArcGIS Server is being installed must have write permissions to the network share. For example, if you're installing ArcGIS Server on a machine named Quick, the Local System account on Quick must have write permission to the network share. If the permissions are not set, the server configuration file may not export successfully. If you're unsure how to correctly set permissions for the network share, contact your system administrator or export the server configuration file locally and copy it to the network share.
Follow the directions on screen to complete the installation.
After installation is complete, in the software authorization wizard, reauthorize ArcGIS Server with a new license file.
You can access your new authorization files in My Esri. You can authorize your software later, but you must complete this workflow before moving on to the next step of the upgrade process.
Note:
If you'll be authorizing ArcGIS Server with multiple server roles, you must run the software authorization wizard again, once for each licensing role you apply to the machine.
When ArcGIS Server Manager automatically starts, click Continue Server Upgrade to complete the upgrade.
You must use ArcGIS Server Manager on the local machine where you're running the upgrade to complete this step. If a local host is not available, you can access ArcGIS Server Manager through the fully qualified domain name of the server machine on port 6443 (
https://gisserver.example.com:6443/arcgis/manager). You cannot continue the upgrade through a web adaptor or load balancer.If you have a multiple-machine ArcGIS Server site, repeat the steps above on the remaining ArcGIS Server machines in your site. Wait until a machine in your site has finished upgrading before clicking Continue Server Upgrade on another machine in your site.
Caution:
If errors are returned when you click Continue Server Upgrade, you may need to address the errors before you can continue. For example, if you encounter an error about an invalid license, you must reauthorize the software using a valid license. You can retry by clicking Continue Server Upgrade again.
Upgrade silently
When silently upgrading using the setup.exe file, you must specify the ArcGIS Server account used by the software. Typically, this is the account you defined when installing the software. If the account has changed since you installed, for example, by using the configureserviceaccount utility, you must provide the username and password you designated when modifying the account.
If you do not specify the ArcGIS Server account, or it does not match the ArcGIS Server account used by your current installation, the installation process displays a message indicating that the credentials could not be validated.
You can determine the ArcGIS Server account by accessing the configureserviceaccount utility from the Start menu on the machine hosting ArcGIS Server. The ArcGIS Server account is listed on the dialog box. If you are unsure of the password for the ArcGIS Server account, contact your system administrator or reset your password using the configureserviceaccount utility. For more information, see ArcGIS Server account.
To upgrade silently, complete the following steps for each machine in the ArcGIS Server site:
From the command prompt, launch the ArcGIS Server setup script as the same user that installed the existing earlier version.
The following example provides the script with arguments required to upgrade ArcGIS Server and authorize it with a provisioning file.
<CD ROOT or untar directory>/Setup -l yes -m silent -f $HOME/license.prvcFor the full explanation of arguments that can be used with the setup script, see How to install ArcGIS Server silently
From the command prompt, launch the ArcGIS Server setup script silently specifying the username and password of the ArcGIS Server account and agreement with the Esri Master Agreement.
In the following example, the ArcGIS Server account used by the software is
myaccountand the password ismypassword.<path to ArcGIS Server setup download folder>\Setup.exe /qb USER_NAME=myaccount PASSWORD=mypassword ACCEPTEULA=yesIf the server site will be authorized for multiple server roles or if you did not provide an authorization file when running the setup script, you must separately authorize ArcGIS Server for each role after the setup completes.
After the installation completes, the software authorization wizard appears, prompting you to reauthorize ArcGIS Server with a new license file. You can access your new authorization files in My Esri. You can authorize your software later, but you must complete this workflow before moving on to the next step of the upgrade process.
Note:
If you'll be authorizing ArcGIS Server with multiple server roles, you must run the software authorization wizard again, once for each licensing role you apply to the machine.
Use the
upgradeservercommand line utility to complete the upgrade and postupgrade operations silently.If you have a multiple-machine ArcGIS Server site, wait until a machine in your site has finished upgrading before running
upgradeserveron another machine in your site.In the command line, browse to your
<Server install directory>/tools/upgradeserverfolderIn the command line, browse to your
<Server install directory>\tools\upgradeserverfolderrun the following command:
upgradeserver.sh -supgradeserver.bat -sFor assistance, run the command with
-hor--help.
You can get more information on the real-time status of the ArcGIS Server post-upgrade operation through the command line utility. Through the command line utility, you can see the following stages during the upgrade process:
Initialize upgrade and check licenses
Upgrade site configurations
Upgrade and start System Utility services
Synchronize local machine with site
Configure Extensions and data providers
Generate SSL Certificate and Enable SSL
Final checks and cleanup
Considerations after upgrading
After the upgrade is finished, you may need to complete the following depending on your ArcGIS Server deployment architecture and organizational needs:
If you configured ArcGIS Web Adaptor to work with your site, you must use an upgraded version of ArcGIS Web Adaptor as well.
Follow the instructions in Install ArcGIS Web Adaptor (Java Platform) on Linux.
Follow the instructions for the type of web adaptor you use
Note:
If you federated an ArcGIS Server site with your portal and you're using ArcGIS Web Adaptor with your site, sign in to the machine hosting the web adaptor and uninstall ArcGIS Web Adaptor. Take note of the web adaptor name; you must use the same name when you reinstall.
If your ArcGIS Server site is federated with ArcGIS Enterprise, upgrade the other ArcGIS Enterprise components.
If you've customized a service with SOEs or SOIs, restart the service after upgrading ArcGIS Server.
You can update passwords and host names in registered and managed database connections used by existing services.
If your ArcGIS Server license has an expiration date, consider updating the licenses in your enterprise geodatabases after upgrading and updating your ArcGIS Server license.
It is recommended that you use the
serverScan.pyscript to check for security best practices with your ArcGIS Server site.