Display airport signs in 2D
 Available with Aviation Airports license.
ArcGIS Aviation Airports includes a custom-built font named Esri Airfield Sign, which enables airfield signs to be displayed in a map in ArcGIS Pro using labels or annotation. The ArcGIS Aviation Airports product data files include an AirportSign feature layer that is preconfigured with symbology and label classes which you can use to display airport sign features as labels.
Labels are useful for configuring the initial desired size and position of airport sign features, but you can also convert labels to feature-linked annotation for more precise and permanent placement of airport signs on a map.
After converting labels to feature-linked annotation, all subsequent airport sign editing is reflected in its feature-linked annotation, and the label classes no longer need to be displayed.
Note:
Annotation is currently only supported in web maps when shared as a cached map image layer or tile layer. When sharing airport sign annotation in a cached map service, keep the following considerations in mind:
- If building the tile cache locally, the Esri Airfield Sign font must be installed with Pro on the local machine.
- If sharing a map image or tile layer on Enterprise and building the cache on the server, the Esri Airfield Sign font must be installed for all users of the ArcGIS Server machine.
Set up the map for the AirportSign layer
To prepare a map for the AirportSign layer, complete the following steps:
Start ArcGIS Pro.
Open or create a project containing aviation data.
In the Contents pane, right-click the map, and click Properties.
The Map Properties window appears.
Click General in the Map Properties window.
Set the Reference scale value for the AirportSign labels, for example, 1:1000.
Click OK.
In the Contents pane, right-click in the map pane, and click Labeling.
Check the Use Maplex Label Engine check box.
Add the airport signs layer file to the map
To use the AirportSign_frontBack_labels.lyrx layer file in the ArcGIS Aviation Airports product files data package to symbolize airport signs, complete the following steps:
Click the Map tab.
In the Layer group, click Add Data.
In the Add Data window, browse to the installation directory for the ArcGIS Aviation Airports product files.
Note:
The default installation directory for this file is
C:\Users\Public\Documents\ArcGIS Aviation Airports\Product Files\<version number>\Layers\AirportSign_frontBack_labels.lyrx.Choose the
AirportSign_frontBack_labels.lyrxfile.Click OK.
The AirportSign feature layer appears in the Contents pane.
Click Repair Broken Data Source next to the AirportSign feature layer in the Contents pane.
The Repair Broken Data Source window appears.
Browse to the AirportSign feature class in your Aviation Airports geodatabase.
Choose the AirportSign feature class.
Click OK.
Set the AirportSign elevation units
To set the AirportSign elevation units, complete the following steps:
Double-click the AirportSign feature layer in the Contents pane to open its layer properties.
Click Elevation in the Layer Properties window.
Click the Elevation units drop-down arrow, and choose an elevation unit for the airport signs.
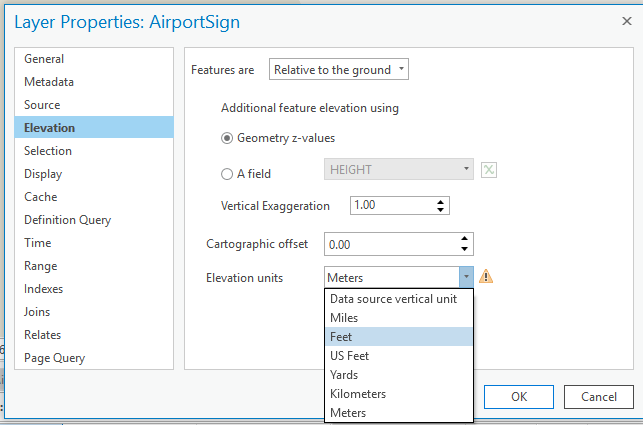
Click OK.