Display airport signs in 3D
 Available with Aviation Airports license.
Airport sign points can be displayed as 3D objects using procedural symbology in a scene in ArcGIS Pro. Procedural rule package files are include in the 3D support folder of the ArcGIS Aviation Airports product files, available on My Esri.
The included RunwaySign18C_Point.rpk file is a procedural marker rule file, which will render the Esri ArcGIS Aviation Airports AirportSign feature class based on the following fields:
AIRPORTSIGNDIRECTIONAIRPORTSIGNHEIGHTVALUEAIRPORTSIGNMSGBACKAIRPORTSIGNMSGFRONTUnits
To render the airport sign in 3D, complete the following steps:
Open a map or scene in ArcGIS Pro containing ArcGIS Aviation Airports data.
- To create a scene, on the Insert tab, click the New Map menu, and choose either New Global Scene
 or New Local Scene
  .
.
Tip:
You can also right-click Maps in the Catalog pane to create a scene in either mode.
- To create a scene, on the Insert tab, click the New Map menu, and choose either New Global Scene
From the Catalog pane, under Databases, browse to your database containing the AirportSign feature class.
Right-click the AirportSign feature class and select Add To Current Map
 .
.Tip:
You can also drag a feature class from your database into a map or scene.
In the Contents pane, right-click the AirportSign layer and click Properties.
Click Elevation.
Click the Features are drop-down arrow, and choose On the ground.
Click OK.
In the Contents pane, click the point symbol under the AirportSign layer.
The Symbology - AirportSign pane appears.
Click the Properties tab.
Click the Layers tab
 , click the drop-down arrow, and choose Procedural marker.
Click Rule..., and browse to the 3DSupport folder in the Aviation Airports product file installation location.
The default location is
C:\Users\Public\Documents\ArcGIS Aviation Airports\Product Files\<version number>\3DSupport.Choose the
RunwaySign18C_Point.rpkfile to load the procedural rules for 3D display.Click Apply.
Optionally, enable rotation on the sign.
Click the Vary symbology by attribute tab
 .
.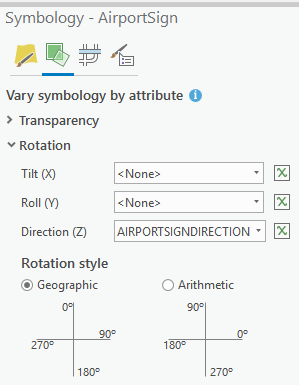
In the Rotation section, click the Direction (Z) drop-down arrow, and choose AIRPORTSIGNDIRECTION.
In the Rotation style section, choose Geographic.
Click Save
 to save the project.
Learn more about editing tools that modify existing features
Explore the scene and allow redraw to cache and render the Airport sign in 3D.