Work with attachments in the Attributes pane
In the Attributes pane ![]() , the Attachments tab includes commands to work with attachments associated with features in a feature class or rows in a stand-alone table. This tab is available when the source geodatabase feature class or table is enabled to store attachments.
, the Attachments tab includes commands to work with attachments associated with features in a feature class or rows in a stand-alone table. This tab is available when the source geodatabase feature class or table is enabled to store attachments.
When working with attachments, consider the following:
To preview the image and view details saved with an existing attachment, hover over the attachment’s title or file name on the Attachments tab.
To use the Attachments dialog box in a table, right-click the feature record and click Manage Attachments
 .
.Note:
The Properties command
 on the Attachments dialog box for editing attachment properties is not available in tables for this release of ArcGIS Pro.
Alternatively, you can use the geoprocessing Attachments toolset.
Add, open, save, update, or remove attachments
To attach a file to a selected feature or record, click the Add command ![]() . The Attachments toolbar includes commands to open, save, update, and remove existing attachments.
. The Attachments toolbar includes commands to open, save, update, and remove existing attachments.
To work with attachments in the Attribute pane, complete the following steps:
On the ribbon, click the Edit tab. In the Selection group, click Attributes
 .
.The Attributes pane opens and the Select tool
 automatically runs.
Select the feature in the map or row in a table.
The selected feature appears in the selection view.
Click the feature in the selection view and click the Attachments tab.
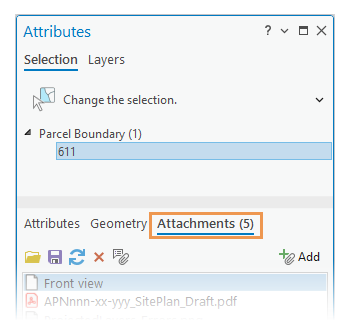
To attach a file to the highlighted feature or record, click the Add command
 on the toolbar, select the file in the Select Attachment file browser, and click Open.
Press Ctrl or Shift to select and add multiple files.
Note:
If the data source attachment table is upgraded to include EXIF and alternative text fields, the Attachment Properties view opens in the pane. Click Add.
The file is copied to the attachment table associated with the feature or record and appears on the Attachments tab.
To open, save, update, or remove an existing attachment, click the attachment, and click one of the following commands on the toolbar:
Command Action Open attachment 
Open the file with the associated application installed on your device. Save attachment 
Save a copy of the attached file to a selected folder. Browse to the folder on your file system and click Save. Update attachment 
Replace the existing attachment with a different file. Browse to the file on your file system and click Open. Remove attachment 
Remove the attachment from the feature or table record. Confirmation is required when the Show dialog to confirm deleting data application editing option is enabled.
View, add, or modify attachment properties
To view, add, or modify information stored with a highlighted attachment, such as searchable keywords or alternative text, click the Properties command ![]() on the Attachments toolbar.
on the Attachments toolbar.
Note:
This command is available only if attachments for the source feature class or table are upgraded to include EXIF and Alternative (Alt) Text attribute fields.
To view or edit attachment properties, complete the following steps:
On the ribbon, click the Edit tab. In the Selection group, click Attributes
.The Attributes pane opens and the Select tool
automatically runs.Select the feature in the map or row in a table.
The selected feature appears in the selection view.
Click the feature in the selection view and click the Attachments tab.
Click the attachment in the attachment view, and click the Properties command
on the toolbar.The Attachment Properties form view opens in the pane and includes the toolbar.
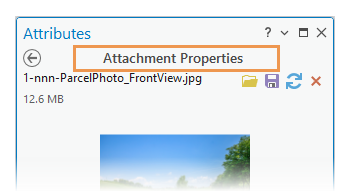
Edit one or more of the following properties:
Text box Usage Title An alternative title displayed on the Attachments tab. If this is blank, the file name is displayed. Alternative Text Used to provide information and give context to an attachment when it can’t be viewed. Caption Used to communicate the purpose of an attachment. Credit or Attribution Used to acknowledge the creator of an image or the terms under which an attachment may be used. Tags Specific keywords used to enhance searchability. EXIF Information that is embedded automatically by devices such as digital cameras and is not editable in this pane. To copy EXIF data to the clipboard, click the Copy command  that appears next to the EXIF heading. If an image doesn’t contain EXIF data, the headings aren’t displayed.
Click Apply or Cancel.
To return to the Attachments tab, click the Back button
 .
.