Change the length of a line sketch
The Change Length command ![]() changes the total length of a sketched line. It is available on the context menu when you right-click a sketched segment edge while creating, continuing, or editing the vertices of a line feature.
changes the total length of a sketched line. It is available on the context menu when you right-click a sketched segment edge while creating, continuing, or editing the vertices of a line feature.
For steps to use the Change Line Length tool ![]() to edit to one or more finished line features, see Change the length of a line feature.
to edit to one or more finished line features, see Change the length of a line feature.
When you use this command, consider the following:
To specify the total length of a sketched line and preserve the current location of the first vertex, enter a positive value. To preserve the last vertex, enter a negative value that is greater than the current total length of the sketch.
To specify the length to be trimmed, enter a negative value that is less than the current total length. This method preserves the location of the first vertex.
Changing the length of a z-aware line sketch preserves the angular pitch of its segments and assigns an interpolated z-value to the moved vertex.
Note:
This tool is COGO-aware. Entered values for COGO lines are scaled using ground to grid correction settings for the active map. Alternatively, you can set this tool to proportionately scale COGO line geometry using the COGO Distance (lines) or Arclength (circular arcs) field values.
To change the length of a line sketch using the Continue Feature tool ![]() or the Edit Vertices tool
or the Edit Vertices tool ![]() , complete the following steps:
, complete the following steps:
Open the map containing the features to be edited or Add the layer to the map.
Tip:
Before editing, confirm the layers you are editing are editable, snap settings add efficiency and accuracy to your workflow, and the coordinate system assigned to the active map is suitable for the type of edits you're performing.
For a basic checklist of settings, see Configure settings for editing.
On the ribbon Edit tab, click Modify
 in the Features group.
The Modify Features pane appears.
Click the Continue Feature tool
 or Edit Vertices tool
  .
.To find these tools, expand Reshape, or type Cont or Vertices, respectively, in the Search text box.
Note:
If map topology is enabled, and you are using the Edit Vertices tool
, click the Features tab.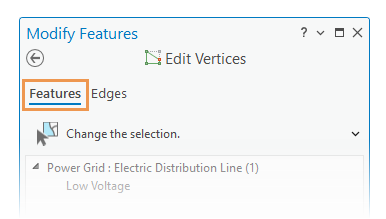
The Features and Edges tabs appear only when a topology is enabled so that you can switch between editing feature vertices or topological edges and nodes.
The tool opens and the Select a feature tool
 automatically runs.
Select the feature you are continuing or editing.
The selected feature appears highlighted in the map with vertex handles. By default, project settings symbolize the first vertex green and the last vertex red.
If you select more than one feature, reselect the feature. Alternatively, click the feature in the pane selection view to flash it in the map, right-click the feature, and click Only Select This
 .
.Hover over a segment until the pointer changes to the segment cursor
 .
.Right-click the segment and click Change Length
 .
.The Change Length dialog box lists the current geometric length and the COGO length stored with the feature, if it exists.
Click the Change Length box, type the line length, choose the units, and press Enter.
Length values modify feature geometry as described in the following table:
Typed line length
Description
Positive values
The total length of the feature is set to the typed length. The last vertex moves, and the location of the first vertex remains unchanged.
Negative values greater than the current total length
The total length of the feature is set to the typed length. The first vertex moves, and the location of the last vertex remains unchanged.
Negative values less than the current total length
The typed length is subtracted from the total length of the feature. The last vertex moves, and the location of the first vertex remains unchanged.
To finish your edits, click Finish
 on the construction toolbar, or press the F2 key.