Configure route ID padding and lookup table settings
![]() Available with Location Referencing license.
Available with Location Referencing license.
When creating and modifying an LRS Network, you can add padding and allow null values for each field that makes up a multifield (concatenated) route ID. Use this workflow when external business systems need to adhere to a specific route ID definition.
Additionally, a lookup table of key values can be configured for any fields that make up a multifield route ID.
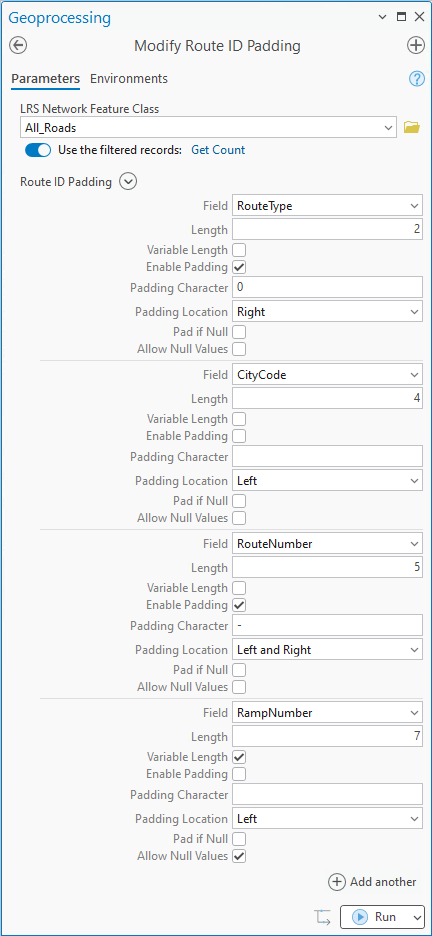
In the image example below, a multifield route ID is configured with four fields: RouteType, CityCode, RouteNumber, and RampNumber. Sample padding, null settings, and lookup table for the four fields are as follows:
RouteTypeis a text field with a length of 2 and has a coded value domain configured. The maximum number of characters in the domain values is two. However, some routes may only have a domain value with one character, and a zero (0) is used as a padding character to the right.CityCodeis a text field with a length of 4 and has a lookup table configured to allow searching for the key value using a display field. Since all theCityCodevalues have a length of 4 in the lookup table, no padding is needed for this field.RouteNumberis a short field type. This field has values ranging from 0 to 99999. A hyphen is used as a padding character to the left and right.RampNumberis a text field with a length of 7. Some routes do not have all the 7 characters entered for this field, while others do not have a value for this field and must be left blank; therefore, no padding is needed.

Configure route ID padding and null settings
Each field that makes up a multifield route ID supports the following:
Can have the maximum length shortened
Can be of variable or fixed length
Can have padding characters added to the left, right, or both left and right sides
Can have padding added when the field has a null value
Tip:
These settings affect route loading and route editing.
To configure route ID padding and null settings, complete the following steps:
Note:
The following steps pertain to the image example above.
In ArcGIS Pro, open the Modify Route ID Padding tool.
Click the LRS Network Feature Class drop-down arrow and choose an LRS Network feature class with fields that need to be modified.
The tool automatically populates the Route ID Padding parameter with the fields that make up the route ID.
For each field, determine the maximum number of characters any route in your LRS Network will use and set the Length value to at least that number.
The default Length value is the length of the field in the geodatabase. The Length value can be set to any number between 1 and the default value.
For this example, the default Length value is used for all fields.
Note:
Changing the Length value only affects the maximum number of characters expected by Roads and Highways tools for each field. The sum of the lengths of the fields that make up the multifield route ID must not exceed the length of the route ID field in the geodatabase.
Specify whether the Length value is a variable or fixed value by checking or unchecking the Variable Length check box.
If you will always populate the field with the exact number of characters specified in the Length text box in step 3, keep the Variable Length check box unchecked. This ensures that the number of characters in the Length text box is fixed for routes that will be loaded or created.
If the field will have a variable number of characters, check the Variable Length check box. This allows for the number of characters in the field to range from 1 to the number specified in the Length text box in step 3 for routes that will be loaded or created.
For this example, the
RampNumberfield is configured with variable length.Optionally, check the Enable Padding check box to enable padding for the field.
For this example, padding is enabled for the
RouteTypeandRouteNumberfields.Optionally, specify a padding character in the Padding Character text box.
The default padding character is a space, but it can be a number or another character. A number sign (#) is not supported as a padding character.
If padding is enabled, click the Padding Location drop-down arrow and choose an option for the field.
Padding can be added to the left, right, or left and right of the value in the field.
For this example,
RouteTypehas a zero (0) as the padding character to the right, andRouteNumberhas a hyphen as the padding character to the left and right.Optionally, check the Pad if Null check box to add padding characters when the field has a null value.
A null value can be used in one or more fields that make up a multifield route ID.
For this example, this check box remains unchecked for all fields.
Optionally, check the Allow Null Values check box to allow null values in the field.
For this example, null values are allowed for the
RampNumberfield.Note:
The Allow Null Values check box must be checked if the Pad if Null check box is checked.
If you allow null values in a field, all fields to the right of that field must also allow null values. However, if you also check the Pad If Null check box, fields to the right do not need to allow null values.
Click Run to run the tool.
Route ID padding and null settings are configured.
Configure a lookup table
You can configure a lookup table for one or more fields that make up a multifield route ID.
Use a lookup table as an alternative to coded value domains when a field that makes up a multifield route ID has several hundred or thousands of potential values—for example, a list of street names or a Geographic Names Information System (GNIS) code.
Tip:
The lookup table is used primarily during route creation.
To configure a lookup table, complete the following steps:
Note:
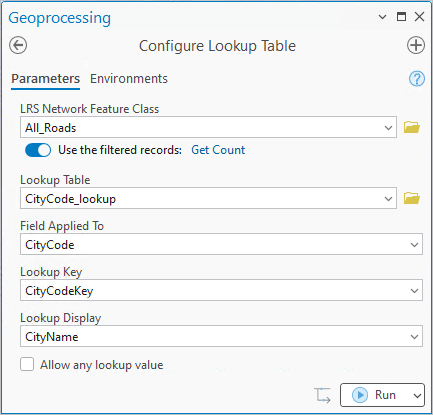
The following steps pertain to the CityCode field in the image example above.
In ArcGIS Pro, open the Configure Lookup Table tool.
Click the LRS Network Feature Class drop-down arrow and choose an LRS Network feature class.
Click the Lookup Table drop-down arrow and choose a table.
Note:
If the table is in an enterprise geodatabase, it must be nonversioned.
Click the Field Applied To drop-down arrow and choose a route ID field in the LRS Network that the lookup table is configured for. Only fields that make up the multifield route ID appear in the drop-down options.
For this example, the lookup table is configured for the
CityCodefield.Click the Lookup Key drop-down arrow and choose a key field in the lookup table.
Note:
- The Lookup Key drop-down options only include the fields from the lookup table that have the same field type and a length less than or equal to the field specified in the Field Applied To parameter.
Optionally, click the Lookup Display drop-down arrow and choose a field that contains the descriptions of the lookup keys.
Tip:
When creating a route using the Create Route tool, the lookup display value appears in a text box next to the corresponding field under the Route ID Attributes section.
For this example, both lookup key and lookup display fields are configured.
Note:
The Lookup Display parameter is required if the Allow any lookup value check box is unchecked.
The lookup key and lookup display fields can be the same or different fields in the lookup table.
Optionally, check the Allow any lookup value check box to allow a value that is not in the lookup table to be added when creating a route.
For this example, this check box remains unchecked.
Note:
The Lookup Display parameter is not available if the Allow any lookup value check box is checked.
Click Run to run the tool.
Note:
Repeat the steps above if you need to configure lookup tables for multiple fields in the LRS Network.
The lookup table is configured.