360 Video To Oriented Imagery (Indoors Tools)
Summary
Extracts 360-degree images from 360-degree video into an oriented imagery dataset. The output of this tool can be added to floor-aware maps and scenes in ArcGIS Pro.
Usage
This tool supports 360-degree MP4 video captured by a 360-degree camera. The video must use an equirectangular representation.
This tool works with both normal-speed and time-compressed 360-degree video. Use one of the following Video Capture Type parameter options to specify how the video was recorded:
Real-time—The video plays at normal speed (no time-compression).
Speed (Multiple)—The video was recorded faster than real-time, expressed as a multiple. For example, a "2x speed" video makes movement look twice as fast as normal.
Interval (Seconds)—The camera captured a single frame every set number of seconds, instead of continuous video. For example, a "0.5-second interval" means the camera captured one frame every half-second.
Note:
Some cameras will record at a low frame rate (FPS) instead of an interval. To convert FPS to an interval in seconds, divide 1 by the FPS. For example, 2 FPS -> 0.5-second interval.
After specifying a Video Capture Type parameter value, use the Video Capture Rate parameter to specify the speed or interval, for example:
For a video captured at 5x speed, set the Video Capture Type parameter to Speed (Multiple) and the Video Capture Rate parameter to 5.
For a video captured at half-second intervals, set the Video Capture Type parameter to Interval (Seconds) and the Video Capture Rate parameter to 0.5.
Note:
If you don't know the amount of time compression, you can make an informed estimate by watching the video and observing how sped up it looks. Even a rough guess will usually produce usable results.
The Target Oriented Imagery parameter value must be a z-enabled oriented imagery layer.
Note:
Create an oriented imagery dataset using the Create Oriented Imagery Dataset tool.
The target oriented imagery layer can be from a local oriented imagery dataset or a hosted feature service. When importing photos to a hosted feature service, the feature service must support feature attachments.
Georeference the output features using the Control Point 1 and Control Point 2 parameters. Set the parameter values as follows:
Video Time—Specify a video playback timestamp to determine camera location in hh:mm:ss.s format.
Use timestamps that are at least 5 seconds from the start or end of the video, and at least 5 seconds between control points.
Note:
The tool checks the timestamps using real time equivalents. For example, for a 2x speed video, use timestamps that are at least 2.5 seconds (5 seconds in real time) from the start or end of the video, and at least 2.5 seconds between control points.
Camera Location—Place a point on the map that reflects where the camera was positioned at the specified timestamp.
Camera locations must be at least 1 meter apart.
Tip:
Use control points with the most possible distance between them to increase accuracy when georeferencing.
Use the following video extraction parameters to specify how images will be automatically extracted along the video path:
- Extraction Interval—The amount of time between output images. The default is 2 seconds, which is approximately 9 feet (3 meters) of movement at an average walking pace.
Note:
The tool measures the time between output images in real time. Use the same value for a time-compressed video as you would for a real-time video.
Start Timestamp—The timestamp to begin extracting images from the video in hh:mm:ss.s format. For example, use a value of 00:15:10 to begin extraction at 15 minutes, 10 seconds into the video. The default is the beginning of the video.
End Timestamp—The timestamp to stop extracting images from the video in hh:mm:ss.s format. For example, use a value of 01:10:00 to end extraction at 1 hour, 10 minutes into the video. The default is the end of the video.
Note:
The actual start time, end time, and time between extracted images may vary depending on the input video quality.
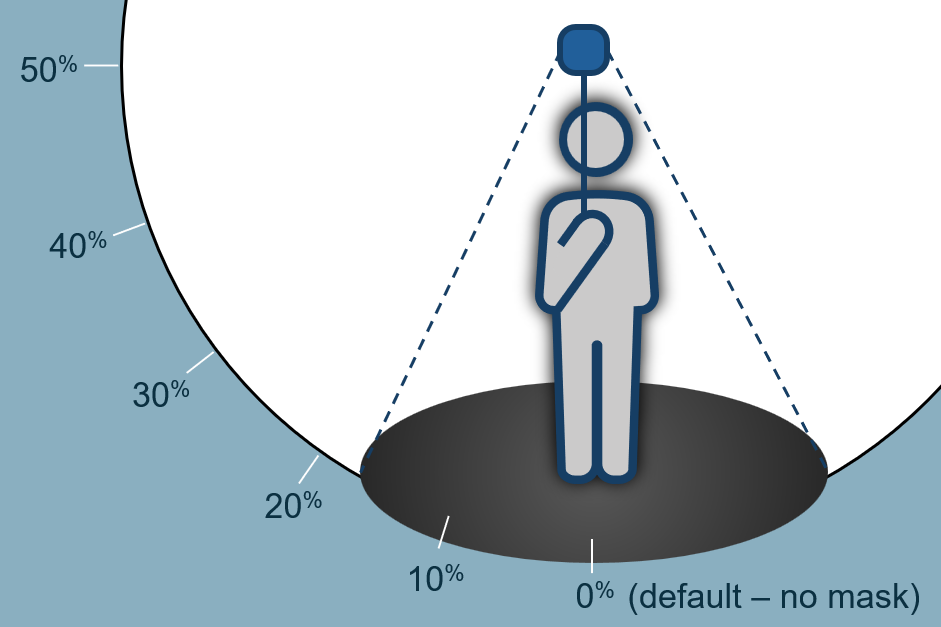
Mask Lower Portion—The percentage of the bottom of the output images to mask or black out. This removes the camera operator from the output images. The default is 0 percent, for no mask, and the maximum is 50 percent, to mask the entire lower hemisphere.
This tool uses visual simultaneous localization and mapping (VSLAM) to determine the relative positions and orientations of the extracted images. The VSLAM accuracy depends on factors including motion blur, the number of trackable locations (edges, corners, textures) in the environment, camera movement speed, and the amount of time-compression used when recording the video.
Note:
When supported hardware is detected, this tool uses GPU acceleration to improve performance; otherwise, it runs on the CPU with the same output quality
Use the Input Level Features parameter if your input video overlaps a level in an Indoors model. This will allow the tool to populate level ID values in the target oriented imagery layer so that it can be configured as floor aware.
If control points are not specified, output features are moved and scaled to the extent and elevation of the selected Levels feature. All output features are assigned the level ID value of the selected Levels feature.
With control points specified, output features are georeferenced (moved, rotated, and scaled) based on the control points. Georeferenced features that are within the selected Levels feature are assigned that level's ID and elevation; features outside the level are assigned an ID of Null and an elevation of 0.
Use the Level parameter to choose the specific level within the Input Level Features parameter value. Only one level can be specified.
Use the Floor Field parameter to create or specify an existing field in the target oriented imagery layer to store level ID values. The tool will set the field in the following ways:
You can provide a custom field name. The tool will create a field with this name in the target oriented imagery layer if one does not exist and populate it with the level ID values of the overlapping level feature.
If the target oriented imagery layer is configured as floor aware, this parameter is automatically populated with the layer’s configured floor field.
If the target oriented imagery layer is not configured as floor aware or no value is provided, the tool will create a field named
LEVEL_IDif one does not exist and populate it with level ID values of the overlapping level feature.
Parameters
| Label | Explanation | Data type |
|---|---|---|
|
Input 360 Video |
The input |
File |
|
Target Oriented Imagery |
The target oriented imagery layer to which features will be added. |
Oriented Imagery Layer |
|
Target Image Folder |
The existing folder where the imagery files will be written. |
Folder |
|
Control Point 1 (Optional) |
The first control point that will be used to georeference the output features. Value table columns:
|
Value Table |
|
Control Point 2 (Optional) |
The second control point that will be used to georeference the output features. Value table columns:
|
Value Table |
|
Input Level Features (Optional) |
The input Levels layer from the Indoors model. |
Feature Layer |
|
Level (Optional) |
The level in the Input Level Features parameter value that represents where some or all of the video was captured. The tool assigns the |
String |
|
Floor Field (Optional) |
The field in the Target Oriented Imagery parameter value that will be populated with the associated level ID from the Level parameter. The tool will set the floor field in the following ways:
|
Field |
|
Extraction Interval (Optional) |
The interval at which images will be extracted from the input video. You can select an interval unit of Milliseconds, Seconds, or Minutes. The default is 2 seconds, and the minimum is 0.2 seconds (200 milliseconds). |
Time Unit |
|
Start Timestamp (Optional) |
A starting point in the video to begin extracting images. Accepted input is in hh:mm:ss.s format. |
String |
|
End Timestamp (Optional) |
An ending point in the video to finish extracting images. Accepted input is in hh:mm:ss.s format. |
String |
|
Video Capture Type (Optional) |
Specifies the type of video that was captured. This parameter is used when processing time-compressed video.
|
String |
|
Video Capture Rate (Optional) |
The rate at which the video was recorded. The default value is 1. This parameter is ignored when the Video Capture Type parameter is set to Real-time. When the Video Capture Type parameter is set to Speed, specify the speed multiplier. For example, if the video was captured at 5x speed, specify a value of 5. When the Video Capture Type parameter is set to Interval, specify the number of seconds. For example, if the video was captured at 0.5 second intervals between frames, specify a value of 0.5. |
|
|
Mask Lower Portion (Optional) |
A percentage of the output image to mask, starting from the bottom of the image. The value must be between 0, for no mask, and 50, to mask the entire lower hemisphere. |
Double |
Derived output
| Label | Explanation | Data type |
|---|---|---|
|
Updated Oriented Imagery |
The updated oriented imagery dataset. Existing oriented imagery data will be retained during the import. A new point feature will be appended for each image in the input data, with the associated image added as an attachment. Attributes will be set on new point features based on attributes of the input image file. |
Oriented Imagery Layer |
|
Updated Imagery Folder |
The updated folder where the imagery files will be written. |
Folder |
Environments
This tool does not use any geoprocessing environments.
Licensing information
- Basic: No
- Standard: No
- Advanced: Requires ArcGIS Indoors Pro or ArcGIS Indoors Maps