Create a feed
This lesson demonstrates how to create a feed type in ArcGIS Velocity. Feeds allow you to collect and visualize real-time data. Feeds typically connect to external sources of observational data such as Internet of Things (IoT) platforms, message brokers, or third-party APIs.
In this lesson, you will work with Marine Cadastre Automatic Identification System (AIS) data and create a feed to simulate historical AIS data (ship position observations) from a file. The configuration wizard you use in this lesson is used in Velocity whenever you create feeds or output layers. Feeds typically connect to external sources of observational data, such as Internet of Things (IoT) platforms, message brokers, or third-party APIs.
This lesson is designed for beginners. You must use an ArcGIS Enterprise user account with Velocity installed. The estimated time to complete this lesson is 30 minutes.
Create an HTTP Simulator feed
To create an HTTP Simulator feed type using the feed configuration wizard, complete the following steps:
On either the Home page or the Feeds page, click Create feed.
The Select a feed type window appears, displaying several categories for the types of feeds available in Velocity.
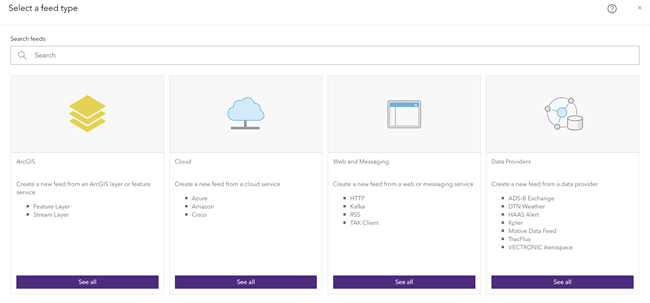
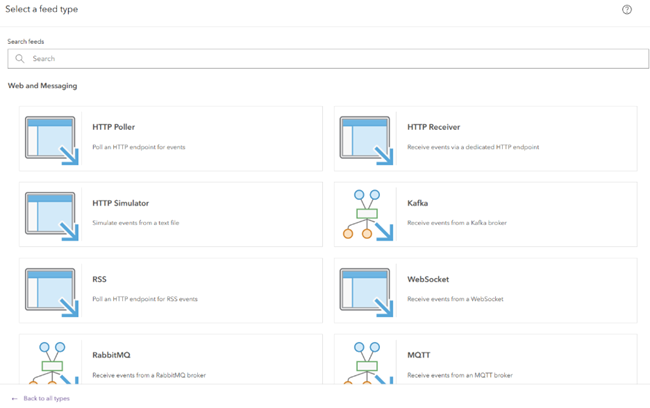
Under Web and Messaging, click See all to access the feed types for web and messaging.
Click HTTP to expand the HTTP related feed types.
Click HTTP Simulator to choose this feed type.
Alternatively, you can type simulator in the Search text box to search for the feed.
Configure the HTTP Simulator feed
The first step in configuring a new feed is typically to define the connection parameters to the data. This can include defining a connection to a server with authentication credentials or browsing to a feature layer in ArcGIS Enterprise.
For HTTP Simulator feeds, you connect to a simulation file available at a URL.
To configure the feed, complete the following steps:
For the Configure Simulation step, configure the connection parameters as follows:
For URL, type
https://a4iot-public.s3-us-west-2.amazonaws.com/simulations/AIS_MarineCadastre_SelectedVessels.csv.For Field separator (optional), accept the default comma (,), since the file you are connecting to is comma delimited.
For Features per execution (optional), type 30.
This simulation file contains a set of observations for 30 ships that are in time stamp order. By setting this parameter to 30, the data is extracted 30 rows at a time, meaning there is a new observation for every unique ship in the dataset.
For Interval for sending events (milliseconds) (optional), accept the default of 1000.
This parameter controls the rate at which the specified number of rows is simulated. In this case, you simulate 30 observations (one for each ship) every 1000 milliseconds (or one second).
For Repeat simulation, leave the check box checked.
When checked, the HTTP Simulator feed loops the data when the end of the simulation file is reached.
For Time field index, type 1.
This parameter sets the numerical index of the date field in the dataset in which the index starts at zero. For this dataset, the time stamp is in the second field, indicating that the index is one.
For Convert to current time, leave the check box checked.
When checked, the time values in the data are converted to the current time as it is simulated. This allows apps to treat the data as real-time data.
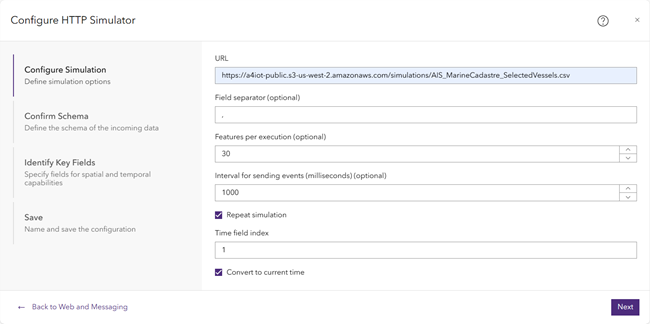
Click Next.
Velocity tests the connection to the data source and attempts to sample the data. If the connection is successful, it then attempts to derive the schema of the data, which you will explore next.
Confirm the data schema
When configuring a feed, it is important to define the schema of the data being received. Velocity defines the schema when it samples the data including estimating the data format, field delimiter, field type, and field name parameters.
To confirm the data schema, complete the following steps:
For the Confirm Schema step, ensure that the schema is returned.
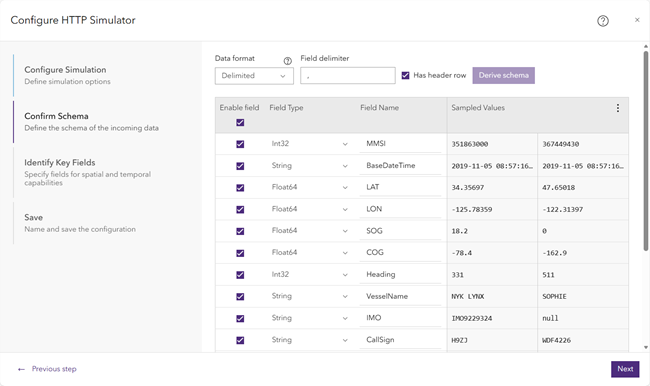
Review the field types returned from the sampled data in the Field Type column.
For delimited data, Velocity identifies the field type based on the sampled data. It is important to review the field types and ensure that they are correct. For example, if a field is identified as a number but you know the values in the field represent coded values, it is a best practice to change the field type to a string. In this lesson, you accept the default field types that were returned.
Review the field names returned from the sampled data in the Field Name column.
Velocity identifies the field names based on the sampled data. Field names are populated for delimited data when a header row is present. You can rename fields now and uncheck any unnecessary fields. In this lesson, you accept the default field names that were returned.
Review the values returned from the sampled data in the Sampled Values column.
The sampled values displayed represent the actual data in the file, allowing you to ensure that the field types and names are correct for the actual data.
Click Next to confirm the schema of the data without making changes.
Identify the key fields
To set parameters so that Velocity can properly construct geometry, date and time information, and a assign a unique identifier for each ship, complete the following steps:
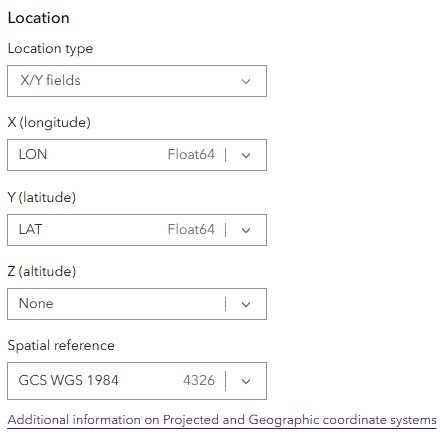
For the Identify Key Fields step, start by setting the Location parameters as follows:
For Location type, choose X/Y fields.
For X (longitude), choose LON.
For Y (latitude), choose LAT.
For Z (altitude), choose None.
For Spatial reference, choose GCS WGS 1984.
Next, set the Date and time parameters as follows:
For Does your data have date fields?, choose Yes.
For Start time (optional), choose BaseDateTime.
For End time (optional), choose None.
This parameter defines the end time for data when time is represented as intervals. For this lesson, the ship observations have a single time stamp.
For Date format, choose Other (string).
For Date Formatting String, type yyyy-MM-dd HH:mm:ss.S.
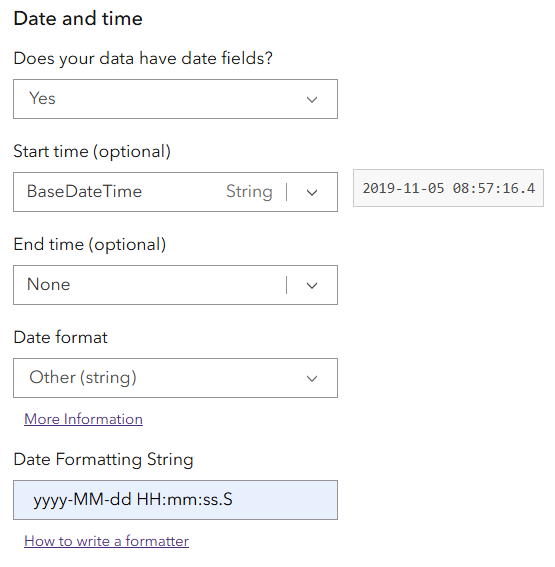
The date and time parameters enable Velocity to construct dates from the string values provided in the BaseDateTime field.
For the Track ID option, under the Tracking parameter, choose MMSI.
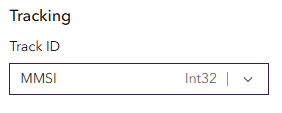
A track ID is a unique identifier for an observation or feature in the data. It allows you to identify multiple records or events in the feed as being associated with a particular feature. In the AIS data feed used in this lesson, the unique identifier is the Maritime Mobile Service Identity (MMSI), which is unique to each ship.
Click Next to confirm the key fields.
Save the feed
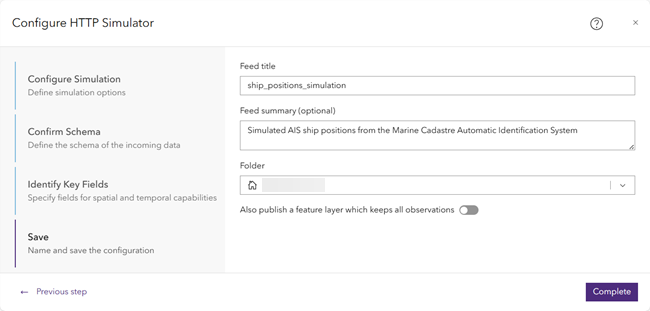
With the parameters of the feed defined, to save the new feed to Velocity, complete the following steps:
For the Save step, type ship_positions_simulation for the Feed title parameter.
Note:
Feed names must be unique across an ArcGIS organization. In Velocity, the feed name must be different from the feature layer and stream layer output names. If there is a duplicate name, you cannot create a real-time analytic in Velocity.
For Feed summary (optional), type Simulated AIS ship positions from the Marine Cadastre Automatic Identification System.
For Folder, set it to your user folder.
Leave Also publish a feature layer which keeps all observations unchecked.
Click Complete to create the new feed.
If this is the first time you've created a feed in Velocity, a sign-in screen appears to verify your credentials. Provide your Portal credentials and click Sign In. This verification is required and enables Velocity to maintain long-running tasks. This is the only time when you must sign in twice.
Review feed details
Once the feed is created, the feed Details page is available. You can review the details of the feed you just created as well as edit, clone, share, delete, view the data in a map, and so on.
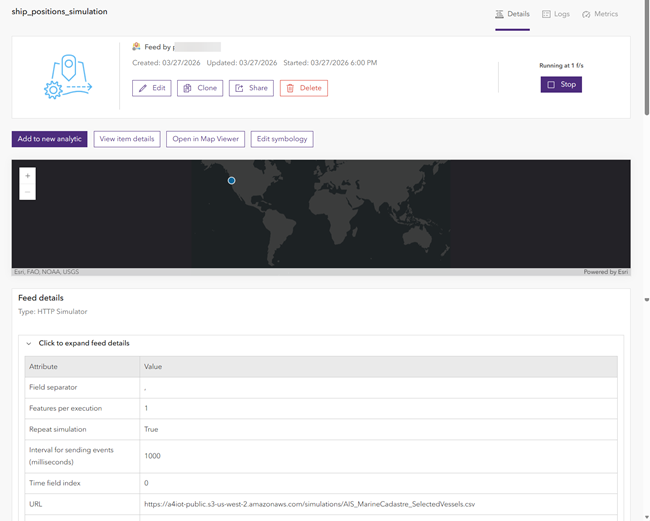
The feed starts automatically and the status button changes to Stop, indicating that the feed is started and running. If the feed does not start automatically, click Start. Once the Start button changes to Stop, the feed is running.
To access the new feed item details in your ArcGIS organization, click View item details. You can add more metadata or information to the item as necessary.
To view the data in a web map, click Open in Map Viewer; the layer is added to a new map.

Explore options for managing feeds
Familiarize yourself with options for managing feeds by completing these steps:
On the Home page, click the Feeds tab to open the Feeds page.
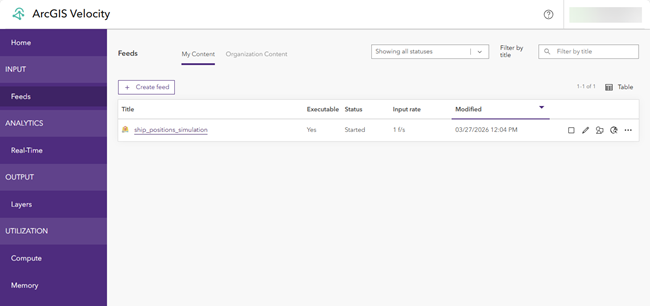
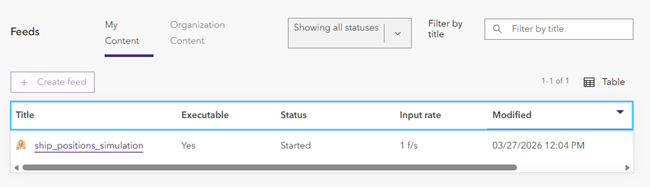
The Feeds page displays a list and status of any configured feeds. You can view the feeds you have created under the My Content page.
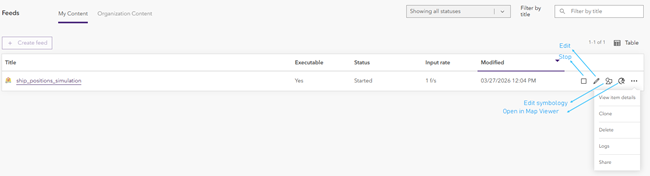
Options for working with existing feeds, include the following:
- Sorting the feed list by title, executable status, running status, input rate, and modified date.
Starting or stopping a feed.
Editing a feed.
Editing the symbology of the output features.
Opening a feed in map viewer.
Accessing additional actions including viewing item details, cloning (copying), deleting, viewing logs, and sharing a feed.
The Feeds page displays an updated list of your configured feeds with their status and key details.
Next steps
You have successfully created a feed in Velocity and are now collecting and visualizing real-time AIS data on a web map. In the next lesson, Design a real-time analytic, you perform real-time analysis on the AIS data.