Configure step contents
The Contents pane lists elements in the currently active view, for example, map layers and tables.
The contents for the active view can be configured on the Contents tab in the Task Designer pane for a task step. The step must be selected in the Tasks pane for the Contents tab to be available in the Task Designer pane. A view must be active on the Views tab for its contents to be available on the Contents tab.
A task step can set the visibility, selectability, editing state, labeling, and snapping of layers in the active map view. For stand-alone tables, a step can set the editing state of the table. A step can also select a layer or table in the Contents pane.
After a task has completed, map contents can be set back to the states they were in before the task was run. In the Task Designer pane for the task, choose Restore map views and contents to their initial states.
To configure the contents for a step, do the following:
Create or record the step.
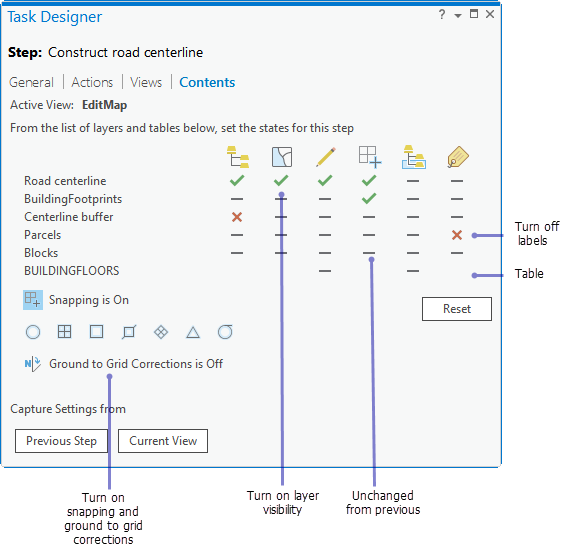
With the step selected and the Task Designer pane open, click the Contents tab.
For each layer or table, click under the icons for Visible
 , Selectable
  , Editable
  , and Snappable
  to change the states of the layer. Alternatively, press the V key to change visibility, the S key to change selectability, the E key to change editability, and the N key to change snapping.
Click to turn the visibility, selectability, editing state, and snapping of the layer or table on
 .
.Click to turn the visibility, selectability, editing state, and snapping off
 .
.Click to keep the visibility, selectability, editing state, and snapping unchanged
 . The layer or table state remains the same as it was for the previous step or before the task started.
Tip:
Click Apply to View to see the chosen layer or table states reflected in the Contents pane and in the active map view.
Click under the Select Layer or Table icon to change whether or not a layer is selected in the Contents pane.
You can also press the H key to change layer selection.
Click under the Labels icon
 to turn the labels of a layer or table on or off.
You can also press the L key to change labeling.
Turn on or off Snapping
in the active view for the step.Enabled snap modes appear shaded.
Turn on or off Ground to Grid Corrections in the active view for the step.
If turning ground to grid corrections on, specify a value for Direction Offset and Distance Factor.
Instead of switching layer and table states, click Current View to match the current layer and table states of the active view. Similarly, click Previous Step to match the states and snap modes of the previous step.
Click Reset to set all layer and table states to Performs no action ![]() and to turn off snapping.
and to turn off snapping.
Configure a step to modify a feature
In this example, a task step configures step contents in preparation for the user to create a right-of-way (ROW) centerline. The steps in the in the Task Designer pane are as follows:
On the Actions tab, load the Modify Features command
 , which opens the Modify Features pane.
On the Views tab, set the map view that contains the right-of-way feature layer to Active.
On the Contents tab, switch the state of the right-of-way feature layer to Visible
, Selectable , Editable , and Snappable .Turn on Snapping
and set the snapping modes that will be used on the Contents tab.
Configure a step to open an attribute table
In another example, a task step configures step contents to open an attribute table for a layer or stand-alone table. The steps in the in the Task Designer pane are as follows:
On the Actions tab, load the Attribute Table command.
Click the Record button
 on the command action bar.
Right-click a layer or a stand-alone table in the Contents pane.
Click Attribute Table to load the command.
On the Views tab, set the map view that contains the layer or stand-alone table to Active.
On the Contents tab, set the state of the layer or stand-alone table to Visible
and Editable . Turn on the selected state of the layer or stand-alone table (select the layer or table in the Contents pane).