Create natural boundaries
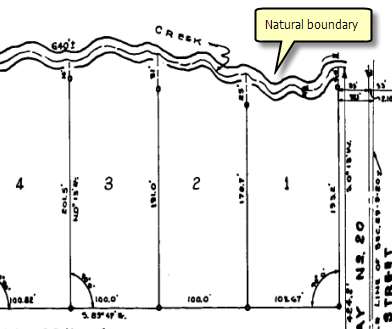
Parcel boundaries may follow natural features such as rivers, coastlines or lakes. In these cases, parcel lines are created as single, multisegmented polylines in which line segments and vertices represent line bends and meanders.
COGO dimensions are typically not entered for parcel lines representing natural boundaries.
The sections below describe parcel editing workflows that involve natural boundaries.
Create a parcel traverse with a natural boundary
When adding a natural boundary to a parcel traverse, the Line tool ![]() is used to digitize along the natural boundary.
is used to digitize along the natural boundary.
To create a parcel traverse with a natural boundary, complete the following steps:
Set the active record in the map for the new parcel.
Click Traverse
 in the Tools gallery on the Parcel Record Workflows tab to open the Traverse tool in the Modify Features pane.
Click the Layer drop-down menu and choose the parcel line feature layer in which to enter the traverse.
Click Set Start and click a starting point on the map to set a start location for the parcel traverse.
Click in the Direction field to begin entering the traverse dimensions.
Follow the steps to enter a natural boundary course.
Learn more about creating a parcel traverse
Trace or digitize natural boundaries
When not using the Traverse tool, you can create parcel lines using the Two-Point Line tool and dynamic constraints. To create natural boundaries, you can use the following tools:
Use the Trace tool
 to trace over existing line features to create polylines representing natural boundaries.
Use the Line tool
 to digitize polylines representing natural boundaries.
For example, in the Split parcels using construction lines workflow, instead of using the Traverse tool or the Two-Point Line tool to add split lines, you can use the Trace tool or the Line tool to add split lines that represent natural boundaries.
Both the Trace tool ![]() and the Line tool
and the Line tool ![]() are available for the ParcelLines template (for the parcel type) in the Create Features pane.
are available for the ParcelLines template (for the parcel type) in the Create Features pane.
Learn more about using the Trace tool
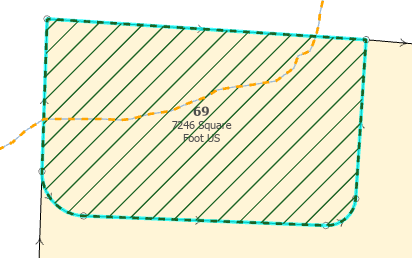
Split a parcel using a natural boundary
The Split tool ![]() in the Tools gallery on the Parcel Record Workflows tab can be used to interactively split parcels with natural boundary features.
in the Tools gallery on the Parcel Record Workflows tab can be used to interactively split parcels with natural boundary features.
In the Split pane, choose the natural boundary line features for Input features and select the parcels to be split for Target Features.
Learn more about splitting parcels using existing features
Update a parcel with a natural boundary
Natural boundaries such as river beds can change over time, and it may be necessary to update the representation of the natural boundary in the parcel fabric. In this workflow, you can use the Shrink To Seeds tool ![]() and Reconstruct From Seeds tool
and Reconstruct From Seeds tool ![]() to update the natural boundaries of parcels.
to update the natural boundaries of parcels.
To update the natural boundaries of parcels, complete the following steps:
Select all the parcels that share the natural boundary to be updated and click Shrink To Seeds
 in the Tools gallery on the Quality tab.
Select and delete the lines and points that represent the outdated natural boundary.
Set the active record and use the Trace tool
or the Line tool to trace or digitize a polyline representing the updated natural boundary.Use the Extent or Trim tool
 in the Tools gallery on the Quality tab to extend or trim parcel lines so they end on the updated natural boundary.
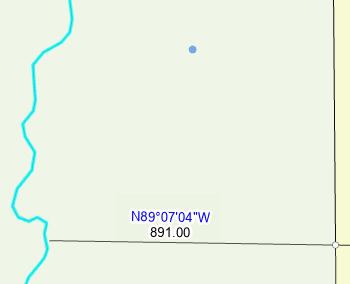
Use the Reconstruct From Seeds tool
 to reconstruct the parcels with the updated boundaries.