Upgrade an existing ArcGIS Maritime server extension installation
![]() Available with Advanced license.
Available with Advanced license.
![]() Available with ArcGIS Maritime license.
Available with ArcGIS Maritime license.
The ArcGIS Maritime server extension setup package is designed to detect and upgrade from an existing installation. Uninstalling earlier versions is not required. If you upgrade to ArcGIS Server 12.1, you must upgrade to the ArcGIS Maritime 12.1 server extension. You cannot run mismatched versions of software.
Note:
To upgrade from 10.7 and earlier, you must upgrade to an interim version (10.8.1-11.4), and then upgrade that installation to ArcGIS Maritime 12.1.
Note:
To upgrade from 10.7 and earlier, you must upgrade to an interim version (10.8.1-11.4), and then upgrade that installation to ArcGIS Maritime 12.1.
The ArcGIS Maritime server extension setup package is designed to install the necessary components for the Maritime Chart Service server object extension and mcstpk.exe. Before 11.1, Maritime Chart Service for Linux did not come with an installer or mcstpk.exe. More steps for ArcGIS Enterprise 12.0 are required to remove the manually installed components.
Learn more about upgrading ArcGIS Server
Upgrade Maritime Chart Service
To upgrade to 10.8.1, you must upgrade the software, MaritimeServer.soe, and map services with Maritime Chart Service configured.
Because versions of Maritime Chart Service before 11.1 did not come with an installer, the installed components must be manually removed.
Note:
If you are upgrading from version 11.1 or later, you do not need to manually remove the installed components and can proceed with the upgrade steps below.
Complete the following steps to remove the Maritime Chart Service deployment package for versions before 11.1:
Locate the
MaritimeChartServiceForLinuxDeployment.zipfile previously copied to your Linux server.Delete the
.zipfile.Delete the contents for the
.zipfile unzipped on your server.This includes the
MaritimeServer.soeand the maritimechartservice folder containing the controlfiles, datasets, logs, and sencs folders.
Complete the following steps to upgrade Maritime Chart Service:
Sign in to the machine as a user with administrative privileges.
Start the ArcGIS Maritime server extension setup program.
Browse to the location that contains the
MaritimeServerLinux-<version>.<build number>.tar.gzsetup package and run the following command to uncompress it:$ tar -zxvf MaritimeServerLinux-<version>.<build number>.tar.gzClick Next on the Welcome to the ArcGIS Maritime server extension Setup Program pane of the installation wizard.
The License Agreement dialog box appears.
Run
Setup.shto start the installation:$ ./ArcGISMaritimeServer/Setup.shNote:
If you are upgrading from Maritime Chart Service 11.1 or later, the software is automatically removed before installing the software version you are upgrading to.
Review the license agreement and accept it or close the dialog box if you do not agree with the terms.
Click Next.
The Custom Setup dialog box appears.
Note:
PDF Merge Support is required for Custom Chart Builder deployments. Without this feature, PDF documents cannot be exported from the CCB app.
Browse to
<ArcGIS Server installation directory>/MaritimeServerto verify the contents of the uncompressed setup package.The package should contain the following:
Bin
MaritimeServer.soemcstpk.exeweb.config.xml
maritimechartservice folder with four subfolders:
controlfiles
datasets
logs
sencs
Maritime server is now installed on the local machine. To install Maritime server in a multimachine deployment, repeat the installation steps on each machine.
Accept the default directory (
C:\ProgramFiles\ArcGIS\MaritimeServer\Server<version>) or choose a different location, and click Next.The Ready to install the Program dialog box appears.
Click Install to begin the installation.
Once the installation is complete, the InstallShield Wizard Completed dialog box appears.
Click Finish.
Maritime server is now installed on the local machine. To install Maritime server in a multimachine deployment, repeat the installation steps on each machine.
Sign in to ArcGIS Server Manager.
Click Services.
Click Stop
 next to the map service with Maritime Chart Service capabilities configured.
Copy the controlfiles folder from
<ArcGIS Server installation drive>\arcgisserver\directories\maritimeserver\maritimechartserviceto a backup location and delete it from the maritimechartservice folder.Copy the controlfiles folder from
<ArcGIS Server installation directory>/usr/directories/maritimeserver/maritimechartserviceto a backup location and delete it from the maritimechartservice folder.Copy the new controlfiles folder from
<ArcGIS Maritime Server installation drive>\MaritimeServer\Server\maritimechartserviceto<ArcGIS Server installation drive>\arcgisserver\directories\maritimeserver\maritimechartservice.Copy the new controlfiles folder from
<ArcGIS Server installation directory>/MaritimeServer/maritimechartserviceto<ArcGIS Server installation directory>/usr/directories/maritimeserver/maritimechartservice.Note:
Consolidate any modifications from the backup control files with the new control files, for example, the coordinate systems and
AutoCellUpdatesettings.If the map service was configured to process S-63 encrypted datasets, copy the S-63
user-permit.txtfile from the backup controlfiles folder to the new controlfiles folder.Delete the
.sencfiles from<ArcGIS Server installation drive>\arcgisserver\directories\maritimeserver\maritimechartservice\sencs.The
.sencfiles must be rebuilt after upgrading. Deleting them improves creation performance.Delete the
.sencfiles from<ArcGIS Server installation directory>/usr/directories/maritimeserver/maritimechartservice.The
.sencfiles must be rebuilt after upgrading. Deleting them improves creation performance.Repeat the steps for each map service with Maritime Chart Service capabilities configured.
Sign in to ArcGIS Server Manager.
Click Site.
Click Extensions in the Server Configuration window.
Click Edit Extension
 next to
 MaritimeServer.soeto update the extension.Click Choose File and browse to
<ArcGIS Maritime Server installation drive>\MaritimeServer\Server<version>\Bin.Click Choose File and browse to
<ArcGIS Server installation directory>/MaritimeServer/Bin.Double-click MaritimeServer.soe.
Click Add.
The new
MaritimeServer.soefile is added.Click the Services tab.
Click the map service to which you want to add Maritime Chart Service.
Maritime Chart Service works with any existing map service.
In the Map Services window, click Capabilities.
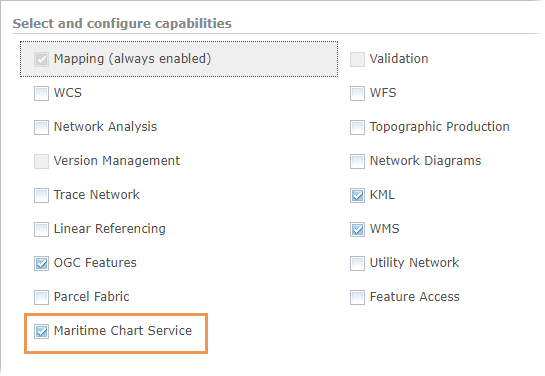
Check the Maritime Chart Service check box.
Verify that the
datasetsDirectory,controlFilesDirectory, andworkingDirectoryparameters point to the correct locations.Learn more about modifying the Maritime Chart Service capabilities properties
Click Save and Restart to make Maritime Chart Service available.
Note:
To confirm that the Maritime Chart Service capabilities are working properly in the map service, verify that the
.sencfiles in the sencs folder are current.Repeat the previous steps for each map service with Maritime Chart Service capabilities configured.
Use ArcGIS Experience Builder widgets to deploy custom web apps and try the latest features available with Maritime widgets.
Learn more about what's new for ArcGIS Maritime
Note:
Once you have upgraded to the latest version of the Maritime server extension, you can deploy Custom Chart Builder.
Upgrade Custom Chart Builder
Before starting the upgrade process, back up your existing Custom Chart Builder deployment. This facilitates the new deployment by preserving some of your settings. It is critical to back up your existing deployment if you made customizations to the web app or Custom Chart Builder configuration files.
Once you have backed up your existing Custom Chart Builder deployment, you can redeploy the new version of Custom Chart Builder. Then you can merge any previous configuration changes.
Note:
The ExportWebmap geoprocessing service works with layouts (.pagx files) from earlier versions. The Notes.aprx and ZOCDiagram.pagx files from an installation of Maritime server 11.4 or earlier must be upgraded to the current version to support multi-page and single-page exports. This is due to changes in element names, font, and color changes.