Reassign by merging to an adjacent route
 Available with the Linear Referencing license.
Reassignment is the technique by which all or a portion of a route or line in a linear referencing system (LRS) Network is moved, or reassigned, to the immediate upstream or downstream of another route or line.
You can use the Reassign Route tool to perform route reassignment using the Merge to adjacent route method. A portion of the route, the entire route, or multiple routes can be reassigned and merged with the adjacent route.
Before using this tool to edit a feature service, you must share branch versioned LRS data as a web layer. If the feature service is not yet published, see Share as web layers. If you are using a file geodatabase LRS dataset, this tool provides limited functionality.
Route reassignment follows gap calibration rules.
Beta:
You can use the ArcGIS Pro Assistant (Beta) to perform route reassignment and to guide you through the workflow.
The following table lists parameters used for line networks in the Reassign Route tool:
| Parameter | Description |
|---|---|
| Network | The network that supports lines in which the routes exist. |
| Effective Date | This is the date when the reassignment has taken place on the ground. |
| Source: From Route Name | The route where the reassignment starts. |
| Source: From Measure | The measure on the source route where the reassignment starts; shown by the green point. |
| Source: To Route Name | The route where the reassignment ends. For example, if the reassignment takes place on a single route, the source route and target route are the same. The source routes should belong to the same line. |
| Source: To Measure | The measure on the source route where the reassignment ends, shown by the red point. |
| Target: Route Name | The route to which the reassigned portion will be added. This can also be a new route. |
| Target: From Measure | The start measure on the reassigned portion. |
| Target: To Measure | The end measure on the reassigned portion. |
The following table lists parameters used for nonline networks in the Reassign Route tool:
| Parameter | Description |
|---|---|
| Network | The network in which the routes exist. |
| Effective Date | This is the date when the reassignment has taken place on the ground. |
| Source: Route Name/ID | The route where the reassignment starts. |
| Source: From Measure | The measure on the source route where the reassignment starts; shown by the green point. |
| Source: To Measure | The measure on the source route where the reassignment ends, shown by the red point. |
| Target: Route Name/ID | The route to which the reassigned portion will be added. This can also be a new route. |
| Target: From Measure | The start measure on the reassigned portion. |
| Target: To Measure | The end measure on the reassigned portion. |
Merge to an adjacent route
To merge to an adjacent route as part of the route reassignment, complete the following steps:
Start ArcGIS Pro and add the LRS Network feature class to a map.
You can also open a map in which the LRS Network layer is present.
Note:
Branch versioned LRS Networks, including any network configured with a user-generated route ID, must be edited through a feature service.
Zoom to the location where you want to reassign a route.
On the Linear Referencing tab, in the Route Editing group, click Reassign
 .
The Reassign Route pane appears.
Click the Network drop-down arrow and choose the LRS Network in which the route reassignment takes place.
Click the Calendar
 next to the Effective Date text box and choose a start date for the route.
You can also double-click the Effective Date text box to insert the current date or enter a date in the box.
In the Source section, click Choose route from map
 and click the route on the map to populate the From Route Name parameter.
If multiple routes exist at the edit location, select one of the routes in the Select a Route dialog box.
Tip:
After clicking Choose route from map
or Choose measure from map  , you can hover over the routes to see the route and measure at the location of the pointer. You can set map scale options for display of route and measure information in the Linear Referencing options.
When hovering near a feature, you can turn snapping on to improve the accuracy of the pointer.
In the Source section, click Choose route from map
and click the route on the map to populate the Route ID or Route Name parameter.If multiple routes exist at the edit location, select one of the routes in the Select a Route dialog box.
Tip:
After clicking Choose route from map
or Choose measure from map , you can hover over the routes to see the route and measure at the location of the pointer. You can set map scale options for display of route and measure information in the Linear Referencing options.When hovering near a feature, you can turn snapping on to improve the accuracy of the pointer.
Provide a start measure for the route by doing one of the following:
Enter a value in the From Measure text box.
Click Choose measure from map
and click a measure location on the map.Check the Use route start measure check box.
Note:
For a line network, you can provide measures as station values in the 00+00.00 or 00+00.000 format.
A green point is placed at the location. The reassignment starts from this location.
Click Choose route from map
and click a route on the map to populate the To Route Name parameter.Provide an end measure by doing one of the following:
Enter a value in the To Measure text box.
Click Choose measure from map
and click a measure location on the map.Check the Use route end measure check box.
A red point is placed at the location. The reassignment takes place on the routes or the portions of routes that exist between the green and red points. The routes that are intersected by the reassigned portion are retired.
Choose whether to recalibrate the remainder of the reassigned route downstream of the reassigned portion by doing one of the following:
Keep the Recalibrate route downstream check box checked to recalibrate the remainder of the reassigned route downstream of the reassigned portion.
Uncheck the Recalibrate route downstream check box if you do not want to recalibrate the remainder of the reassigned route downstream of the reassigned portion.
Choose whether to transfer the source calibration points to the target route using the Transfer calibration points to the target route check box.
Note:
The Transfer calibration points to the target route check box is checked by default and is the preferred method to maintain established measures between points.
All of the calibration points between and including the start measure and ending measure, even those spanning routes in between, are included in the transfer of calibration points to the target route.
In the Method section, choose the Merge to adjacent route method.
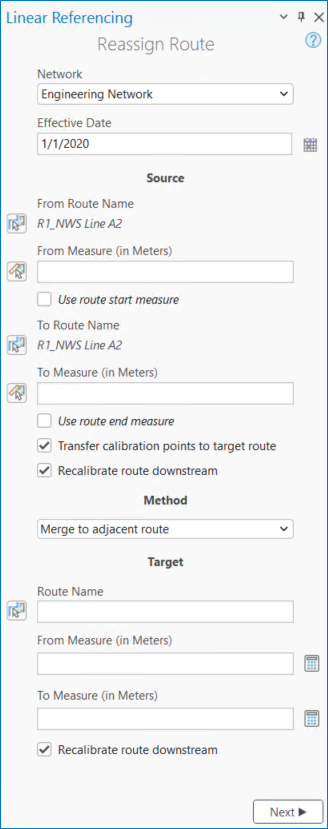
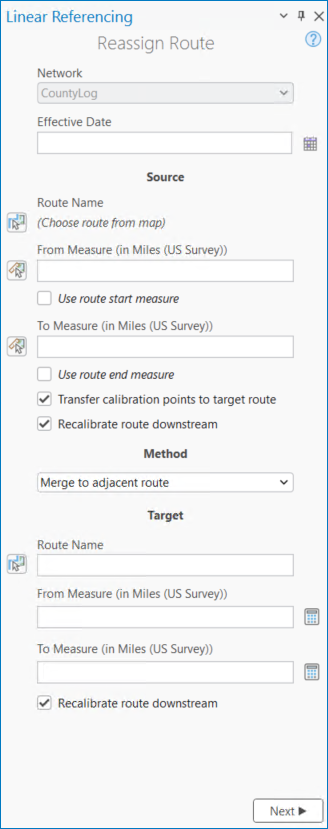
In the Target section, click Choose route from map
and select the target route on the map.You can also provide the name or ID of an existing route.
Provide a start measure for the target route reassignment location by doing one of the following:
Enter a value in the From Measure text box.
Click Recalculate From Measure
 to calculate a suggested start measure. This value is calculated as the source measure length minus the end measure.
Note:
If you are filling a gap, this value is equal to the measure at the beginning of the gap.
If you are adding the reassigned route to the end of the target route, this value is equal to the end measure of the target route.
Provide the end measure of the target route reassignment location by doing one of the following:
Enter a value in the To Measure text box.
Click the Recalculate To Measure
to calculate a suggested end measure. This value is calculated as the source measure length minus the start measure.
Note:
If you are filling a gap, this value is equal to the measure at the end of the gap.
If you are adding the reassigned route to the beginning of the target route, this value is equal to the total length in the linear referencing method (LRM) measure units of the reassigned portion.
If you are creating a route or adding the reassigned value to the end of the target route, this value is equal to the new end measure of the route.
Choose whether to recalibrate the remainder of the target route downstream of the reassigned portion by doing one of the following:
Check the Recalibrate route downstream check box to recalibrate the remainder of the reassigned route downstream of the reassigned portion.
Uncheck the Recalibrate route downstream check box if you do not want to recalibrate the remainder of the reassigned route downstream of the reassigned portion.
Click Next.
A list of routes that are going to be retired as a result of the route reassignment appears.
Note:
This list only appears when you are using a line network.
Click Next.
Optionally, if the network has attribute fields other than the system-defined fields, you can either transfer the existing values of the source route or provide new values in the Reassign Route pane. The existing values of the source route are populated by default.
If the reassignment spans multiple routes, the values from the first starting value of the route are populated by default.
This attribute section also supports domains, subtypes, contingent values, and attribute rules.
Note:
The field alias, not the field name, appears in the Reassign Route pane.
Click Run.
The route is reassigned.
Note:
If the route edit introduces one or more physical gaps on the route, a prompt appears before the tool runs. If you don't plan to create a gapped route, click No. You can disable this warning by unchecking the Warn before allowing route edits that can create physical gaps check box in the Linear Referencing options.
If the route already has one or more physical gaps and the edit does not introduce more, no prompt appears.
If a message about acquiring locks appears, it means that conflict prevention is enabled. After you select a route, the tool attempts to release the route lock if the active user acquires the route lock in a different named version and the releasable status value is Yes.
In a combined LRS and utility network dataset, if the centerline is split because of this edit activity, the route ID, start measure, and end measure fields are updated for the split centerlines.