Move, rotate, or scale features
Move, Rotate and Scale tools allow you to select and move, rotate, or scale features. You can drag them with the pointer or type scale and rotation values. These tools are available in the Modify Features pane.
If Map Topology is turned on, rubber band lines show how topologically connected features are also modified. If edits exceed a given tolerance as you drag the pointer, the rubber band lines disappear, and only the selected features are modified.
Move features
Use the Move tool ![]() to select and drag features across a map. To align or distribute features right-click and choose the commands from the context menu.
to select and drag features across a map. To align or distribute features right-click and choose the commands from the context menu.
Use the Move To tool ![]() to type a coordinate location or an offset.
to type a coordinate location or an offset.
To move features, complete the following steps:
Open the map containing the features to be edited or add the layer to the map.
Tip:
Before editing, confirm the layers you are editing are editable, snap settings add efficiency and accuracy to your workflow, and the coordinate system assigned to the active map is suitable for the type of edits you're performing.
For a basic checklist of settings, see Configure settings for editing.
Click the ribbon Edit tab. In the Features group, click Modify
 .
.The Modify Features pane appears.
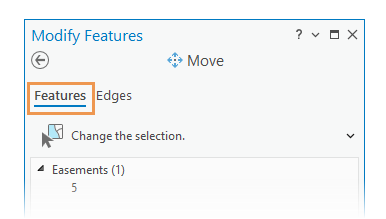
Click the Move tool
 .
.To find the tool, expand Alignment, or type Move in the Search text box.
Alternatively, click the tool on the ribbon Edit tab in the Tools group.
Note:
If map topology is turned on, click the tool Features tab.
The tool opens and the Select one or more features tool
 automatically runs.
Select the features to be moved.
The selected features highlight in the map and appear in the selection view organized by layer. The selection anchor appears at the center (centroid) of the entire selection set.
To refine the selection in the selection view, right-click a feature and click Unselect
 or Only Select This
  .
.If features are currently selected, the selection tool displays Change the selection.
To move the selection anchor and use it to snap to other features, press Ctrl and drag the anchor when the pointer changes to the Directional cursor
 .
.The selection anchor snaps to other features using the current snap settings.
Hover over the selected features and drag them when the pointer changes to the Move cursor
 .
.To move a multipatch or 3D object feature along an x-, y-, or z-axis in a 3D scene, hover over an axis symbol. When the pointer changes to the move cursor, drag it.
Note:
Annotation leader anchor points move with their respective annotation features. To keep annotation leader anchor points fixed to their original location, use the Annotation tool
 .
.To learn more, see Move, rotate, or resize annotation features.
Click Finish
 on the toolbar or press F2.
Keyboard shortcuts for Move
| Keyboard shortcut | Action | Comment |
|---|---|---|
| Ctrl and click | Relocate the anchor. | Relocate the selection anchor to the clicked location. You can zoom in to a feature without the current location of the anchor being visible in the active view. |
| Ctrl and drag | Move the anchor. | Drag the selection anchor to the new location. |
Rotate features
Use the Rotate tool ![]() to select and drag features around a selection anchor. If the rotation of a symbolized point feature layer is set to vary symbology by rotation the values are updated in the source layer attribute table.
to select and drag features around a selection anchor. If the rotation of a symbolized point feature layer is set to vary symbology by rotation the values are updated in the source layer attribute table.
To rotate marker symbol layers and update symbol angle properties, ensure that the point symbol is enabled to allow symbol property connections, and the rotation angle property is connected to a numeric attribute field.
When you rotate features, consider the following:
Press the A key to type a rotation angle value.
Press the Ctrl key to drag the selection anchor to a different location.
Press the S key to show and use the auxiliary anchor to snap the rotation to other features.
To rotate features, complete the following steps:
Open the map containing the features to be edited or add the layer to the map.
Tip:
Before editing, confirm the layers you are editing are editable, snap settings add efficiency and accuracy to your workflow, and the coordinate system assigned to the active map is suitable for the type of edits you're performing.
For a basic checklist of settings, see Configure settings for editing.
Click the ribbon Edit tab. In the Features group, click Modify
.The Modify Features pane appears.
Click the Rotate tool
 .
.To find the tool, expand Alignment, or type Rotate in the Search text box.
Alternatively, click the tool on the ribbon Edit tab in the Tools group.
The tool opens and the Select one or more features tool
automatically runs.Select the features to be rotated.
The selected features highlight in the map and appear in the selection view organized by layer. The selection anchor appears at the center (centroid) of the entire selection set.
To refine the selection in the selection view, right-click a feature and click Unselect
or Only Select This .If features are currently selected, the selection tool displays Change the selection.
Optionally, move the selection and auxiliary anchors use them to snap to other features.
Press Ctrl and hover over the selection anchor. Hover over the anchor and drag it when the pointer changes to the Directional cursor
.Press S to turn the auxiliary anchor on or off. By default, it appears near the pointer. Press Ctrl, hover over the anchor, and drag it when the pointer changes to the Directional cursor
.
The selection and auxiliary anchors snap to other features using the current snap settings.
Hover over the selected features and drag them when the pointer changes to the rotation cursor.
Alternatively, press A and type an angle. A positive value rotates the selection counterclockwise. A negative value rotates the selection clockwise.
To rotate a multipatch or 3D object feature along an x-, y-, or z-axis in a 3D scene, hover over an axis symbol. When the pointer changes to the rotation cursor, do one of the following:
Drag the rotation symbol.
Turn on on-screen constraints, press Tab to activate the text box, type a rotation angle, and press Enter.
Click Finish
on the toolbar or press F2.
Keyboard shortcuts for Rotate
| Keyboard shortcut | Action | Comment |
|---|---|---|
| A | Specify an angle. | Open the Angle dialog box. |
| Ctrl and click | Relocate the anchor. | Relocate the selection anchor to the clicked location. You can zoom in to a feature without the current location of the anchor being visible in the active view. |
| Ctrl and drag | Move the anchor. | Drag the selection anchor to the new location. |
| S | Access the secondary anchor. | Turn the secondary anchor on and off. When it is turned on, the anchor is positioned at the pointer location. |
Scale features
Use the Scale tool ![]() to select and resize features by dragging a control point that appears on the selection bounding box. Press the S key to type a scale factor.
to select and resize features by dragging a control point that appears on the selection bounding box. Press the S key to type a scale factor.
To scale features, complete the following steps:
Open the map containing the features to be edited or add the layer to the map.
Tip:
Before editing, confirm the layers you are editing are editable, snap settings add efficiency and accuracy to your workflow, and the coordinate system assigned to the active map is suitable for the type of edits you're performing.
For a basic checklist of settings, see Configure settings for editing.
Click the ribbon Edit tab. In the Features group, click Modify
.The Modify Features pane appears.
Click the Scale tool
 .
.To find the tool, expand Alignment, or type Scale in the Search text box.
Alternatively, click the tool on the ribbon Edit tab in the Tools group.
The tool opens and the Select one or more features tool
automatically runs.Select the features to be scaled.
The selected features highlight in the map and appear in the selection view organized by layer. The selection anchor appears at the center (centroid) of the entire selection set.
To refine the selection in the selection view, right-click a feature and click Unselect
or Only Select This .If features are currently selected, the selection tool displays Change the selection.
Optionally, move the selection and auxiliary anchors to useful locations and use them to snap to other features.
Press Ctrl and hover over the selection anchor. Hover over the anchor and drag it when the pointer changes to the Directional cursor
.Press S to turn the auxiliary anchor on or off. By default, it appears near the pointer. Hover over the anchor and drag it when the pointer changes to the Directional cursor
.
The selection and auxiliary anchors snap to other features using the current snap settings.
Hover over a control point along the selection boundary and drag it when the pointer changes to the scale cursor.
Alternatively, press F and type a scale factor.
To scale a multipatch or 3D object feature along an x-, y-, or z-axis in a 3D scene, hover over an axis symbol. When the pointer changes to the Move cursor
, do one of the following:Drag the axis symbol.
Turn on on-screen constraints, press Tab to activate the text box, type a scale factor, and press Enter.
Click Finish
on the toolbar or press F2.
Keyboard shortcuts for Scale
| Keyboard shortcut | Action | Comment |
|---|---|---|
| F | Specify a scale factor. | Open the Scale dialog box. |
| Ctrl and click | Relocate the anchor. | Relocate the selection anchor to the clicked location. You can zoom in to a feature without the current location of the anchor being visible in the active view. |
| Ctrl and drag | Move the anchor. | Drag the selection anchor to the new location. |
| S | Access the secondary anchor. | Turn the secondary anchor on and off. When it is turned on, the anchor is positioned at the pointer location. |