Realign routes
 Available with the Linear Referencing license.
During the lifespan of a pipeline, route geometry and length can change. Route sections are updated while others are added. Major changes, such as environmental concerns, building a new pumping station, or repair work, can require a change in the shape of the route's geometry and length.
During the life span of a roadway, route geometry and length can change. Existing route sections are updated, and others are added. Major changes, such as environmental concerns or repair work, can require an update in the shape of the route's geometry and length.
Use the Realign Route tool to realign a single route or to realign several adjoining routes that are part of the same line. As with other route editing activities, centerline features provide the location and geometry to realign a route. You can use existing centerline features in the centerline feature class, digitize them from aerial photography or basemaps, copy them from other feature classes, or import them from CAD files or other ArcGIS-supported data sources.
Before using this tool to edit a feature service, you must share branch versioned LRS data as a web layer. If the feature service is not yet published, see Share as web layers. If you are using a file geodatabase LRS dataset, this tool provides limited functionality.
Route realignment follows gap calibration rules.
Beta:
You can use the ArcGIS Pro Assistant (Beta) to perform route realignment and to guide you through the workflow.
The following table lists parameters used for engineering (line) networks in the Realign Route tool:
| Parameter | Description |
|---|---|
| Network | The network in which the routes that support an engineering network exist. |
| Effective Date | The date when the realignment has taken place on the ground. |
| Source Route: From Route Name | The route where the realignment starts. |
| Source Route: From Measure | The measure on the source route where the realignment starts; shown by a green point. |
| Source Route: To Route Name | The route where the realignment ends. In the case where the realignment takes place on a single route, the source route and target route are the same. |
| Source Route: To Measure | The measure on the target route where the realignment ends; shown by a red point. |
| Realigned Route: From Measure | The start measure on the realigned portion. |
| Realigned Route: To Measure | The end measure on the realigned portion. |
| Realigned Route: Abandon the route(s) | Choose whether to abandon the source routes or to retire them. |
| Realigned Route: Recalibrate route downstream | Choose whether the tool recalibrates the route downstream of the realignment measures. |
The following table lists parameters used for nonline networks in the Realign Route tool:
| Parameter | Description |
|---|---|
| Network | The nonline network in which the routes exist. |
| Effective Date | The date when the realignment has taken place on the ground. |
| Source Route: Route Name | The route where the realignment takes place. |
| Source Route: From Measure | The measure on the source route where the realignment starts; shown by a green point. |
| Source Route: To Measure | The measure on the source route where the realignment ends; shown by a red point. |
| Realigned Route: From Measure | The start measure on the realigned portion. |
| Realigned Route: To Measure | The end measure on the realigned portion. |
The following table lists parameters used for nonline networks in the Realign Route tool:
| Parameter | Description |
|---|---|
| Network | The nonline network in which the routes exist. |
| Effective Date | The date when the realignment takes place on the ground. |
| Source Route: Route ID | The route where the realignment takes place. |
| Source Route: From Measure | The measure on the source route where the realignment starts, shown by the green point. |
| Source Route: To Measure | The measure on the source route where the realignment ends, shown by the red point. |
| Realigned Route: From Measure | The start measure on the realigned portion. |
| Realigned Route: To Measure | The end measure on the realigned portion. |
Realign a route
In the following example, there are three routes across a line. A route realignment is scheduled to take place between Route X and Route Z.
The following diagram shows the routes before the realignment:

The following table provides details about the routes before the realignment:
| Route Name | From Measure | To Measure | Line Order |
|---|---|---|---|
| RouteX | 0 | 7 | 100 |
| RouteY | 10 | 24 | 200 |
| RouteZ | 28 | 35 | 300 |
To realign a route, complete the following steps:
Note:
The following steps pertain to the example above.
Start ArcGIS Pro and add the centerline and LRS Network feature classes to a map.
You can also open a map in which the centerline and LRS Network layers are present.
Note:
In the LRS data model, only one centerline feature is expected at any given location. Ensure that the centerlines used for your edit do not overlap other centerlines in the LRS.
Branch versioned LRS Networks, including any network configured with a user-generated route ID, must be edited through a feature service.
Zoom to the location where you want to realign a route.
The centerline features for the route must exist before extending the route.
On the Linear Referencing tab, in the Route Editing group, click Realign
 .
The Realign Route pane appears with the Select By Rectangle tool
 as the default.
Select one or more centerlines by rectangle at the location of the new route.
Tip:
You can also click the Select one or more centerlines drop-down arrow and choose a different selection tool or use the interactive selection tools on the Map tab.
The Keep centerlines chosen and selected option in the Linear Referencing options is useful if you're realigning a route in the engineering network and want to realign another route in the continuous network using the same centerlines, or vice versa.
You can keep the centerlines chosen after realigning the route.
The selected centerlines are highlighted on the map, and the Allow choosing of one or more centerlines button
 appears in the Realign Route pane.
In the Realign Route pane, click Allow choosing of one or more centerlines
.The Chosen Centerlines section appears in the pane with the centerlines listed in order of selection. On the map, the selected centerlines are numbered and highlighted.
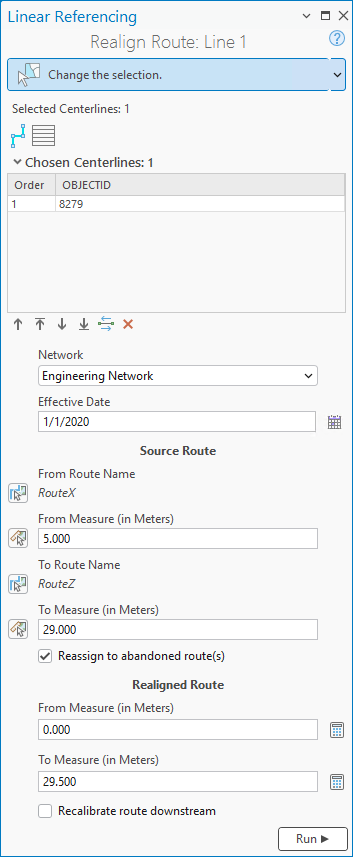
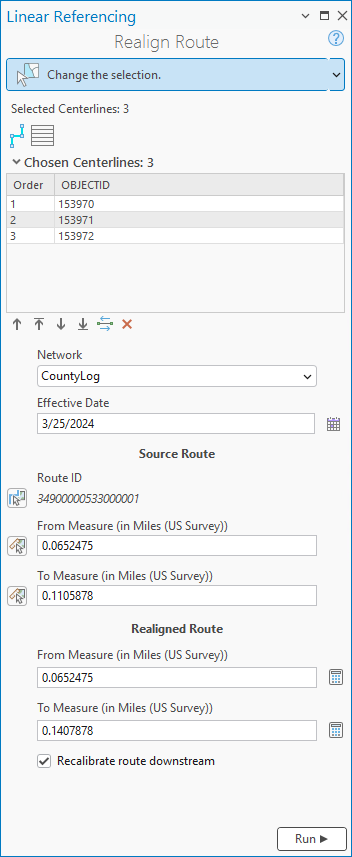
Note:
The direction of digitization determines the direction of calibration, increasing in the direction of digitization. You can reverse direction for the selected centerlines using the Flip the direction of the centerlines button
 . The flip occurs in memory only and is not permanent.
If the centerline contains curves, they are converted into a densified polyline feature.
Optionally, choose one or more rows from the Order column, and use the buttons below the table to change the centerline selection order. You can also drag rows to change the order.
Tip:
You can also drag a row to change the order.
To change the display field in the Chosen Centerlines section, right-click the centerline feature class in the Contents pane, and choose Properties from the context menu. On the Layer Properties dialog box, click the Display tab, and click the Display field drop-down arrow to change its value. In the example above, the display field is
OBJECTID.
The following table describes the tools available in the Chosen Centerlines section:
Tool Tool name Tool description Allow choosing of one or more centerlines Allows you to choose the centerlines on the map and displays them in a table by order of selection. Use the move buttons below the table or drag rows to reorder the chosen centerlines. 
Clear the currently chosen centerlines Clears the chosen centerlines and keeps the selected centerlines. You can reselect after clicking this button or click the Allow choosing of one or more centerlines button a second time.
Move chosen centerlines up Moves one or more selected centerlines up a row in the table order. 
Move chosen centerlines to the top Moves one or more centerlines to the top of the table order. 
Move chosen centerlines down Moves one or more centerlines down a row in the table order. 
Move chosen centerlines to the bottom Moves one or more centerlines to the bottom of the table order. Flip the direction of the centerlines Reverses the direction of the chosen centerlines. The flip occurs in memory only and is not permanent. 
Remove the chosen centerlines Removes the chosen centerline from the table order but leaves it selected. The map reflects changes in the centerline selection order.
Click the Network drop-down arrow and choose the LRS Network to which you want to realign a route.
Specify an effective date for the realignment by doing one of the following:
Provide a date in the Effective Date text box.
Click Calendar
 and choose a date.
Double-click the empty Effective Date text box to populate today's date.
Optionally, if the centerline doesn't touch the route, use the pickers to populate the From Route Name, To Route Name, From Measure, and To Measure parameters.
If the centerline touches the routes, the From Route Name, From Measure, To Route Name, and To Measure parameters in the Source Route section are automatically populated.
If multiple routes exist at the edit location, select one of the routes in the Select a Route dialog box.
Tip:
After clicking Choose route from map
 , you can hover over the routes to see the route and measure at the location of the pointer. You can set map scale options for display of route and measure information in the Linear Referencing options.
When hovering near a feature, you can turn snapping on to improve the accuracy of the pointer.
Note:
In this example, the Reassign to abandoned route(s) option is checked. Routes that represent assets that are present but not in use are created.
Optionally, provide a start measure of your choice in the From Measure text box in the Realigned Route section.
The From Measure value in the Realigned Route section is automatically populated if the centerline touches the route.
Note:
Z-values are considered when calculating the geometric length of the centerlines.
For an engineering (line) network, you can provide measures as station values in the 00+00.00 or 00+00.000 format.
Optionally, provide an end measure of your choice in the To Measure text box in the Realigned Route section.
The To Measure value in the Realigned Route section is automatically populated if the centerline touches the route.
Note:
In this example, the Recalibrate route downstream option is not checked. A new route is created in the realigned portion.
Click Run.
The Realign Route pane transitions to the next page, in which the routes to be abandoned due to the realignment are listed.
Route realignment is complete.
Note:
If the route edit introduces one or more physical gaps on the route, a prompt appears before the tool runs. If you don't plan to create a gapped route, click No, and edit the digitized centerlines so that no gaps result during route editing.
If a message about acquiring locks appears, it means that conflict prevention is enabled. After you select a route, the tool attempts to release the route lock if the active user acquires the route lock in a different named version and the releasable status value is Yes.
Click Next.
Provide a name for the new route that is created in the realigned portion.
Tip:
To copy attributes from an existing route, click Copy attribute values by choosing route from map
 and choose an existing route.
Click Next.
Provide a name for each abandoned route.
You can also provide any required attributes for the abandoned route or routes at this time, or check the Apply values to all routes check box to provide the same values for all abandoned routes.
Click Run.
Route realignment is complete.
The following diagram shows the routes after the realignment:

The following table provides details about the routes after the realignment:
Route Name From Measure To Measure Line Order RouteX 0 5 100 RouteA 0 29.5 200 RouteZ 29 35 300 In this example, the following occurs after you click Run:
Route X is retired with its end date populated with the effective date.
Since a portion of Route X is involved in the realignment, a new time slice of Route X is created. Its start date is populated with the effective date, and the end date is populated with a null value. The start measure is 0 and the end measure is 5—these measures are unaffected by the realignment.
Route Y is retired with its end date populated with the effective date.
Route Z is retired with its end date populated with the effective date.
Since a portion of Route Z is involved in the realignment, a new time slice of Route Z is created. Its start date is populated with the effective date, and the end date is populated with a null value. The start measure is 29 and the end measure is 35—these measures are unaffected by the realignment.
A new route, Route A, is created in the realigned portion.
Note:
If the route edit introduces one or more physical gaps on the route, a prompt appears before the tool runs. If you don't plan to create a gapped route, click No. You can disable this warning by unchecking the Warn before allowing route edits that can create physical gaps check box in the Linear Referencing options.
If the route already has one or more physical gaps and the edit does not introduce more, no prompt appears.
If a message about acquiring locks appears, it means that conflict prevention is enabled. After you select a route, the tool attempts to release the route lock if the active user acquires the route lock in a different named version and the releasable status value is Yes.
Route realignment scenarios
In the following examples, Route X has a start measure of 0 and an end measure of 10 before realignment. The line order is 100.
Scenario 1
In this example, the realigned portion has the start and end measures suggested by the software.

Before realignment, the Route X edit region has a start measure of 2 and an end measure of 6.
The following table shows the inputs used for the Source Route section of the Realign Route tool:
| Parameter | Value |
|---|---|
| From Route Name | RouteX |
| From Measure | 2 |
| To Route Name | RouteX |
| To Measure | 6 |
| Recalibrate route downstream | Yes |
After realignment, Route X is realigned with updated downstream measures due to recalibration. The line order remains 100.

The following table shows the inputs used for the Realigned Route section of the Realign Route tool:
| Parameter | Value |
|---|---|
| From Measure | 2 |
| To Measure | 10 |
| Recalibrate route downstream | Yes |
Scenario 2
In this example, there is no downstream recalibration after the realigned portion of the route. This results in an equation at the end measure location of the realigned route.
The following table shows the inputs used for the Source Route section of the Realign Route tool:
| Parameter | Value |
|---|---|
| From Route Name | RouteX |
| From Measure | 2 |
| To Route Name | RouteX |
| To Measure | 6 |
| Recalibrate route downstream | No |
After realignment, a new route (Route A) is created from the beginning of the source route to the end of the realigned section, which is the end measure location of the realigned route. Route A gets the line order of 100 and Route X’s line order changes to 200.

The following table shows the inputs used for the Realigned Route section of the Realign Route tool:
| Parameter | Value |
|---|---|
| From Measure | 2 |
| To Measure | 10 |
| New Route | RouteA |
| Recalibrate route downstream | No |
Scenario 3
If you change the end measure of the realigned route before you run the tool, an equation occurs at the start and end measure locations, and two routes are created.
Note:
An equation can occur if you do not use the measures suggested by the software.
The following table shows the inputs used for the Source Route section of the Realign Route tool:
| Parameter | Value |
|---|---|
| From Route Name | RouteX |
| From Measure | 2 |
| To Route Name | RouteX |
| To Measure | 6 |
| Recalibrate route downstream | Yes |
After realignment, the first new route (Route A) starts and ends at the realigned portion. The second new route (Route B) starts from the end of the realigned portion and goes until the end of the original route. Route X’s line order remains 100, Route A gets a line order of 200, and Route B gets a line order of 300.
Similarly, if the start and end measures of the realigned route are changed so that an equation is created at the start and end measure locations, and the Recalibrate route downstream check box is checked, then two routes are created. The first new route (Route A) starts and ends at the realigned portion. The second new route (Route B) starts from the end of the realigned portion and goes until the end of the original route.

The following table shows the inputs used for the Realigned Route section of the Realign Route tool:
| Parameter | Value |
|---|---|
| From Measure | 3 |
| To Measure | 10 |
| New Route | RouteA |
| New Route | RouteB |
| Recalibrate route downstream | No |
Scenario 4
if the start measure of the realigned route is changed in such a way that it results in an equation, which can happen when measures suggested by the software are not used, and the Recalibrate route downstream check box is checked, then a new route is created.
The following table shows the inputs used for the Source Route section of the Realign Route tool:
| Parameter | Value |
|---|---|
| From Route Name | RouteX |
| From Measure | 2 |
| To Route Name | RouteX |
| To Measure | 6 |
The new route (Route A) starts at the beginning of the realigned portion and goes until the end of the original route. Route X’s line order remains 100 and Route A gets a line order of 200.

The following table shows the inputs used for the Realigned Route section of the Realign Route tool:
| Parameter | Value |
|---|---|
| From Measure | 3 |
| To Measure | 12 |
| New Route | RouteA |
| Recalibrate route downstream | Yes |
Route realignment scenario
In the following example, Route XYZ has a start measure of 0 and an end measure of 30 before realignment. The realigned section has measures from 10 to 20.

The following table provides details before route realignment:
| Parameter | Value |
|---|---|
| From Measure | 10 |
| To Measure | 20 |
| Recalibrate route downstream | Yes |
After realignment, the realigned section has measures from 10 to 35, while the entire route has measures from 0 to 45.

The following table provides details after route realignment:
| Parameter | Value |
|---|---|
| From Measure | 10 |
| To Measure | 35 |
Abandoned route reassignment
The default option in ArcGIS Linear Referencing is to reassign any realigned routes to abandoned routes (new routes in the network), rather than retire them. Instead of retiring the existing routes as of the effective date of the edit, abandoned routes are created to represent assets that are still present, but not in use.
Leave the Reassign to abandoned route(s) check box checked to show the names of any abandoned routes that are created, as well as the line to which they belong.
You can also provide any required attributes for the abandoned route or routes at this time, or check the Apply values to all routes check box to provide the same values for all abandoned routes.
The following diagrams show before and after reassignment to abandoned routes that have the _ab suffix:

Complex route realignment scenarios
The following sections describe complex route realignment scenarios for loop, lollipop, gapped, and infinity routes.
Realignment on a loop route
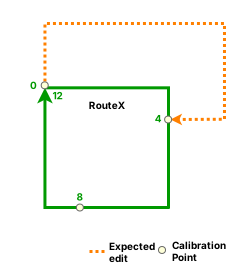
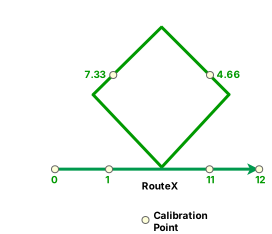
The route is realigned from measure 0 to measure 4, which is from the beginning to the middle of the route. In the following example, Route X has a start measure of 0 and an end measure of 12 before realignment:
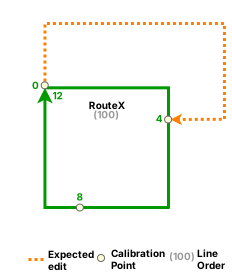
Without downstream recalibration, an equation point is created at measure 4 of Route X. This results in the creation of a new route (Route A) from measure 0 to measure 9.5.
Route A is assigned line order 100, and the Route X line order changes to 200.
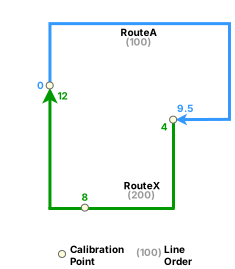
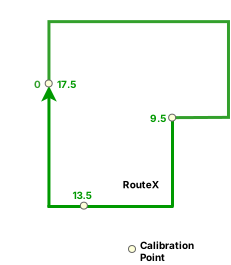
With downstream recalibration, the realignment results in a start measure of 0 and an end measure of 17.5 for Route X.
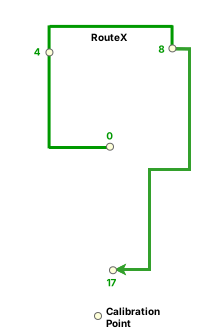
Realignment on a lollipop route
Route X is realigned from measure 8 to measure 15. In the following example, Route X has a start measure of 0 and an end measure of 15 before realignment:
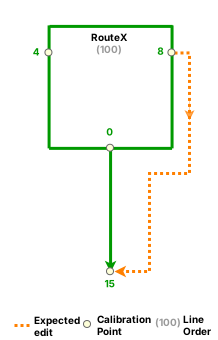
As realignment is from the middle to the end, downstream recalibration does not apply. Route X is realigned with a start measure of 0 and an end measure of 17. The realigned section is assigned measures 8 to 17.
The line order remains unchanged.
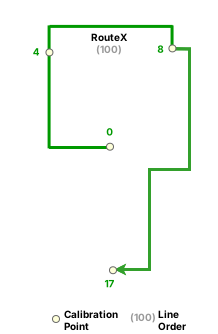
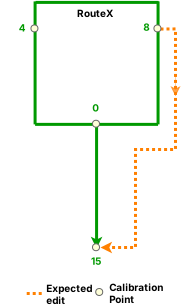
Because the realignment is from the middle to the end, downstream recalibration does not apply. Route X is realigned with a start measure of 0 and an end measure of 17.
Realignment on a gapped route
Route X is realigned from measure 1 to measure 3. In the following example, a gapped route has a start measure of 0 and an end measure of 4 before realignment:
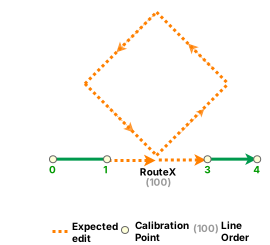
Without downstream recalibration, an equation point is created at measure 3 on Route X. This results in the creation of a new route (Route A) from measure 0 to measure 11.
As a result, Route A is assigned line order 100 and Route X's line order changes to 200.
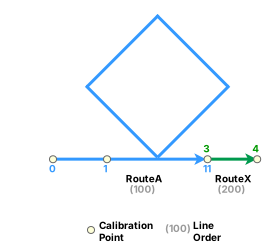
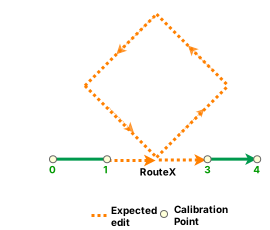
With downstream recalibration, the realignment results in a start measure of 0 and an end measure of 12 for Route X.
Realignment on an infinity route
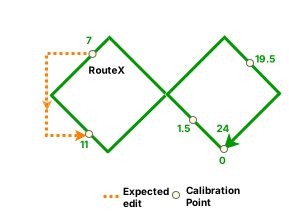
Route X is realigned from measure 7 to measure 11. In this realignment, the suggested start measure is not used. The start measure of 10 for the realignment section is the input value and the end measure of 16 is calculated using the geometric length of the centerline. In the following example, Route X has a start measure of 0 and an end measure of 24 before realignment:
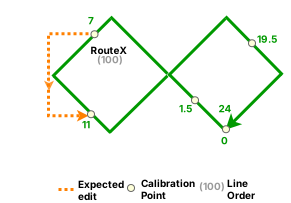
Because the suggested measure is not used, an equation point is created at measure 7 of Route X resulting in a new route (Route A). Without downstream recalibration, another equation point is created at measure 16 of Route A. This results in the creation of another new route (Route B) from measure 11 to measure 24.
Route X's line order remains 100, and Route A and Route B are assigned a line order of 200 and 300, respectively.
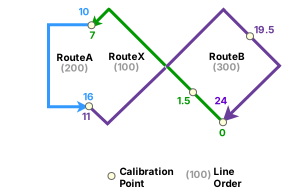
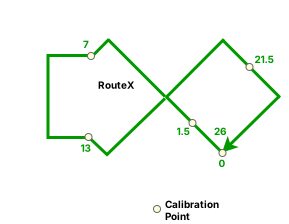
In the following example, a route (Route X) has a start measure of 0 and an end measure of 24 before realignment. The route is realigned from measure 7 to measure 11, which is in the middle of the route.
With downstream recalibration, Route X has a start measure of 0 and an end measure of 26.
Route realignment when the direction of the centerline is against the direction of the route
The following examples describe centerlines and routes with opposite directions in an engineering network.
In the following example, although a new route is created using the centerline, downstream calibration is not supported:


In the following example, no new route is created and the upstream of Route Z is assimilated with the centerline:


Route realignment in a utility network dataset
After configuring a utility network for use with an LRS using the Configure Utility Network Feature Classes tool, you can realign routes using the steps above.
In a combined LRS and utility network dataset, the centerline features in the centerline (Pipeline Line) feature class involved in route extension can have prepopulated start and end measures. The coincident points of the centerline features must have the same measures. At the point where the selected centerline intersects the route, the interpolated measure value or calibration point is compared against the start measure or end measure stored on the centerline to determine whether an equation point exists. If an equation point exists, a new route is created.
Note:
If the measures are not provided using the centerline feature class, the LRS route editing tools provide start and end measures on the route.
If the centerline is split due to route realignment, the route ID, start measure, and end measure fields are updated for the split centerlines.
In the following examples, Route X, which consists of three centerlines (CL1, CL2, CL3), is realigned using three new centerlines (CL4, CL5, CL6).
Example 1
In the following example, Route X is realigned using a start measure of 5 and an end measure of 8 without creating any new routes.
The start measure of CL4 is 5, which matches the calibration point value (5) on Route X.
The following diagram shows the centerlines and routes before route realignment:
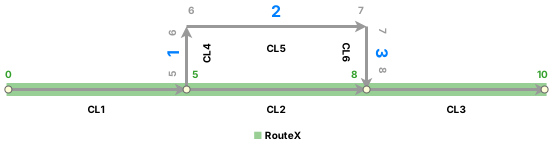
The end measure of CL4 matches the start measure of CL5 (6), and the end measure of CL5 (7) matches the start measure of CL6 (7).
The end measure of CL6 matches the calibration value (8) on Route X, so an equation point is not created.
The following diagram shows routes after route realignment:

Example 2
In the following example, Route X cannot be realigned using the start measure of 5 and end measure of 9 because the end measure of CL4 (6) does not match the start measure of CL5 (7).
The following diagram shows the centerlines and routes:
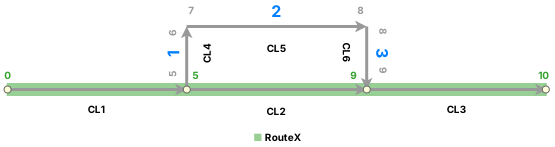
Route X is not realigned and has the same measures after realignment fails.
Example 3
In the following example, Route X is realigned using the start measure of 5 and the end measure of 9, which results in the creation of a new route (Route Y) with a start measure of 6 and an end measure of 10 based on the start measure of CL4 (6) and the previously existing end measure of 10.
The start measure of CL4 (6) does not match the calibration point value (5) on Route X, which results in an equation point. The end measure of CL4 matches the start measure of CL5 (7), and the end measure of CL5 matches the start measure of CL6 (8).
The end measure of CL6 matches the calibration value (9) on Route X, so an equation point is not created.
The following diagram shows the centerlines and routes before route realignment:
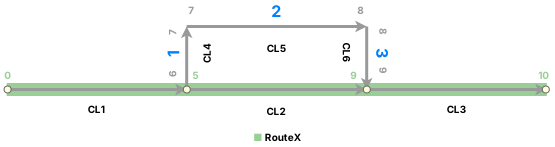
The result is a realigned Route X with a start measure of 0 and an end measure of 5 and a new Route Y with a start measure of 6 and an end measure of 10.
The following diagram shows the routes after route realignment:

Example 4
In the following example, Route X is realigned using the measures of 5 to 10, which results in two new routes.
CL4's start measure (6) does not match the calibration point value (5) on Route X, so an equation point is created. The end measure of CL4 matches the start measure of CL5 (7), and the end measure of CL5 matches the start measure of CL6 (8).
The end measure of CL6 (9) does not match the calibration point value (10) on Route X, so an equation point and a new route are created.
The following diagram shows the centerlines and routes before route realignment:
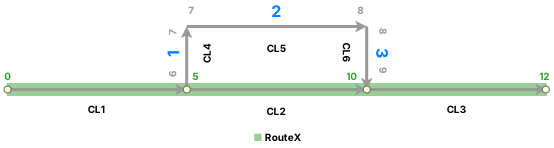
The result is a shortened Route X with a start measure of 0 and an end measure of 5, a new route (Route Y) with a start measure of 6 and an end measure of 9, and a third route (Route Z) with a start measure of 10 and an end measure of 12.
The following diagram shows the routes after route realignment:
