Tutorial: Create a locator
In this exercise, you will create a single role locator with a primary role of Street Address, an alternate name table, a custom output field, and high precision.
Get the data
The data for this tutorial is available for download.
Go to the data download page.
Click the Download button, and save the file locally.
Unzip the downloaded file.
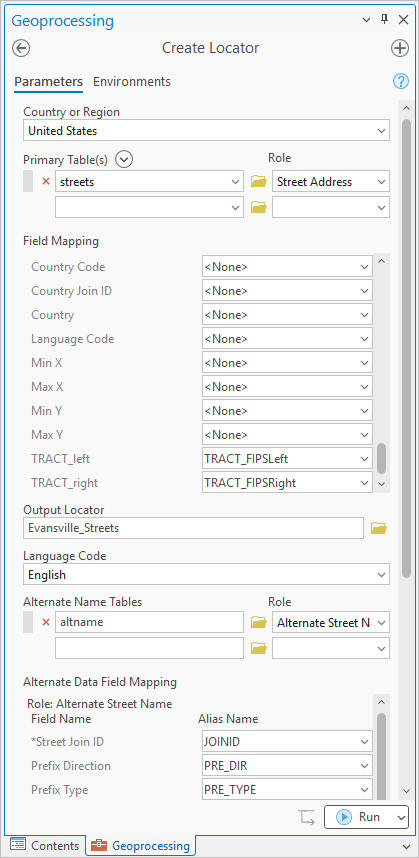
Create a Street Address locator
In this exercise, you will build a Street Address locator using an Atlanta streets layer.
Open ArcGIS Pro.
Create a project from the Map template.
Right-click Folders in the Catalog pane, and click Add Folder Connection.
On the Add Folder Connection dialog box, browse to the geocoding tutorial folder and click OK.
Expand Folders in the Catalog pane, and expand the geocoding tutorial folder that you added in the previous step.
Expand the
Evansville.gdbgeodatabase inside of the geocoding tutorial folder.Drag the
streetsfeature class inside the geodatabase onto the map.The map zooms to Evansville, Indiana, and a street layer is visible on the map. The streets layer is also shown in the Contents pane.
Drag the
altnametable inside the geodatabase onto the map.The
altnametable is shown in the Contents pane.In the Geoprocessing pane, type create locator in the search box.
If the pane is not open, on the Analysis tab, click Tools
 to open the Geoprocessing pane.
Click the Create Locator tool
 to open the tool in the Geoprocessing pane.
In the Create Locator tool, leave the Country or Region parameter as the default value of United States.
Select
streetsfrom the drop-down menu for the Primary Table parameter.The layer is available in the drop-down menu because it has been added to the map.
Select Street Address from the drop-down menu for the Role parameter.
For more information on the other roles you can use to build locators, you can review the introduction to primary locator roles.
Map the fields in the Field Mapping portion of the geoprocessing tool by selecting the appropriate field from the Alias Name drop-down menu for each relevant field name in the Role: Street Address section.
For Left House Number From select
FROM_LEFT.For Left House Number To select
TO_LEFT.For Right House Number From select
FROM_RIGHT.For Right House Number To select
TO_RIGHT.For Prefix Direction select
PREFIX_DIR.For Prefix Type select
PREFIX_TYPE.For Street Name select
STREET_NAME.For Suffix Type select
SUFFIX_TYPE.For Suffix Direction select
SUFFIX_DIR.For Left City select
CITY_LEFT.For Right City select
CITY_RIGHT.For Left State Abbreviation select
STATE_LEFT.For Right State Abbreviation select
STATE_RIGHT.For Left ZIP select
ZIP_LEFT.For Right ZIP select
ZIP_RIGHT.
You can find more information about the types of values expected for each locator role field by reviewing locator role fields.
Modify the Output Locator parameter to rename the output locator Evansville_Streets.
Select English from the Language Code drop-down menu.
You can run the tool now to create a Street Address locator for the city of Evansville, or you can continue with the next steps to add an alternate street name table.
Add an alternate street name table to your locator
Adding an alternate name table to your locator will allow for you to search for addresses using official or alternate street names, for instance Old 10th St, Orange St, or Old Country Rd. Learn more about how you can make use of alternate name tables with your own data.
Select
altnamefrom the Alternate Name Tables drop-down menu.The table is available in the drop-down menu because you added it to the map.
Select Alternate Street Name from the Role drop-down menu for the table.
Map the fields in the Alternate Data Field Mapping portion of the geoprocessing tool by selecting the appropriate field from the Alias Name drop-down menu for each relevant field name in the Role: Alternate Street Name section.
For Street Join ID select
JOINID.For Prefix Direction select
PRE_DIR.For Prefix Type select
PRE_TYPE.For Street Name select
ST_NAME.For Suffix Type select
ST_TYPE.For Suffix Direction select
SUF_DIR.
Scroll back up to the Field Mapping for the Role: Street Address section.
- For Street Join ID select
JOINID.
You can run the tool now to create a Street Address locator for the city of Evansville with alternate street names, or you can continue with the next steps to add a custom output field.
- For Street Join ID select
Add a custom output field to your locator
You can select additional fields from the reference data to add them to the locator when the locator is created. These fields are used to provide additional information about the geocode result. The custom output fields do not participate in searching for the address or place but are returned with all geocode results in addition to any default output fields. The maximum number of custom output fields supported in a locator is 50.
Type
TRACTin the Custom Output Fields text box and press TAB to persist the role field.After typing the name to use as the custom output field, the new role field is automatically added to Field Mapping. You must assign a field from the reference data to the new set of role fields in Field Mapping.
Scroll back up to the Role: Street Address section. In the Field Mapping parameter, map the fields for your custom output field.
For TRACT_left select
TRACT_FIPSLeft.For TRACT_right select
TRACT_FIPSRight.
Optionally, you can run the tool now to create a Street Address locator for the city of Evansville with alternate street names and your configured custom output field, or you can continue with the next steps to create your locator with higher than default precision.
Update the precision settings of your locator
You can optionally set the precision of the locator. By default the locator is created with Global High Precision, which returns results that are within 0.5 meters of the original reference data globally. Global Extra High returns results that are within 1 centimeter of the original reference data globally and Local Extra High can return results with even more precision for local areas that are smaller in size.
Select Local Extra High from the Precision Type drop-down menu.
This increased precision level is suitable for local geocoding.
Run the tool to create your locator
Click Run to create the Evansville Street Address locator.
A warning message is returned after running the tool. This is expected because the
JOINIDfield you selected for the altname table is not the optimal join strategy and can increase the size of your locator. This will not create problems in this tutorial with a small dataset and minimal joins.For more details about the warning, click WARNING 003106 under View Details. The Create Locator tool can show warning or error messages while using or after running the tool. Clicking the warning or error number opens a help topic that provides more details about the message.
The locator is created in your project folder by default and is automatically added to the project. You can use it in the Locate pane, in the Geocode Table pane, and anywhere else you use locators.
Tip:
If the field mapping in the Create Locator tool becomes complex when creating a multirole locator, consider building a model with ModelBuilder to create locators. When you build a model, you can re-create the locator if the reference data changes, if you need to modify the locator by adding custom output fields, or if you want to share how the locator was created with a colleague. Another option for keeping track of the settings used to build the locator is to create the locator with the Create Locator tool once and save the previously executed tool as either a Python script or a geoprocessing package from the History pane on the Geoprocessing tab.
Using the steps above creates a locator based on the Street Address role that supports searching for addresses with house numbers, street intersections, street blocks, addresses with alternate street names, and only street names. This locator can be used to geocode the customers table that is included in the Geocode a table of addresses tutorial as well as search for addresses in the Locate pane. Search for the following addresses by either copying and pasting the address in the search box and pressing Enter or typing the address and selecting the suggestion that is displayed as you type.
Tip:
To disable all other locators in the project before using the Evansville Street Address locator, click the Options button ![]() , and uncheck the providers listed except for the Evansville Street Address locator.
, and uncheck the providers listed except for the Evansville Street Address locator.
Mystic Creek, Evansville
1015 Walnut St, Evansville, 47714
Sycamore St E & Willow Rd S, Evansville, IN 47714
900 block of E Cherry St, Evansville, 47713
201 N Stockwell Rd, Evansville, 47715
Note:
You can also geocode global coordinates (latitude/longitude, Military Grid Reference System (MGRS), Decimal Degrees (DD), or United States National Grid (USNG)) using any locator created with the Create Locator tool. Support for coordinate searching is disabled or enabled under Categories to support on the Geocoding options page of the Locator Properties dialog box for the locator.